All rights reserved.
Pos Ecolife Responsive Prestashop Theme 1.7
Pos Ecolife is a premium Responsive Prestashop theme with advanced admin modules, extremely customizable and fully responsive. It is suitable for every type of store. It is a standalone design package so you can easily create your own sub-themes.
And here you can find out more about theme updates, new features and about our upcoming themes:
- Follow us on Facebook
- Follow us on Twitter
- Follow us on Posthemes
PosThemes,
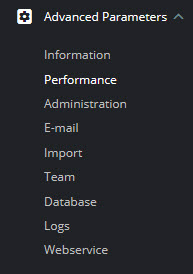
Installation
Before you get started, make sure you have all the requirements available: Server space at a Hosting Provider, Domain Name, FTP client, Text Editor.
- System: Unix, Linux or Windows. Unix is highly recommended.
- Web server: Apache Web server 2.0 or later.
- PHP 5.4 or later.
- MySQL 5.0 or later.
- At least 128 Mb of RAM on your server.
To install this theme you must have a working version of Prestashop already installed. For information in regard to installing the Prestashop platform, please see the Prestashop Wiki : http://doc.prestashop.com/display/PS17/Getting+started
After Prestashop is installed, you must delete “install” folder in your Prestashop.
Install
For each package, you will have: demo package, theme package, PSD. There are two ways to install a Prestashop Theme:
-
Install Demo Package: By using the demo package, you will set the theme exactly as our Demo with sample data.
-
Install Theme : If you have available shop, you can install only theme.
Enabling Static Block and Static Footer with other language
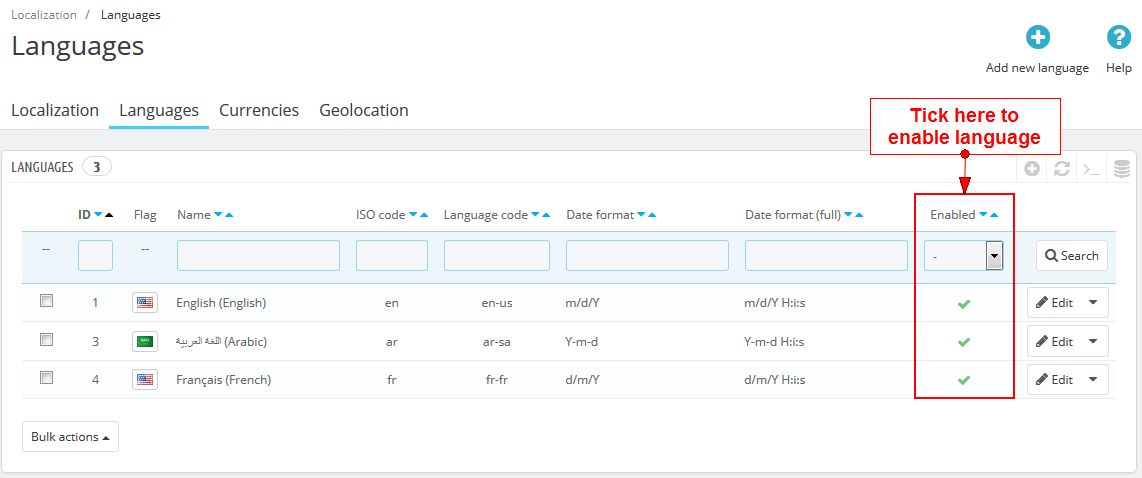
In your theme, if there are 3 languages or more, please enabling static block by below guide:
- Login your prestashop admin
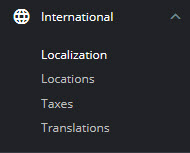
- Go to International > Localization .
- Choose tab Languages.
- Go to Modules > Modules Manager
- Choose “Installed modules” tab
- On Pos Staticblock or Pos Static Footer module, click "Configure" button.
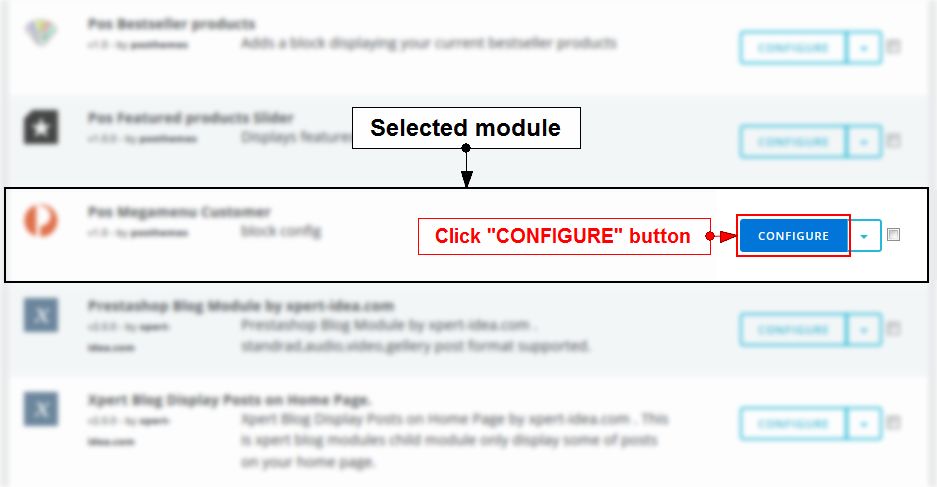
- Click "Edit" button of your selected block
- Choose Source Code
 to show code HTML of this block in English. Then copy source code.
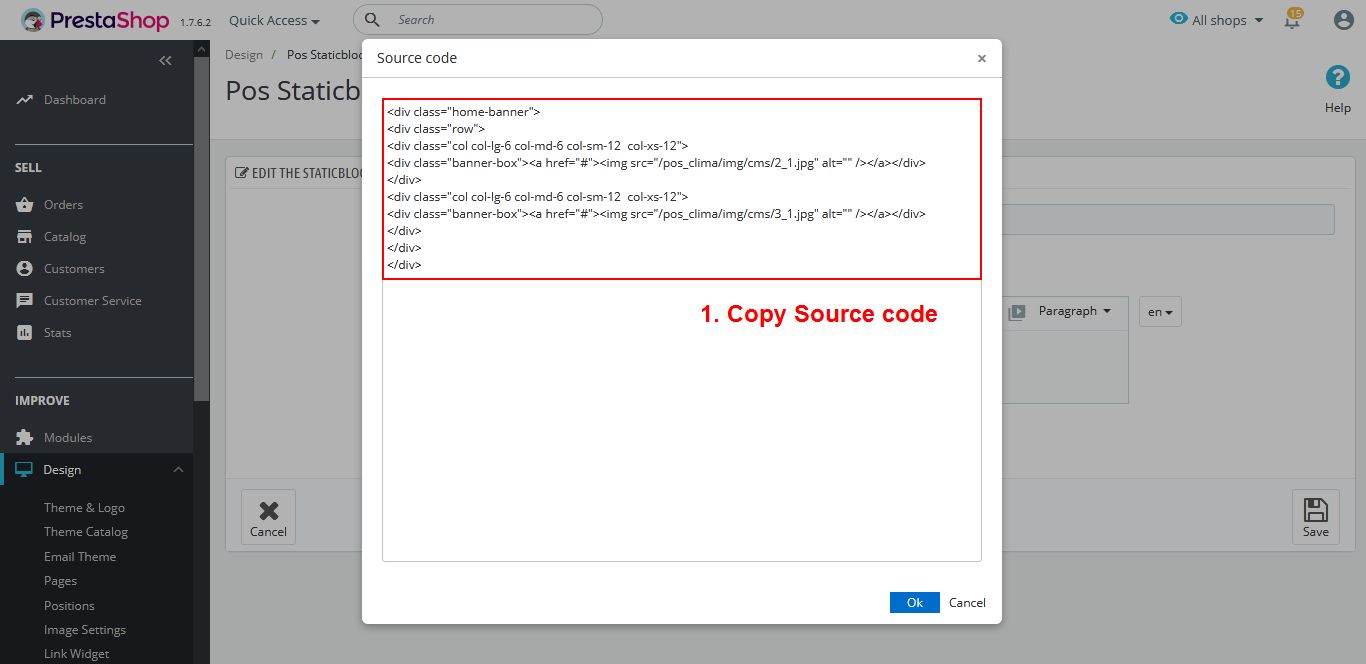
- Click
 to choose language you want to translate. Choose Source Code
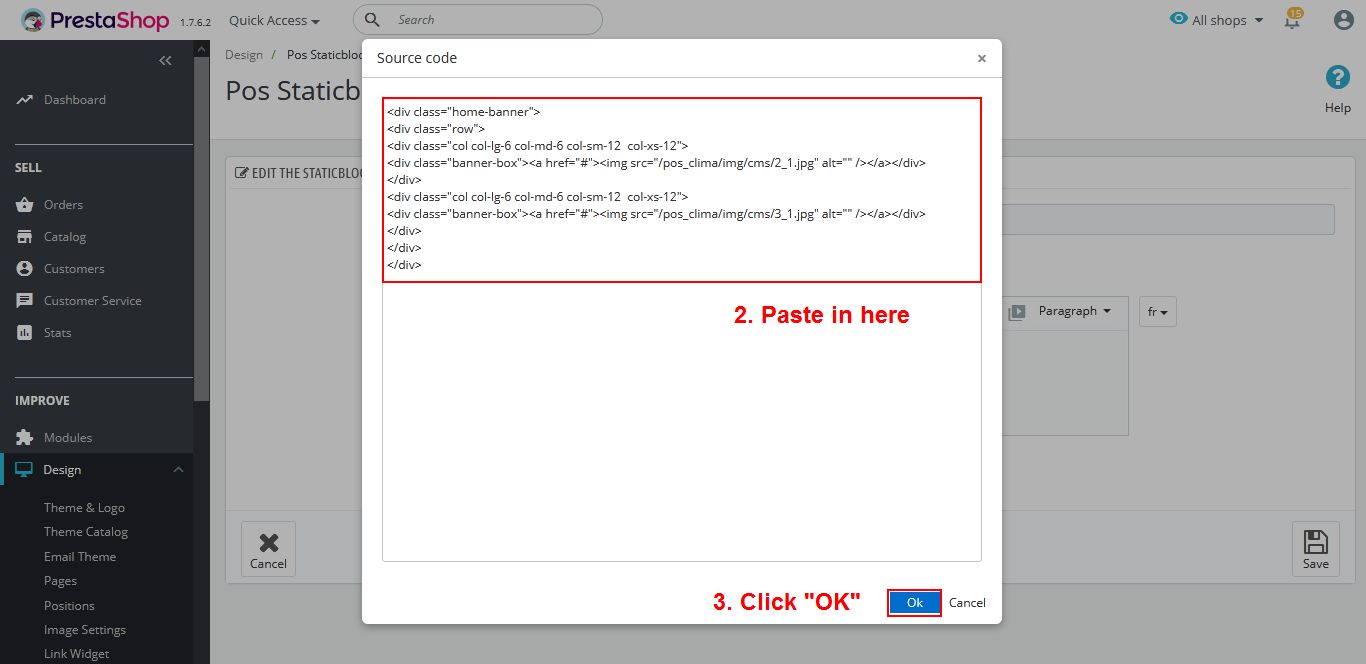
- Click Save button when you finish
Install Demo
You install new website with database sample. After you install your website like our demo.
Each theme we update has its demo, here, we guide demo installation in general.
Create new database:
Open your Browser and type : localhost/phpmyadmin or yourdomain/phpmyadmin
-
Then create database

-
Click database you have just created
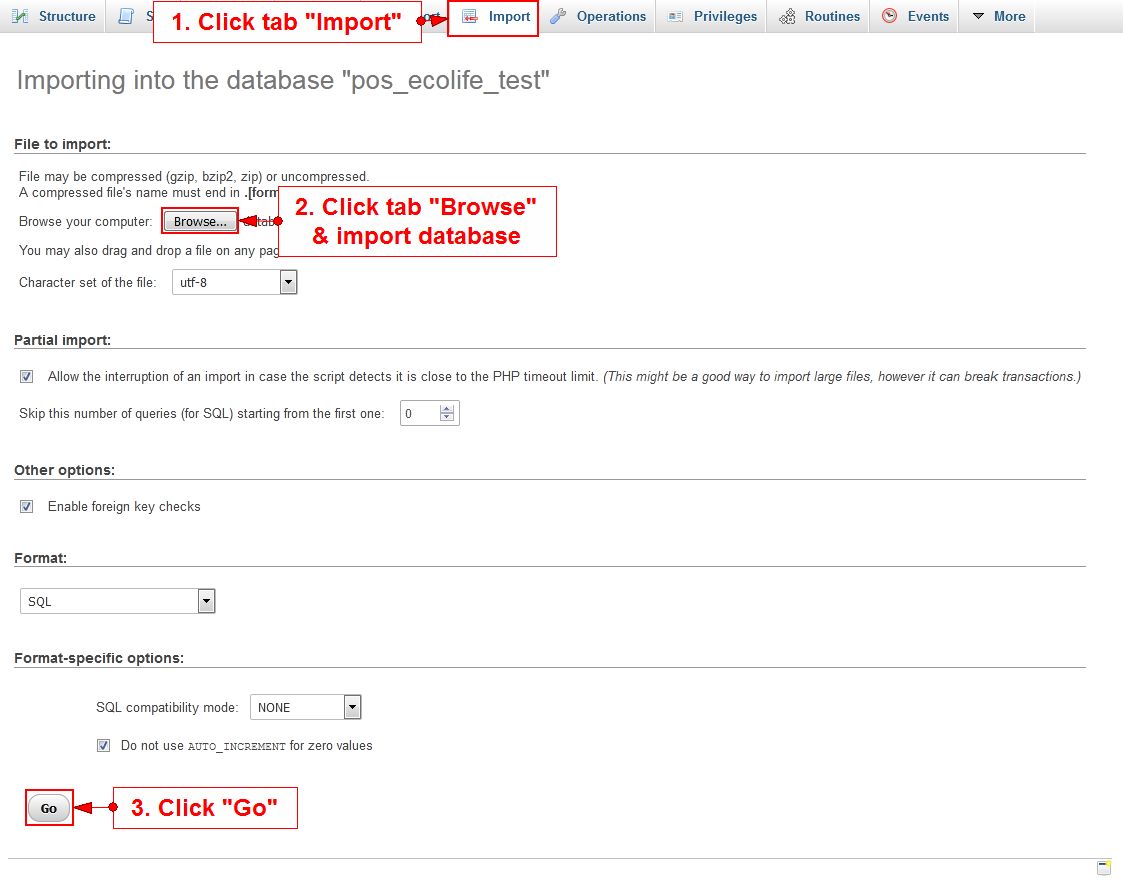
-
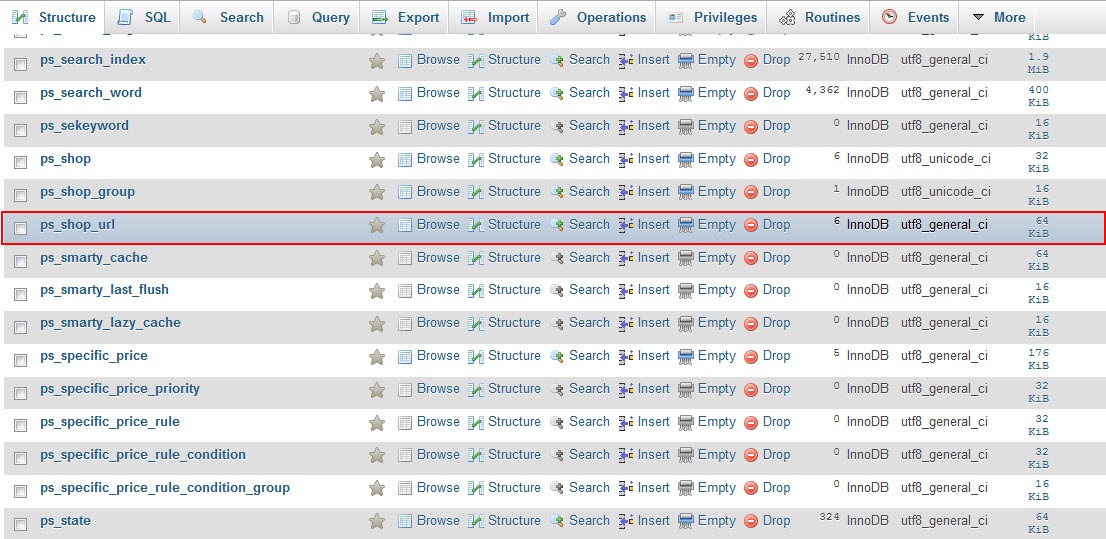
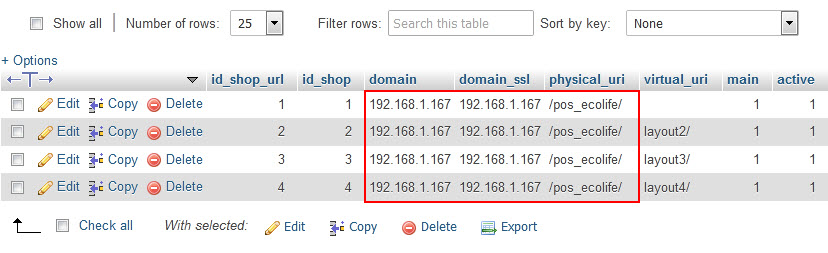
After import database, click that database and edit table ps_shop_url
-
Change domain, domain_ssl, physical_uri based on your data.
-
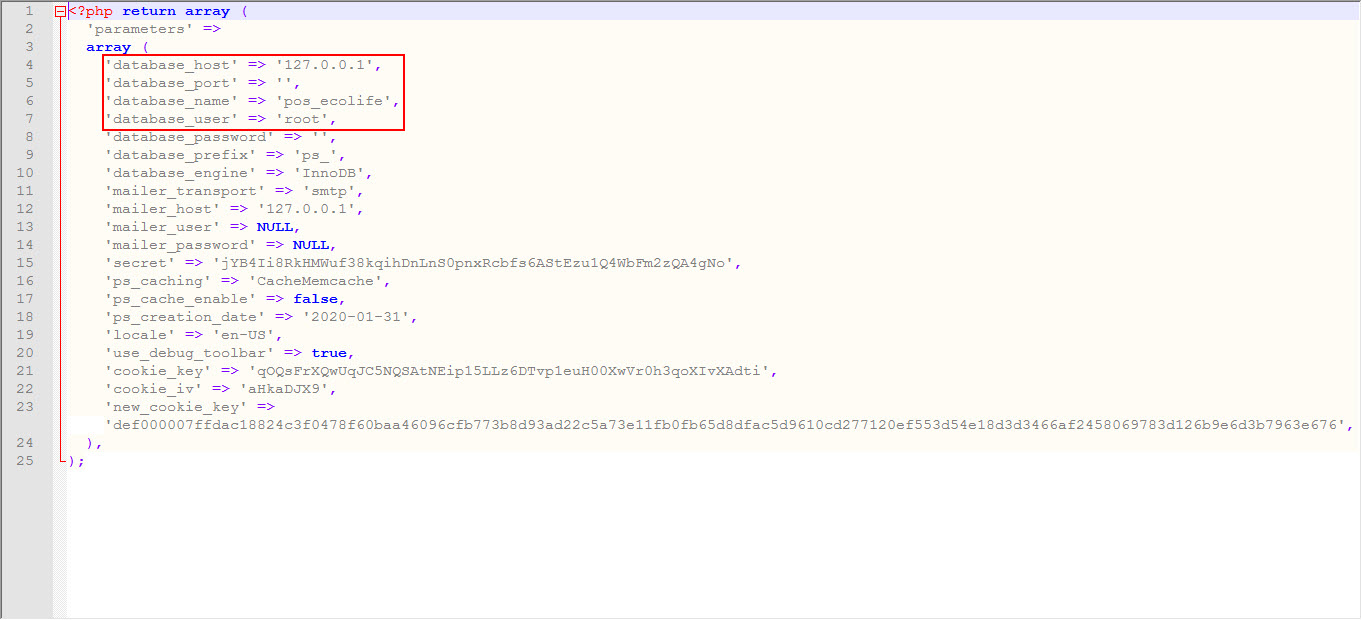
Connect to file config \app\config\parameters.php, change database_host, database_name, database_user, database_password:
-
Generate file .htaccess
-
Login your prestashop admin : http://[Pretashop host or IP]/[path to Prestashop]/admin083c7fizm
- Username: demo@posthemes.com
- Pass: admin123
-
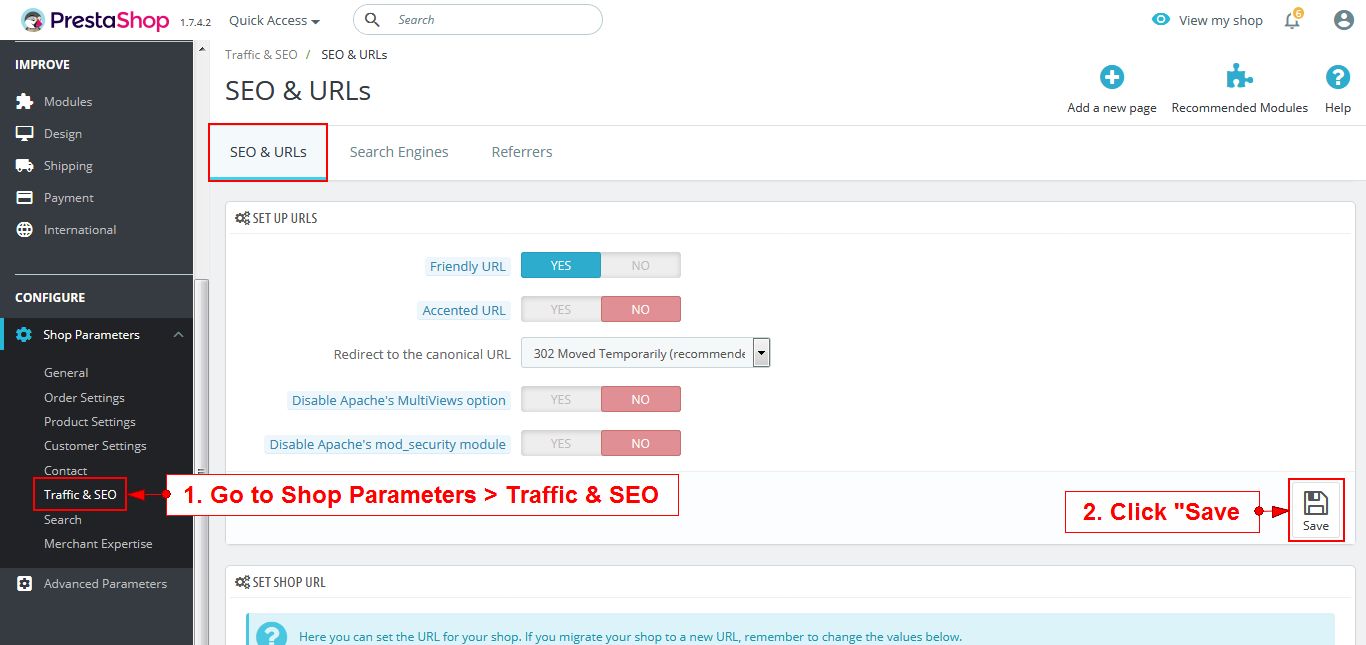
Go to Shop Parameters > Traffic & SEO, at tab SEO & URLs, set up URLS and click "Save"
-
Note:
- If you use localhost you shoud generate file .htaccess
- If you use normal hosting, you have to set permission 666 before you generate file .htaccess
-
- Finish installer.
Install Theme
You must install default prestashop before. You can see instruction install default prestashop on Prestashop Wiki: http://doc.prestashop.com/display/PS17/Installing+PrestaShop
- To install this theme automatically do the following the video:
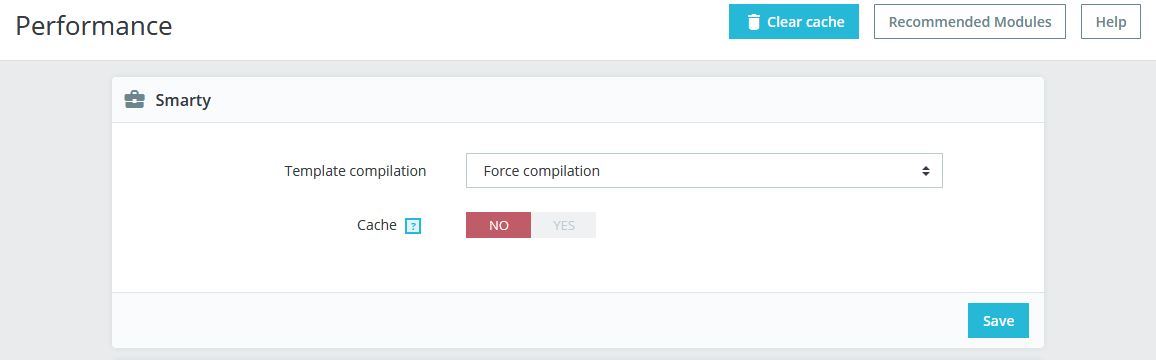
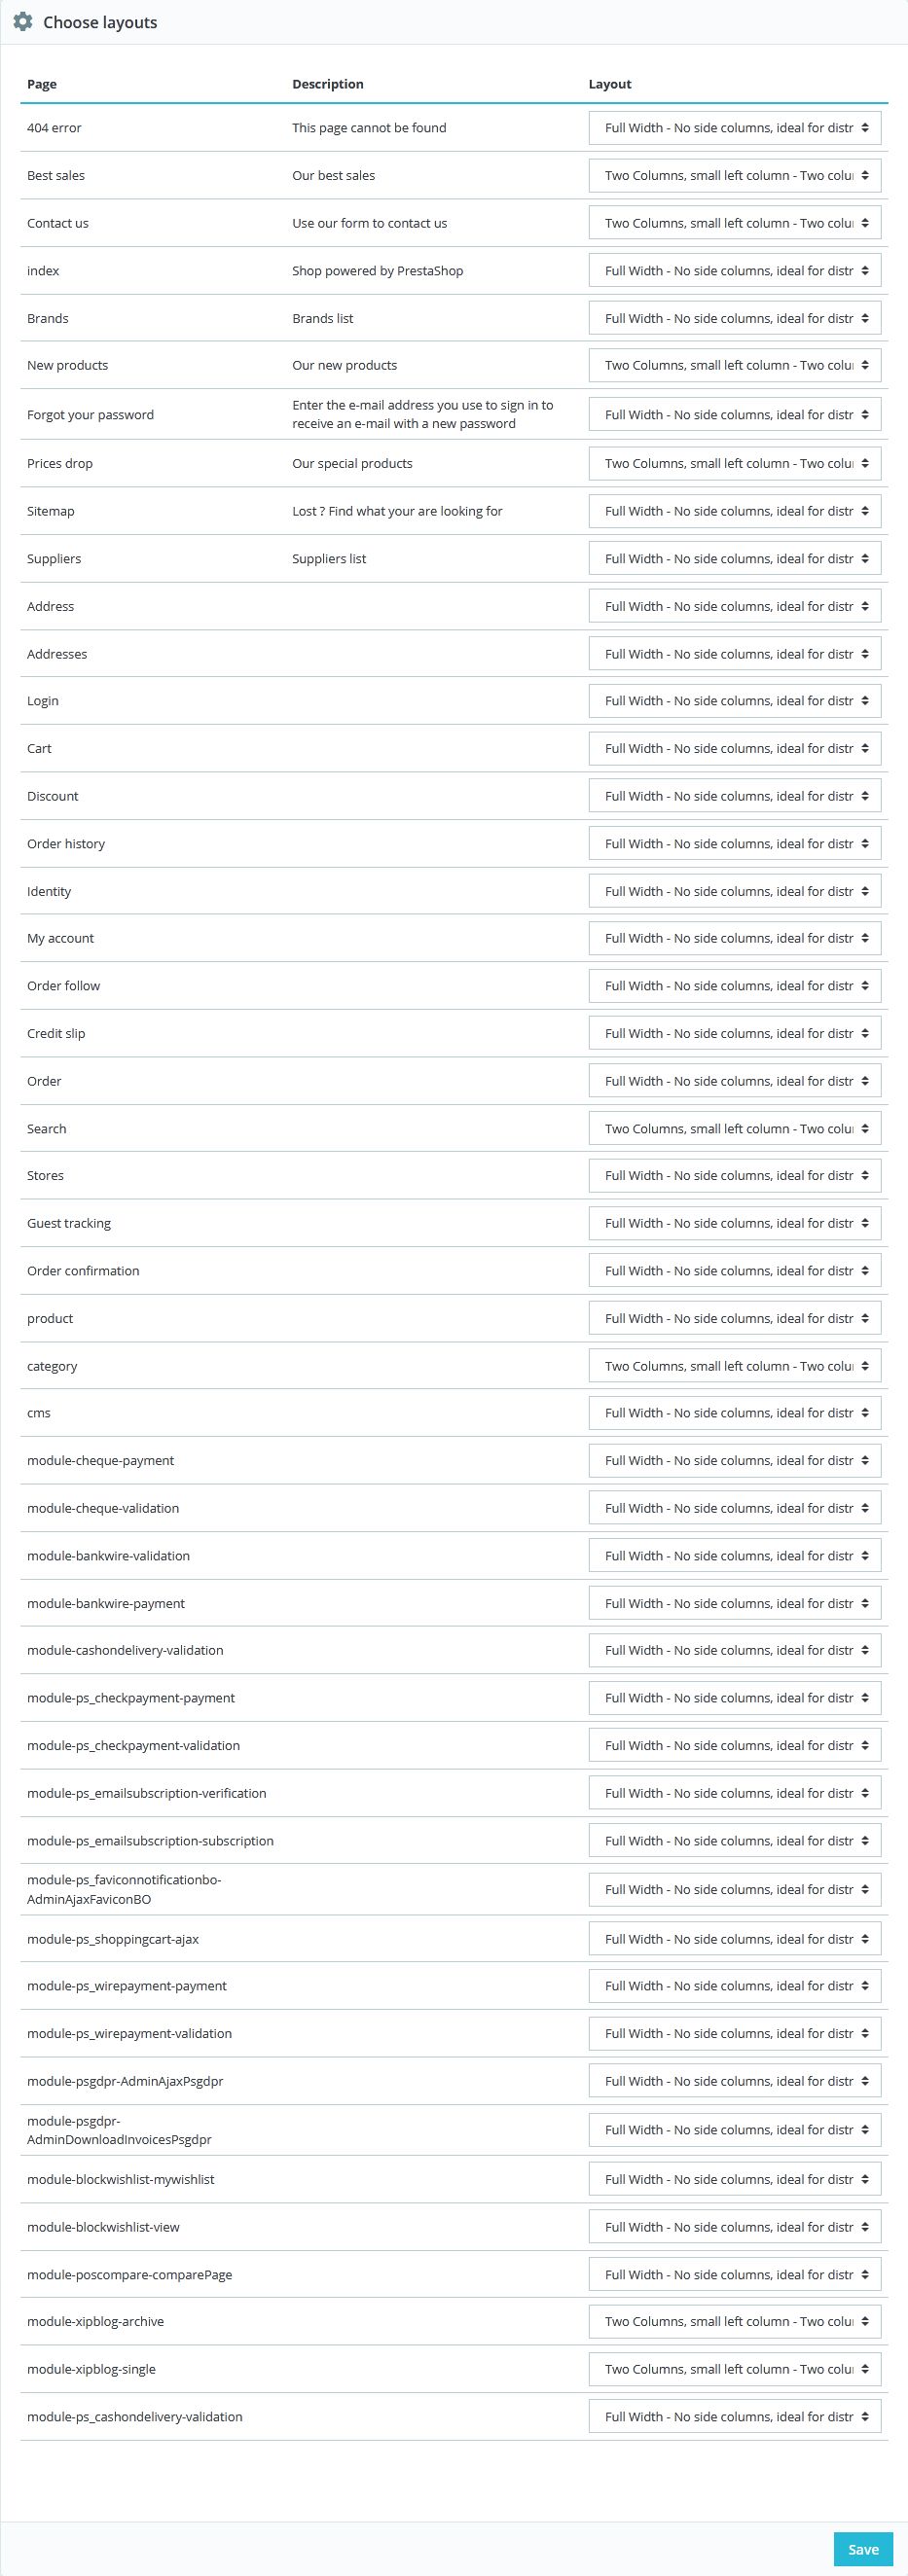
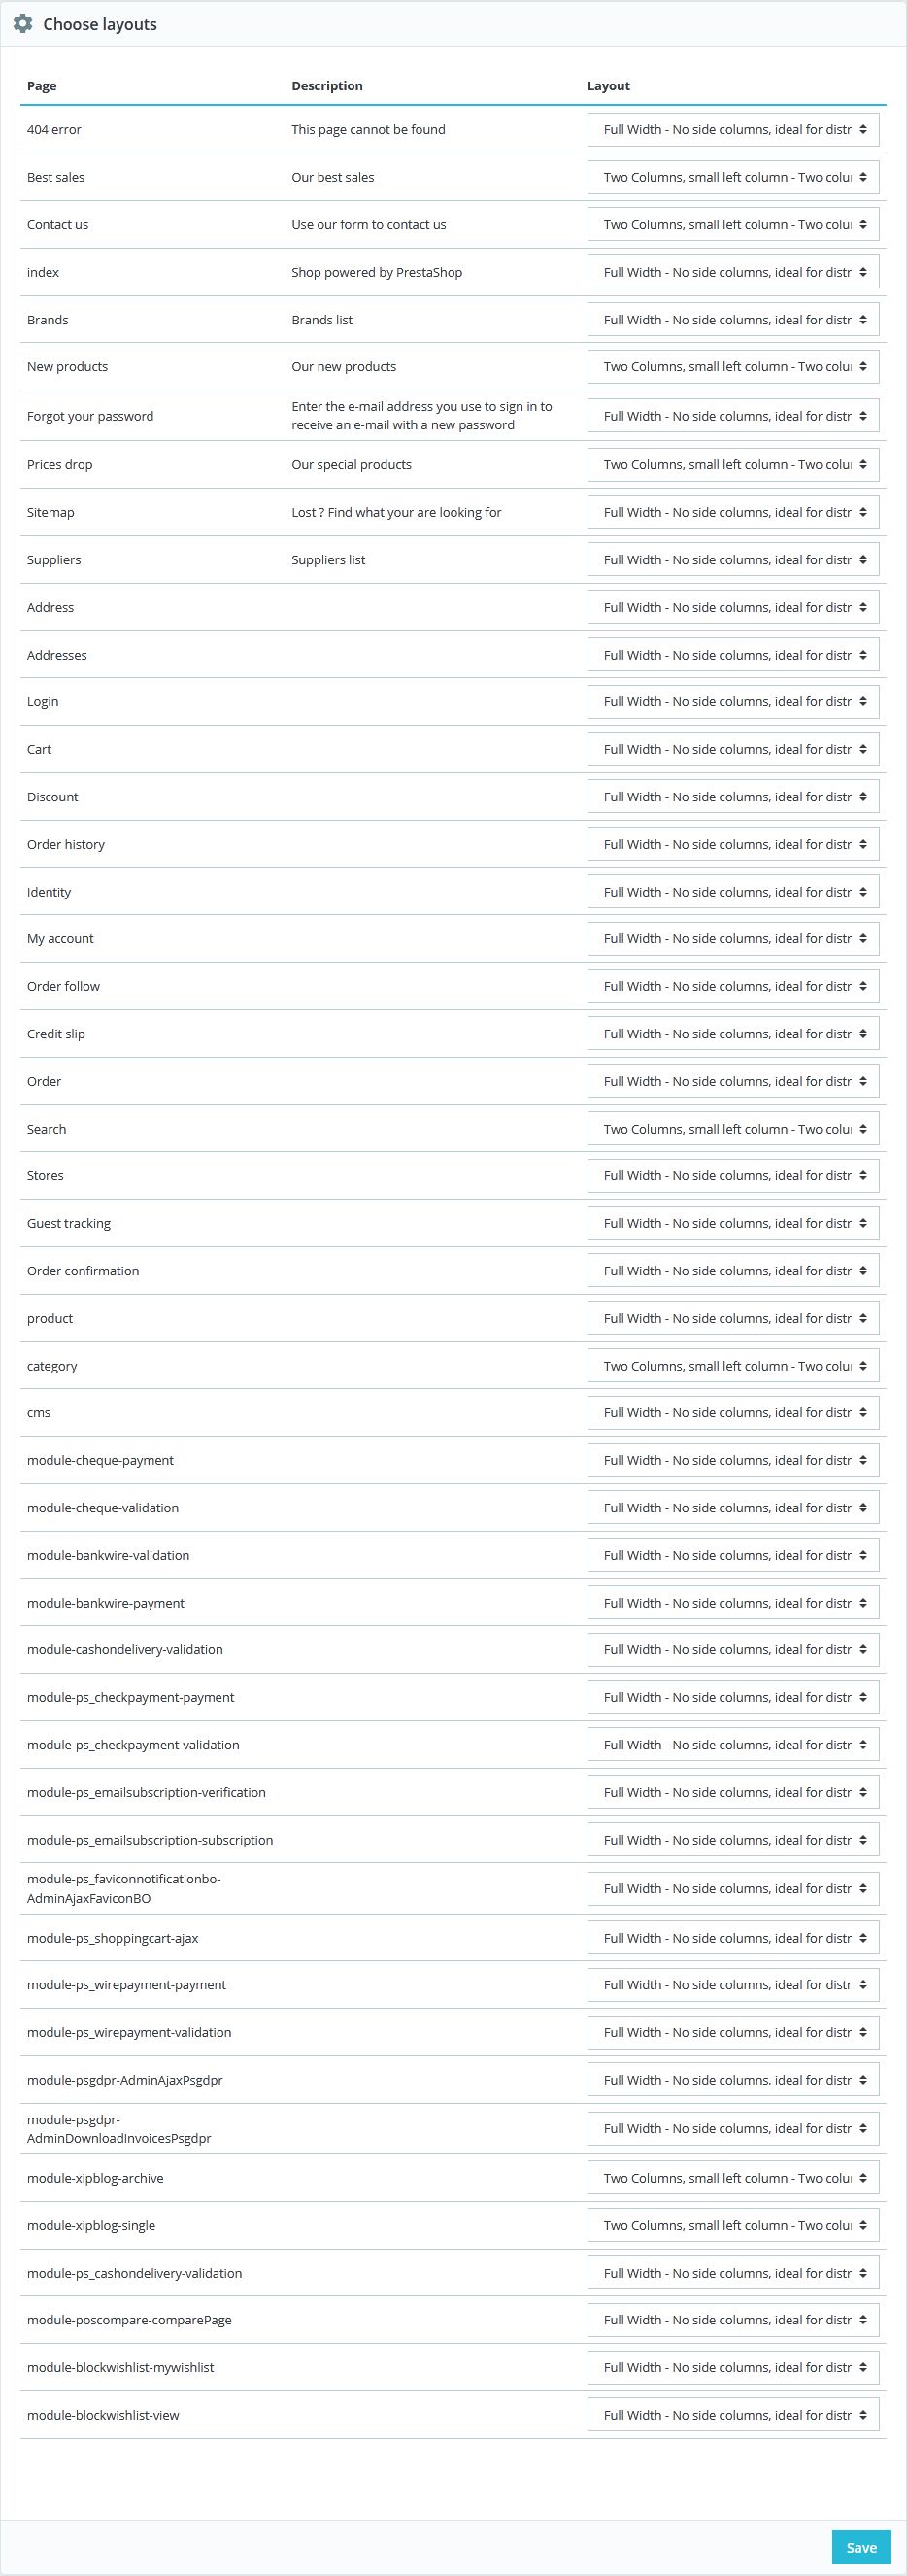
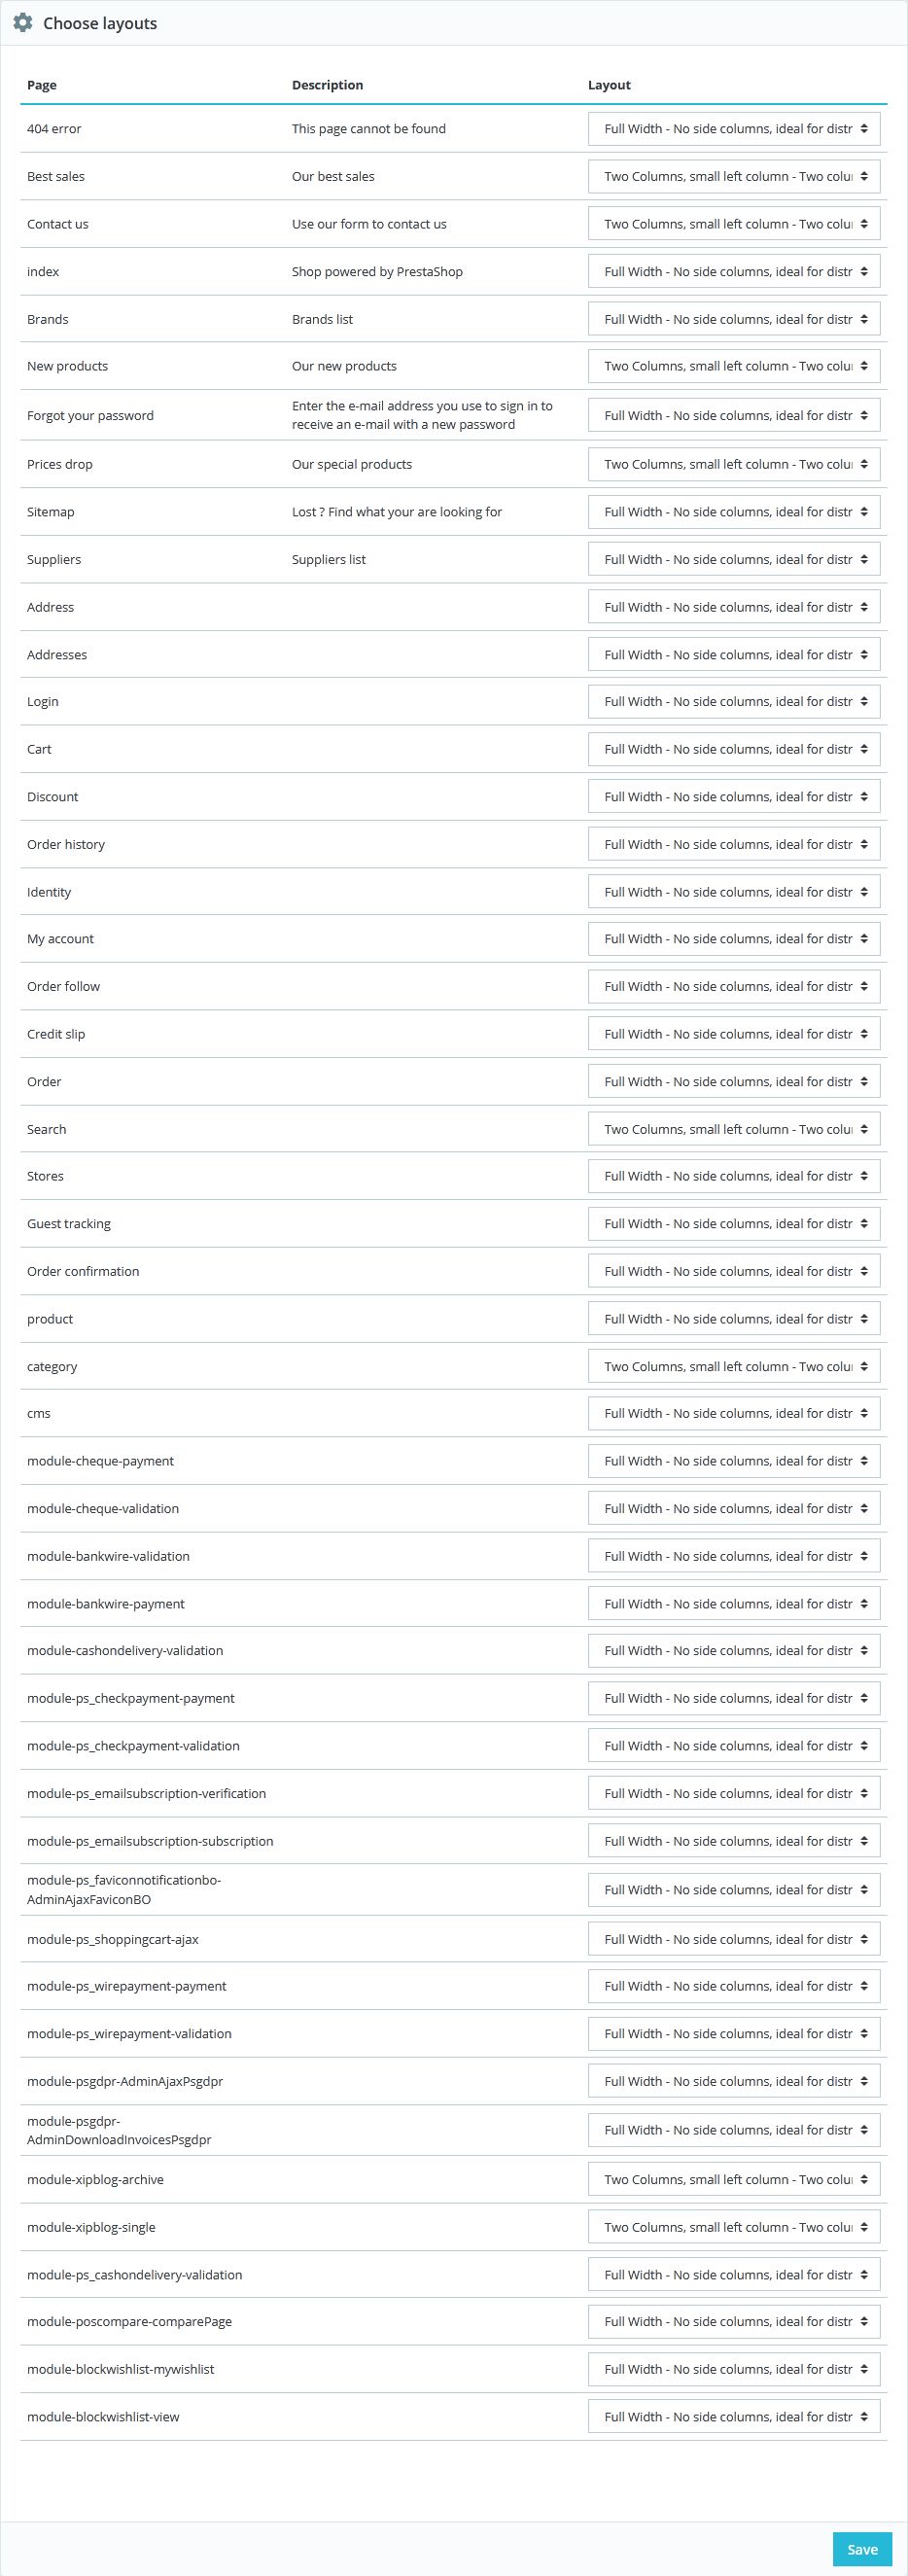
- Config show left or right column in each page
1. Go to Advanced Parametters > Performance
2. Click "Clear cache"
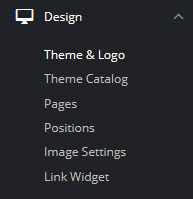
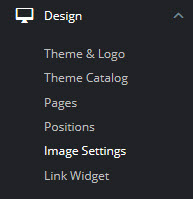
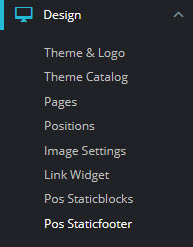
3. Go to Design > Theme & Logo
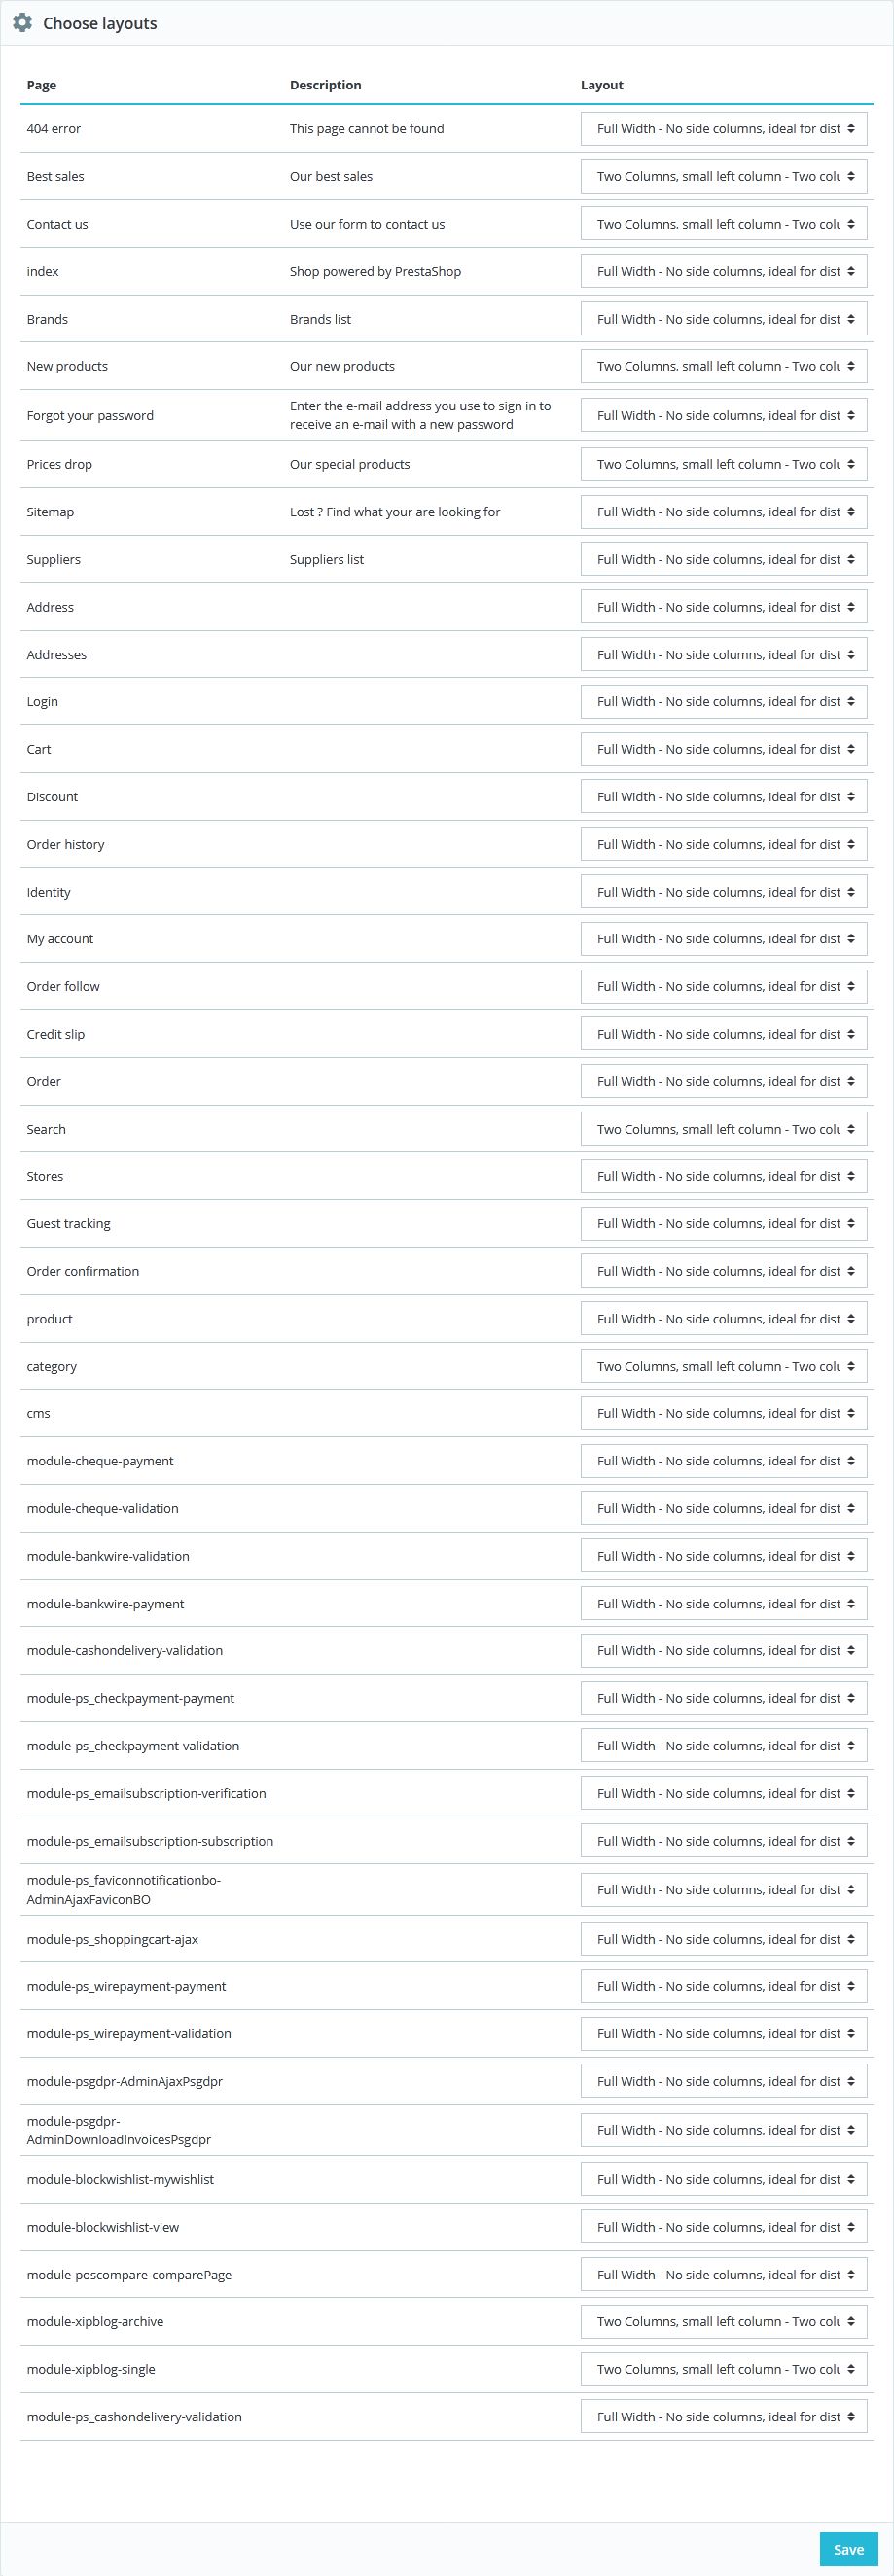
4. Choose Choose layouts
- Config Pos Ecolife Organic1 Layout

- Config Pos Ecolife Organic2 Layout

- Config Pos Ecolife Organic3 Layout
- Config Pos Ecolife Organic4 Layout

- Config Pos Ecolife Cosmetic1 Layout
- Config Pos Ecolife Cosmetic2 Layout

- Config Pos Ecolife Cosmetic3 Layout
- Config Pos Ecolife Cosmetic4 Layout

- Config Pos Ecolife Digital1 Layout

- Config Pos Ecolife Digital2 Layout
- Config Pos Ecolife Digital3 Layout
- Config Pos Ecolife Digital4 Layout
- Config Pos Ecolife Furniture1 Layout
- Config Pos Ecolife Furniture2 Layout
- Config Pos Ecolife Furniture3 Layout
- Config Pos Ecolife Furniture4 Layout
- Finish installer.
How to add new language
When working with different languages in PrestaShop, you should add new language by this guide
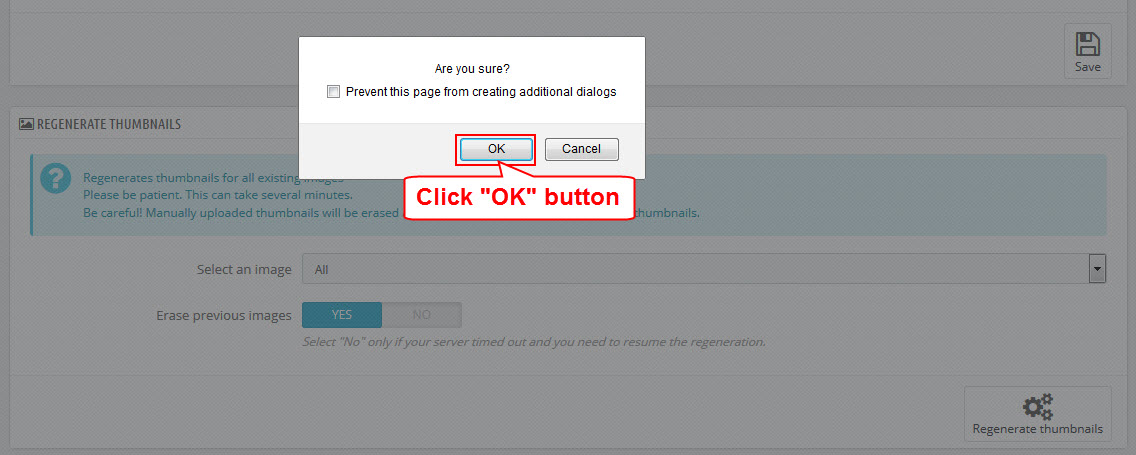
Create or edit size image and Regenerate thumbnails
-
Go to Design > Images Settings
-
Create or edit size image
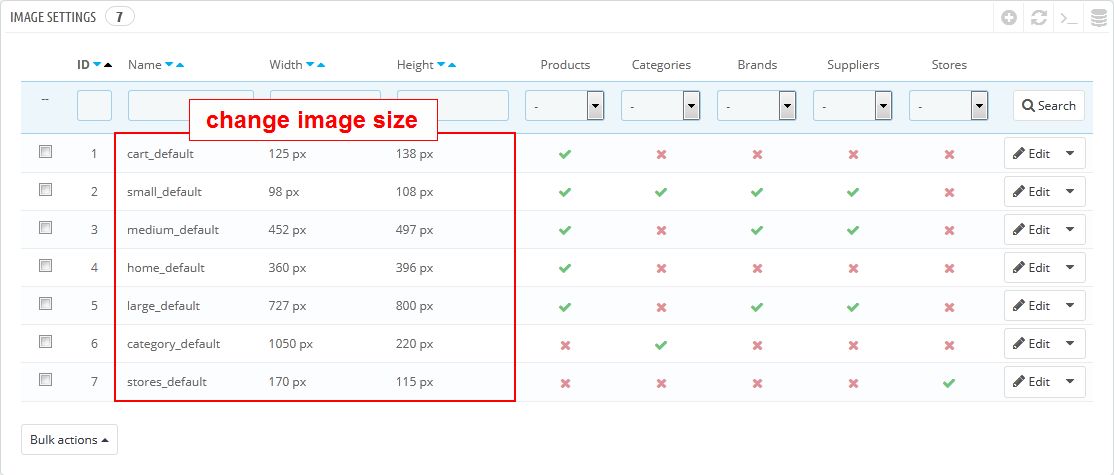
-
Choose Regenerate thumbnails button
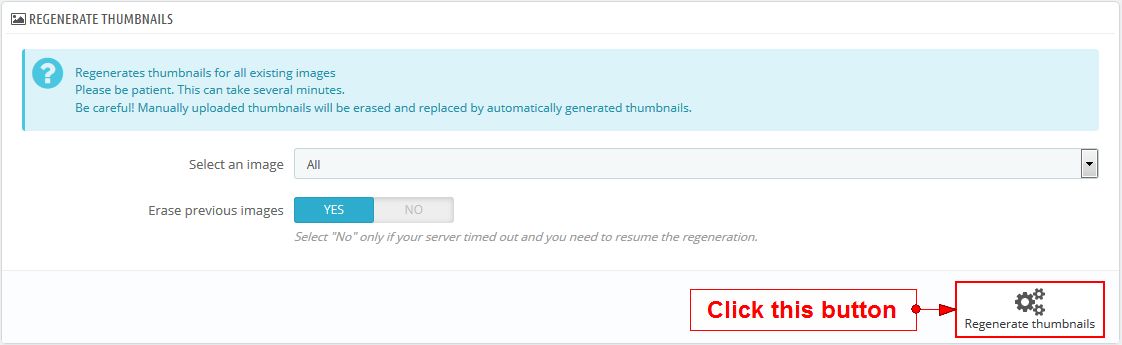
-
After that, we got:

PrestaShop’s Features
User will also be able to efficiently manage your PrestaShop site without related the programming skill. You work in the front-office interface directly (in the Administration Area), which can be helpful to everyone, special for shop owners. To find more informations, please read on http://doc.prestashop.com/display/PS17/User+Guide
Note: When you finish install theme, you should disable cache. This step will help your Prestashop site active normally.
- Advanced Parameters > Performance
- At field Cache, choose No
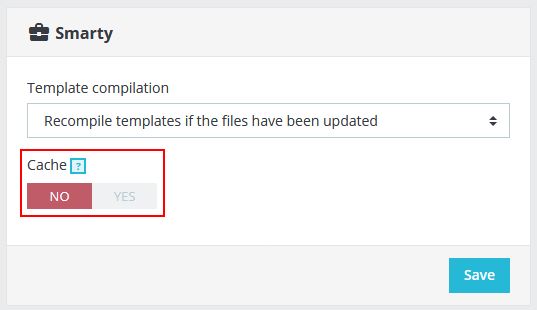
- Click Save button
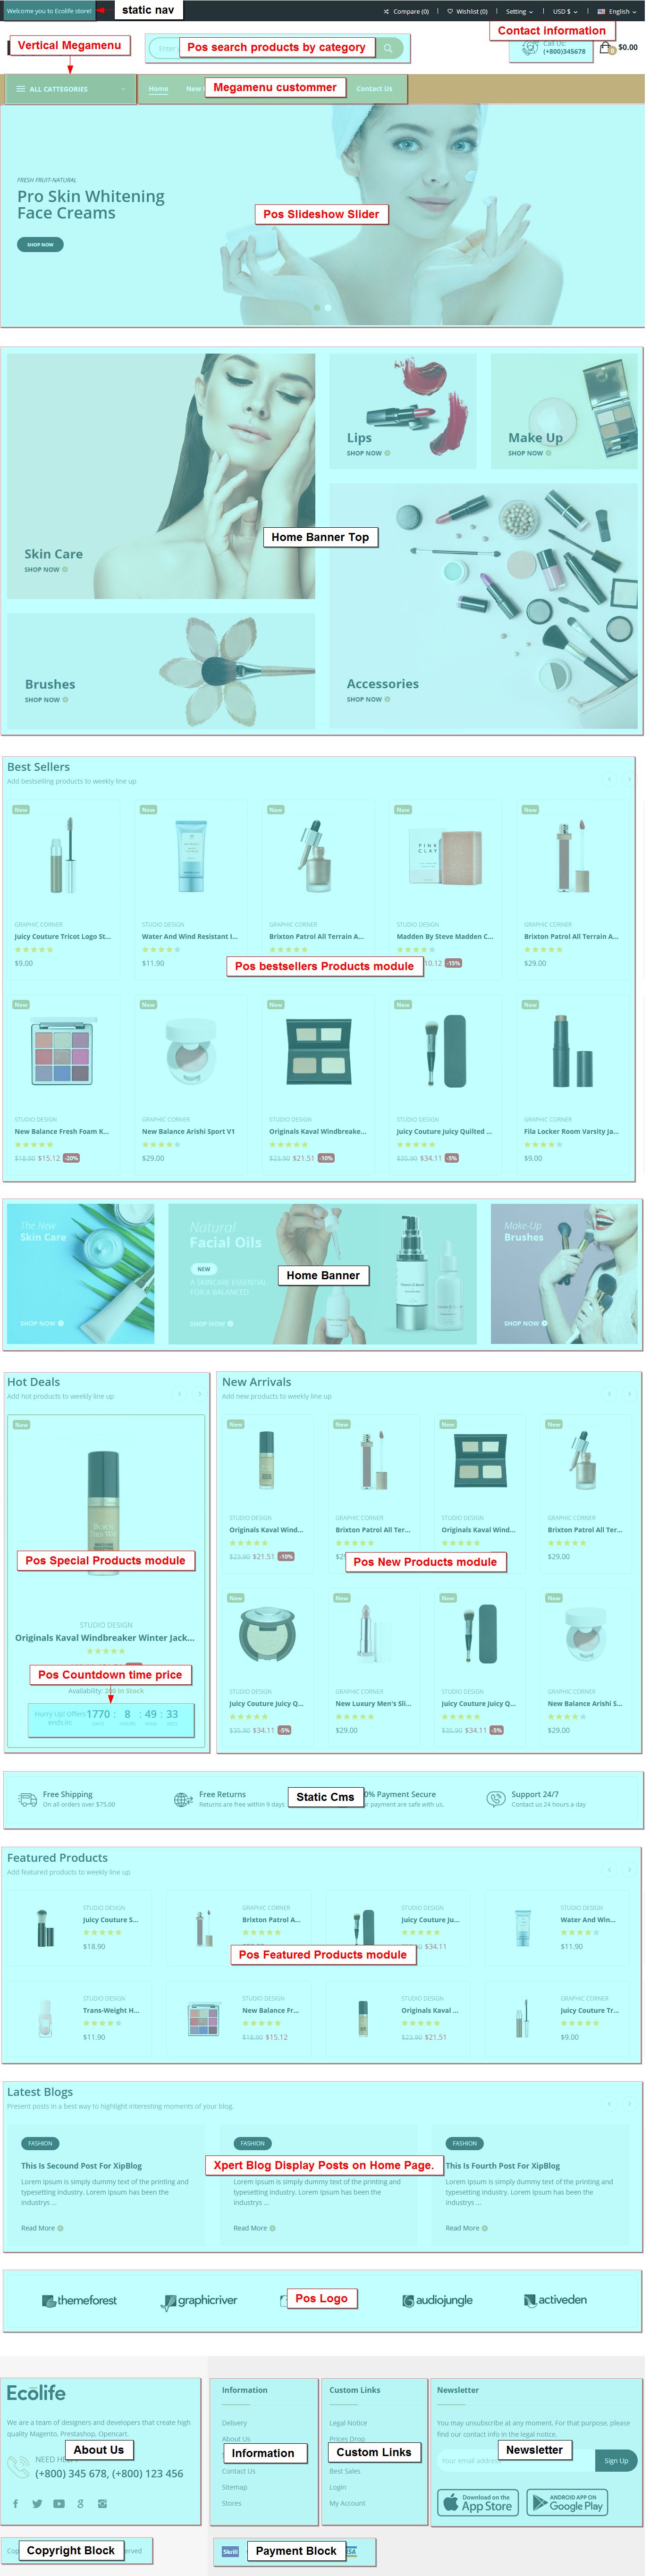
Modules names and Static Blocks on front-end
Note
- BLACK texts: name of blocks.
- RED texts: name of modules.
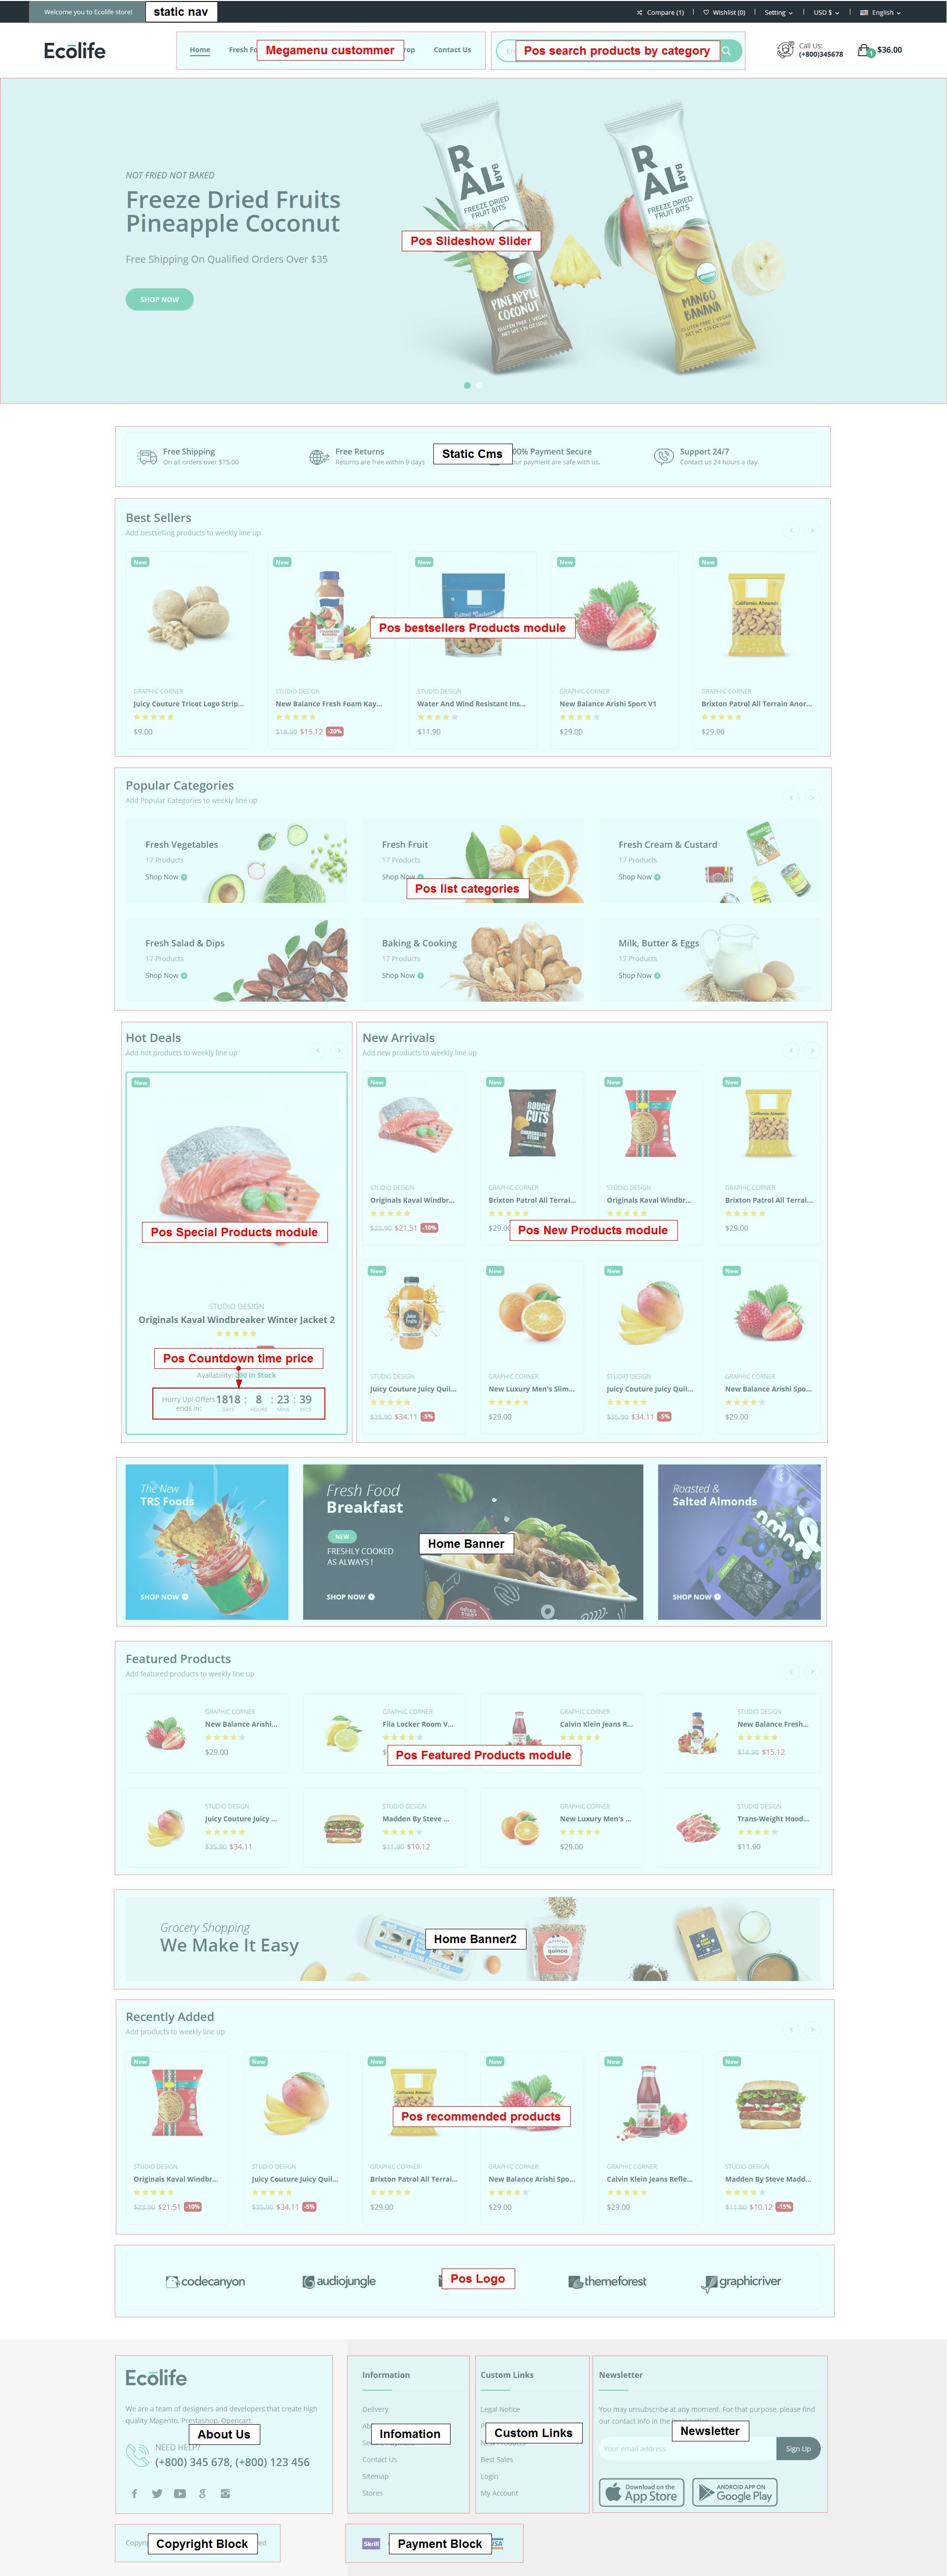
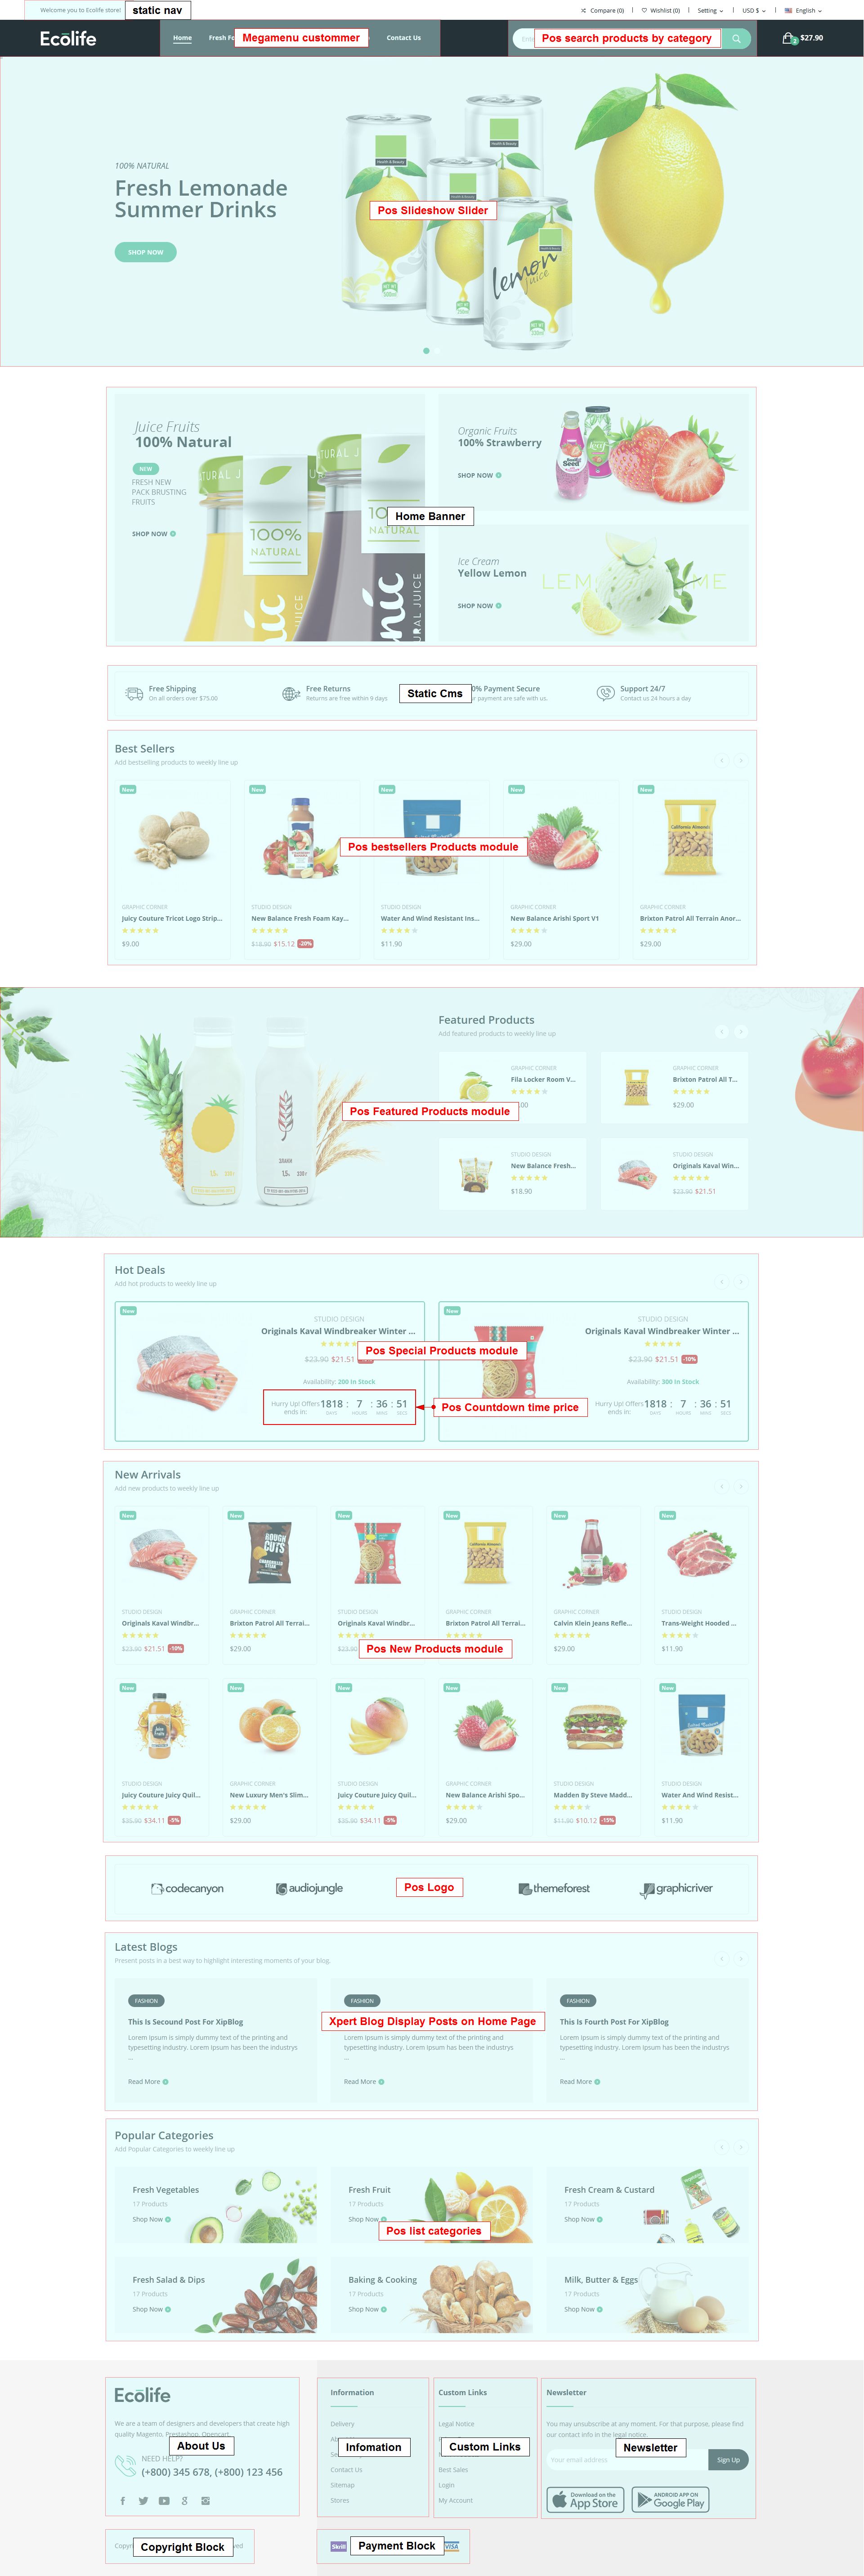
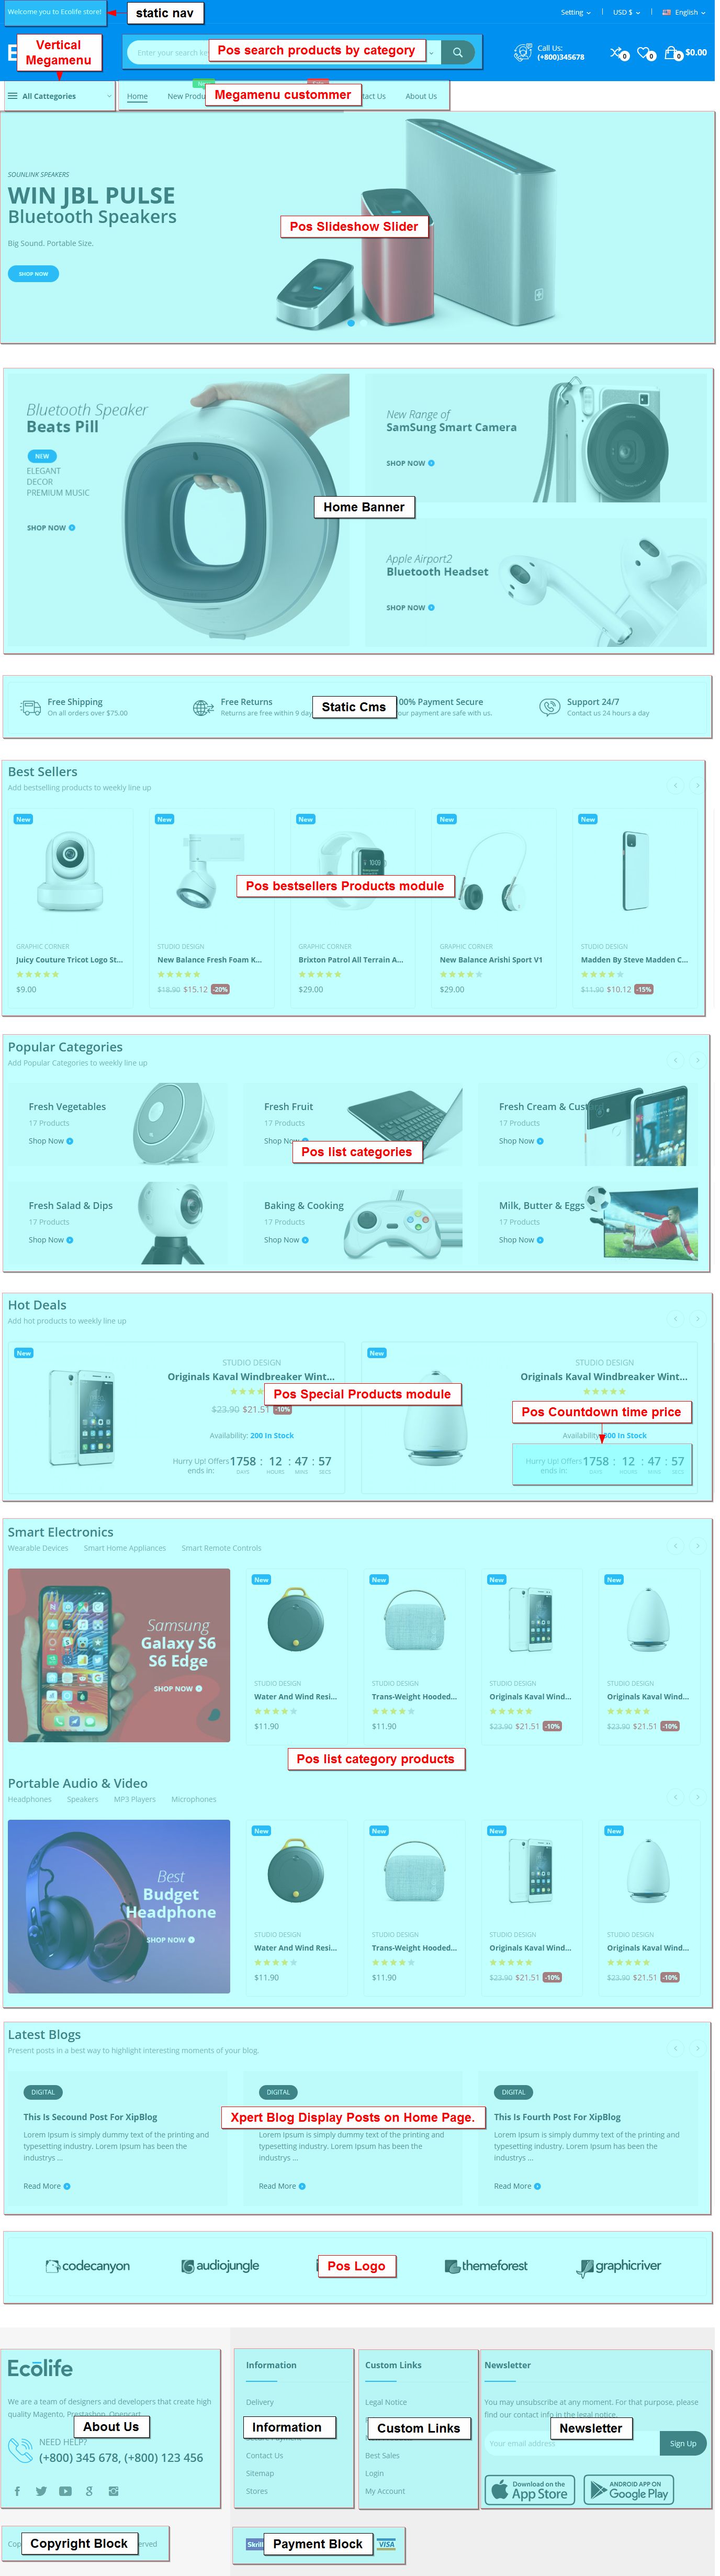
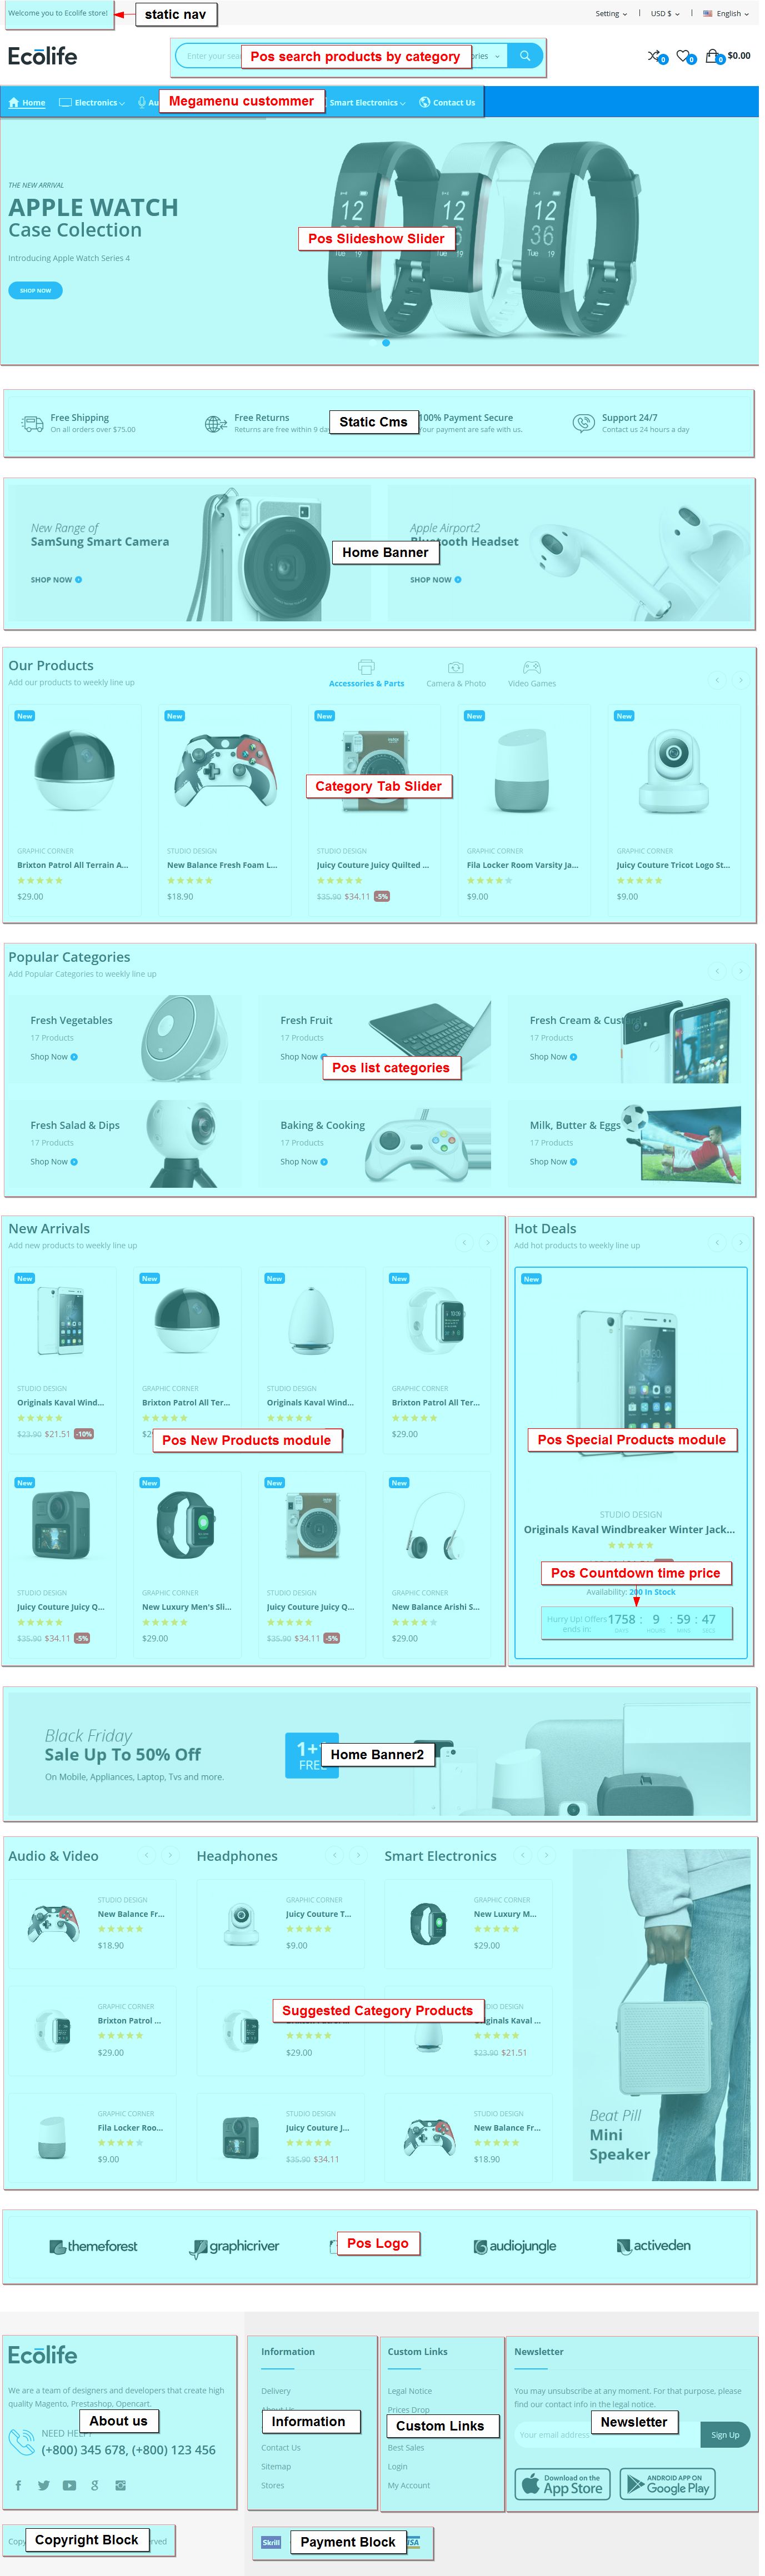
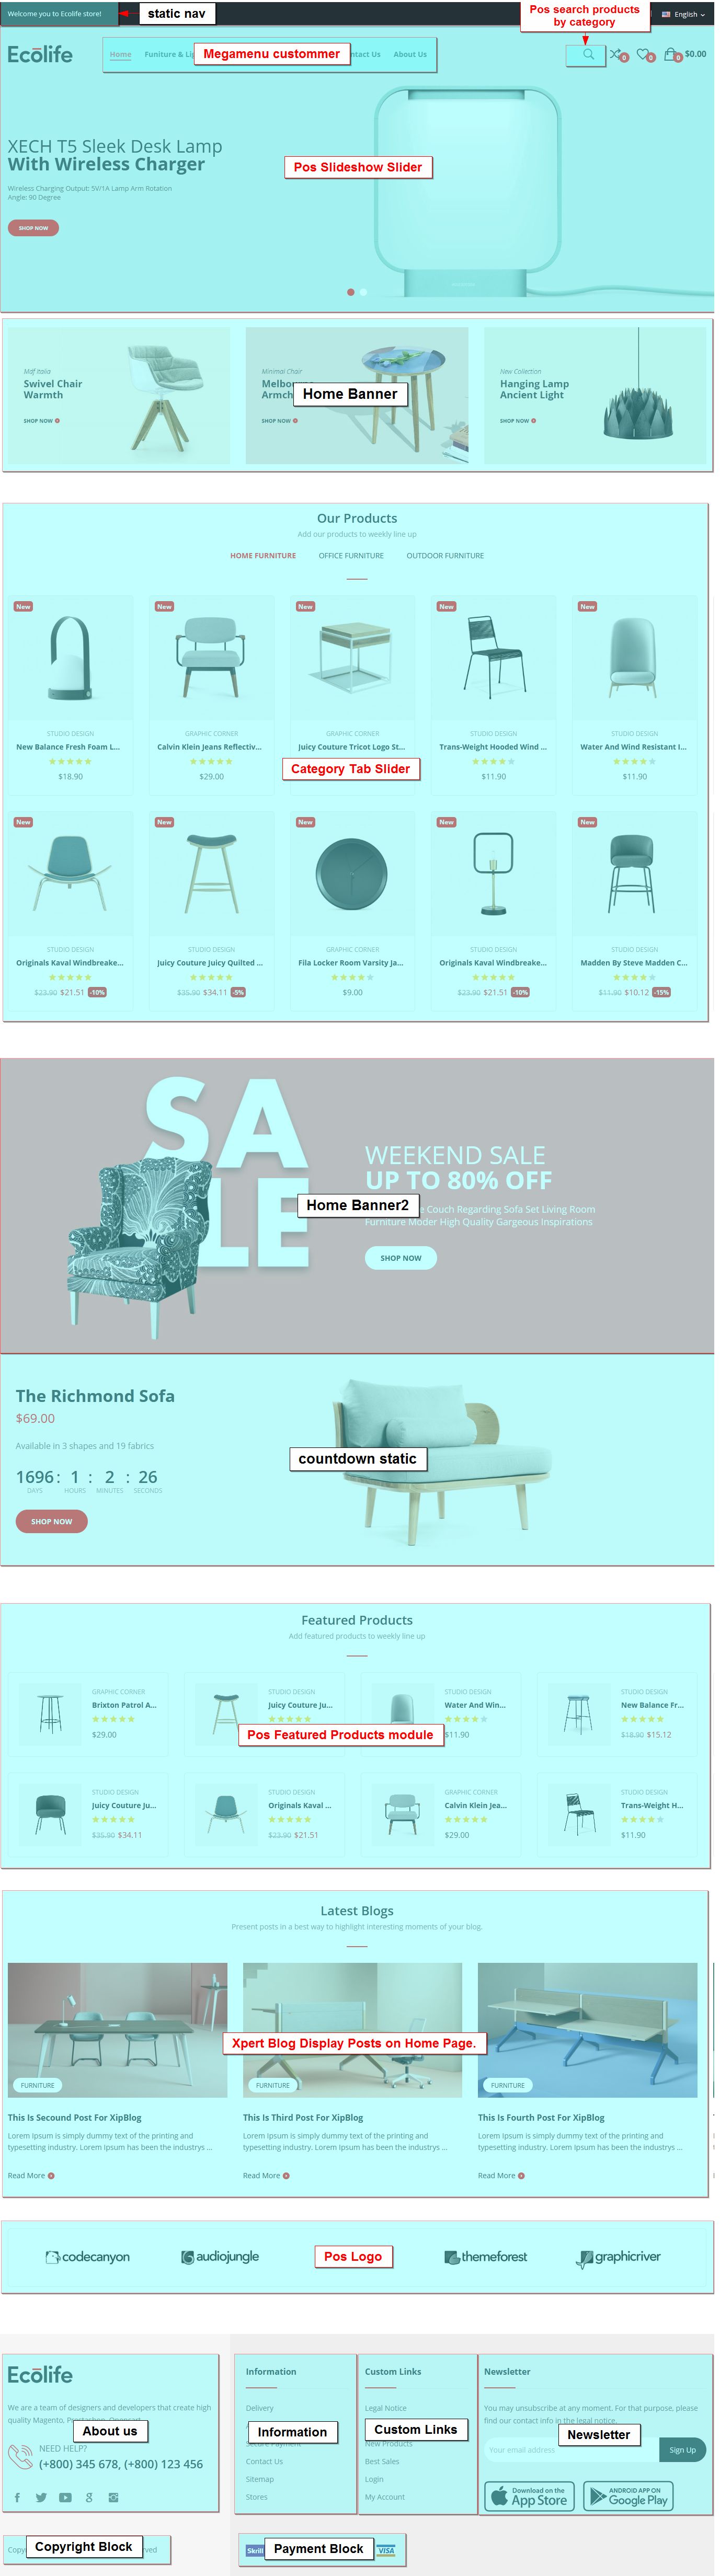
#Layout Ecolife Organic1
List of Modules
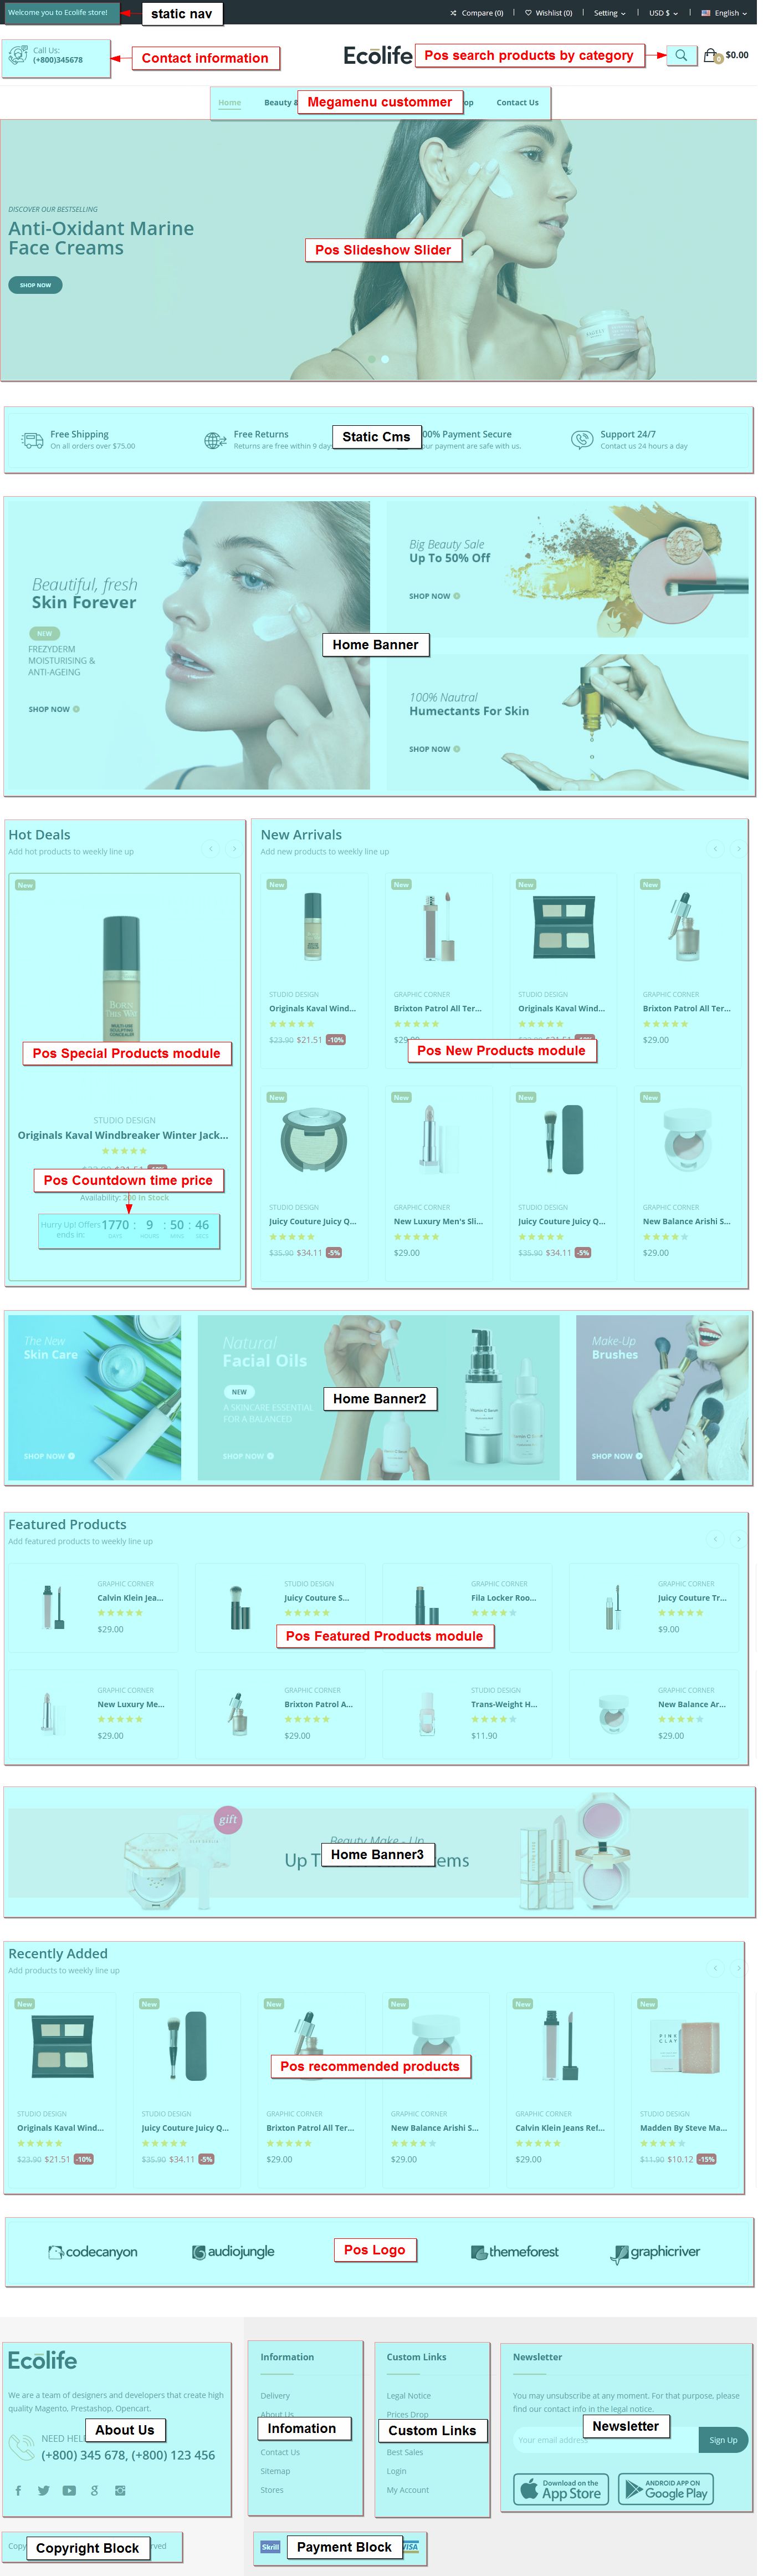
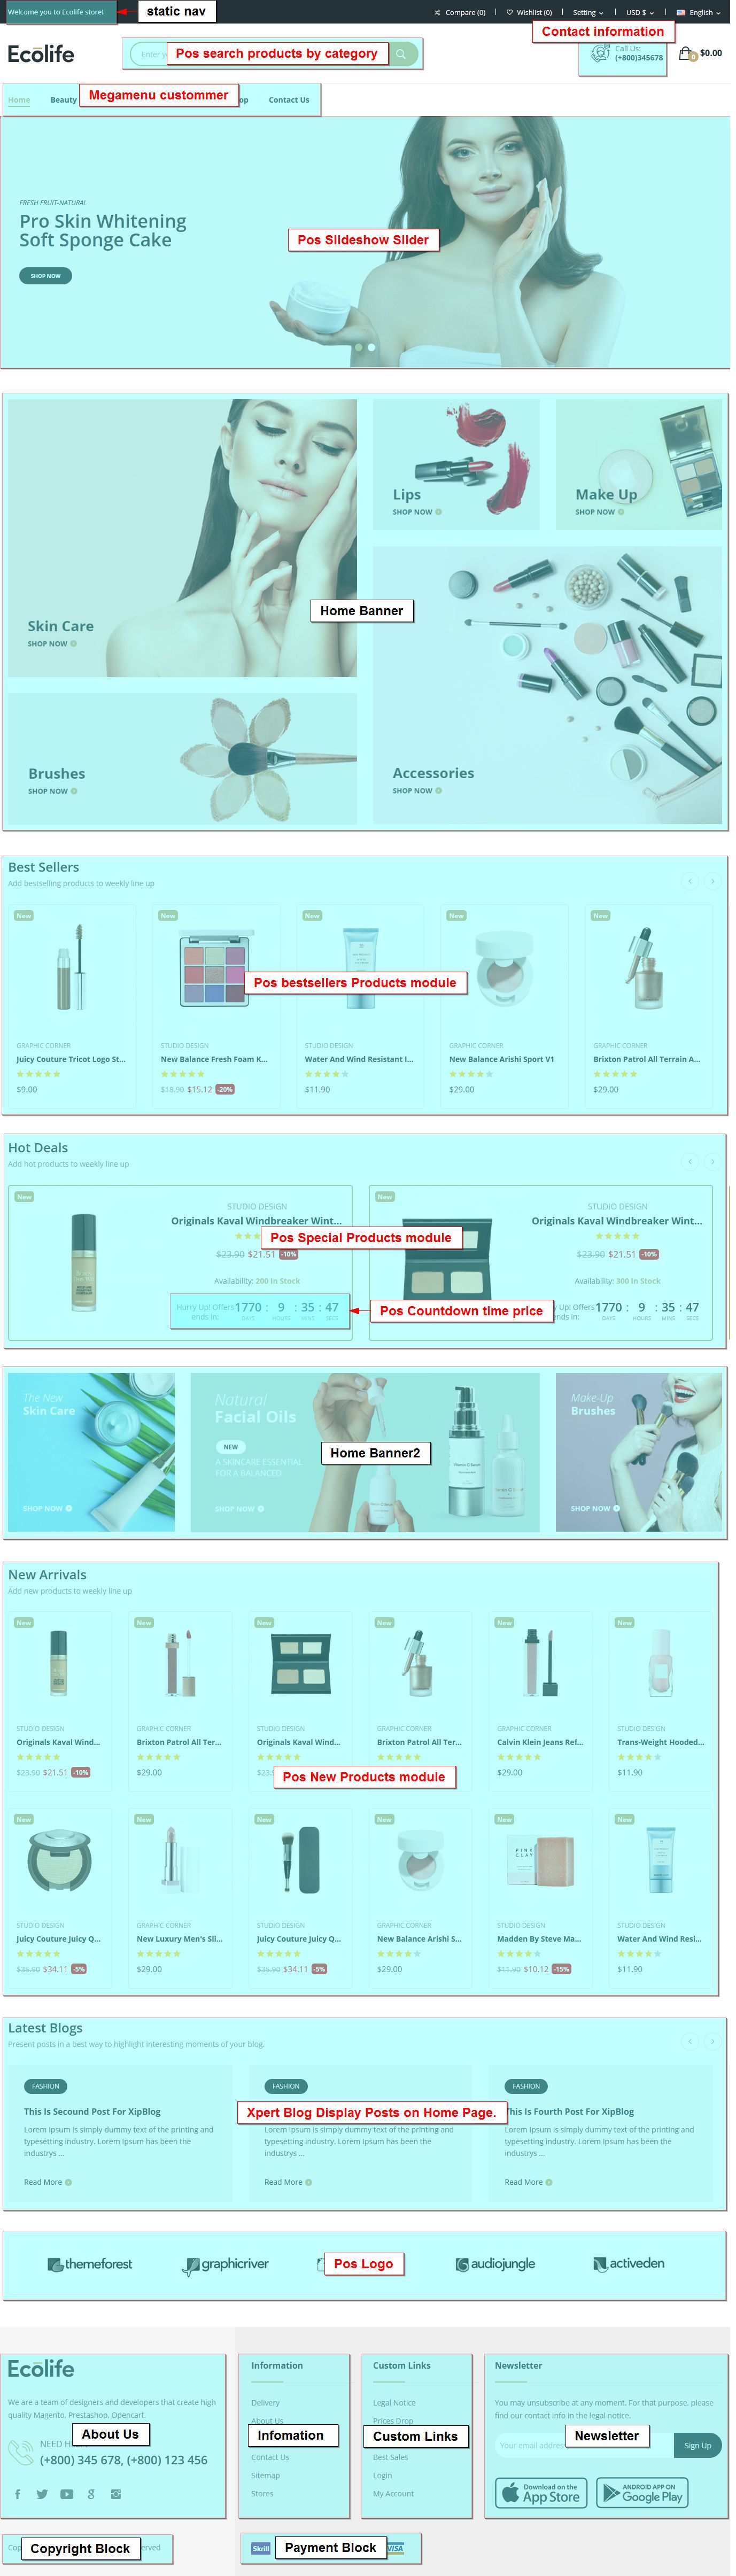
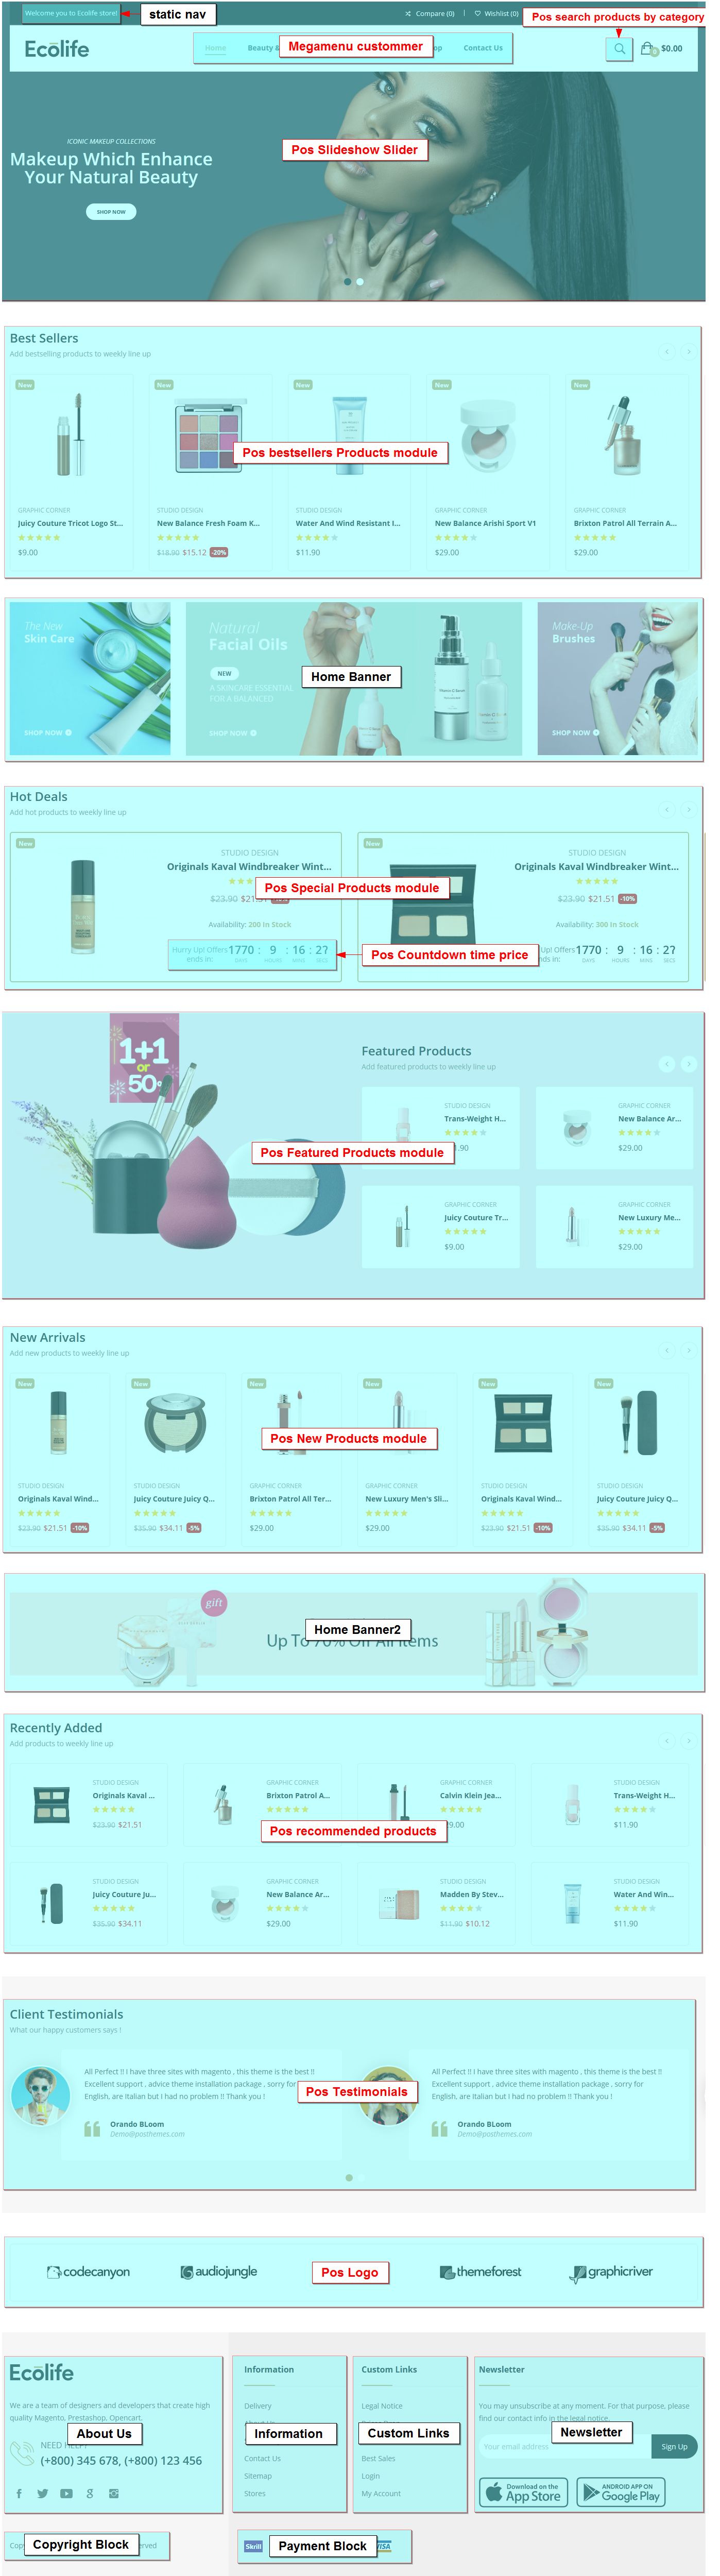
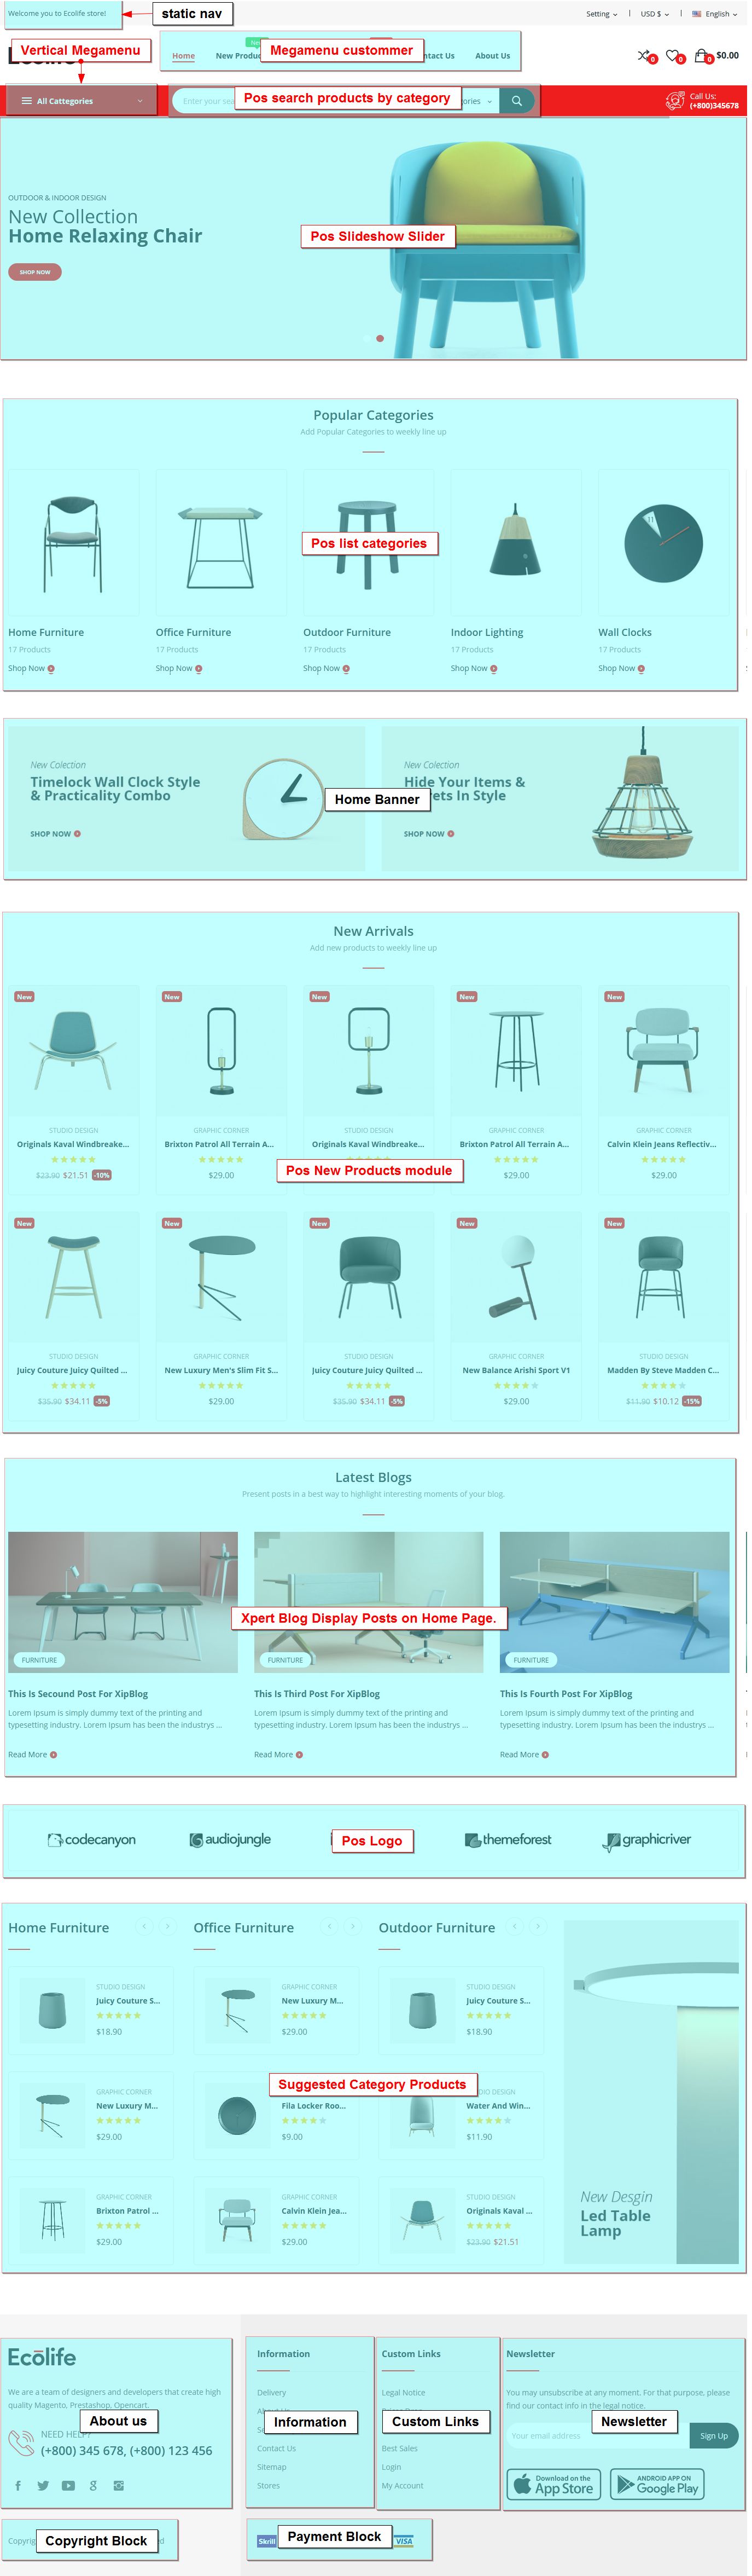
- Megamenu custommer
- Pos Slideshow Slider
- Pos list categories
- Pos Special Products module
- Pos Countdown time price
- Pos Featured Products module
- Pos New Products module
- Pos bestsellers Products module
- Pos recommended products
- Pos Themeoptions
- Pos search products by category
- Rotator img
- Pos Logo
List of Pos Static Blocks
- static nav
- Static Cms
- Home Banner
- Home Banner2
List of Pos Static Footer
- About Us (included Social media follow links)
- Information (included Link List)
- Custom Links (included Link List)
- Newsletter(included Newsletter subscription)
- Copyright Block
- Payment Block
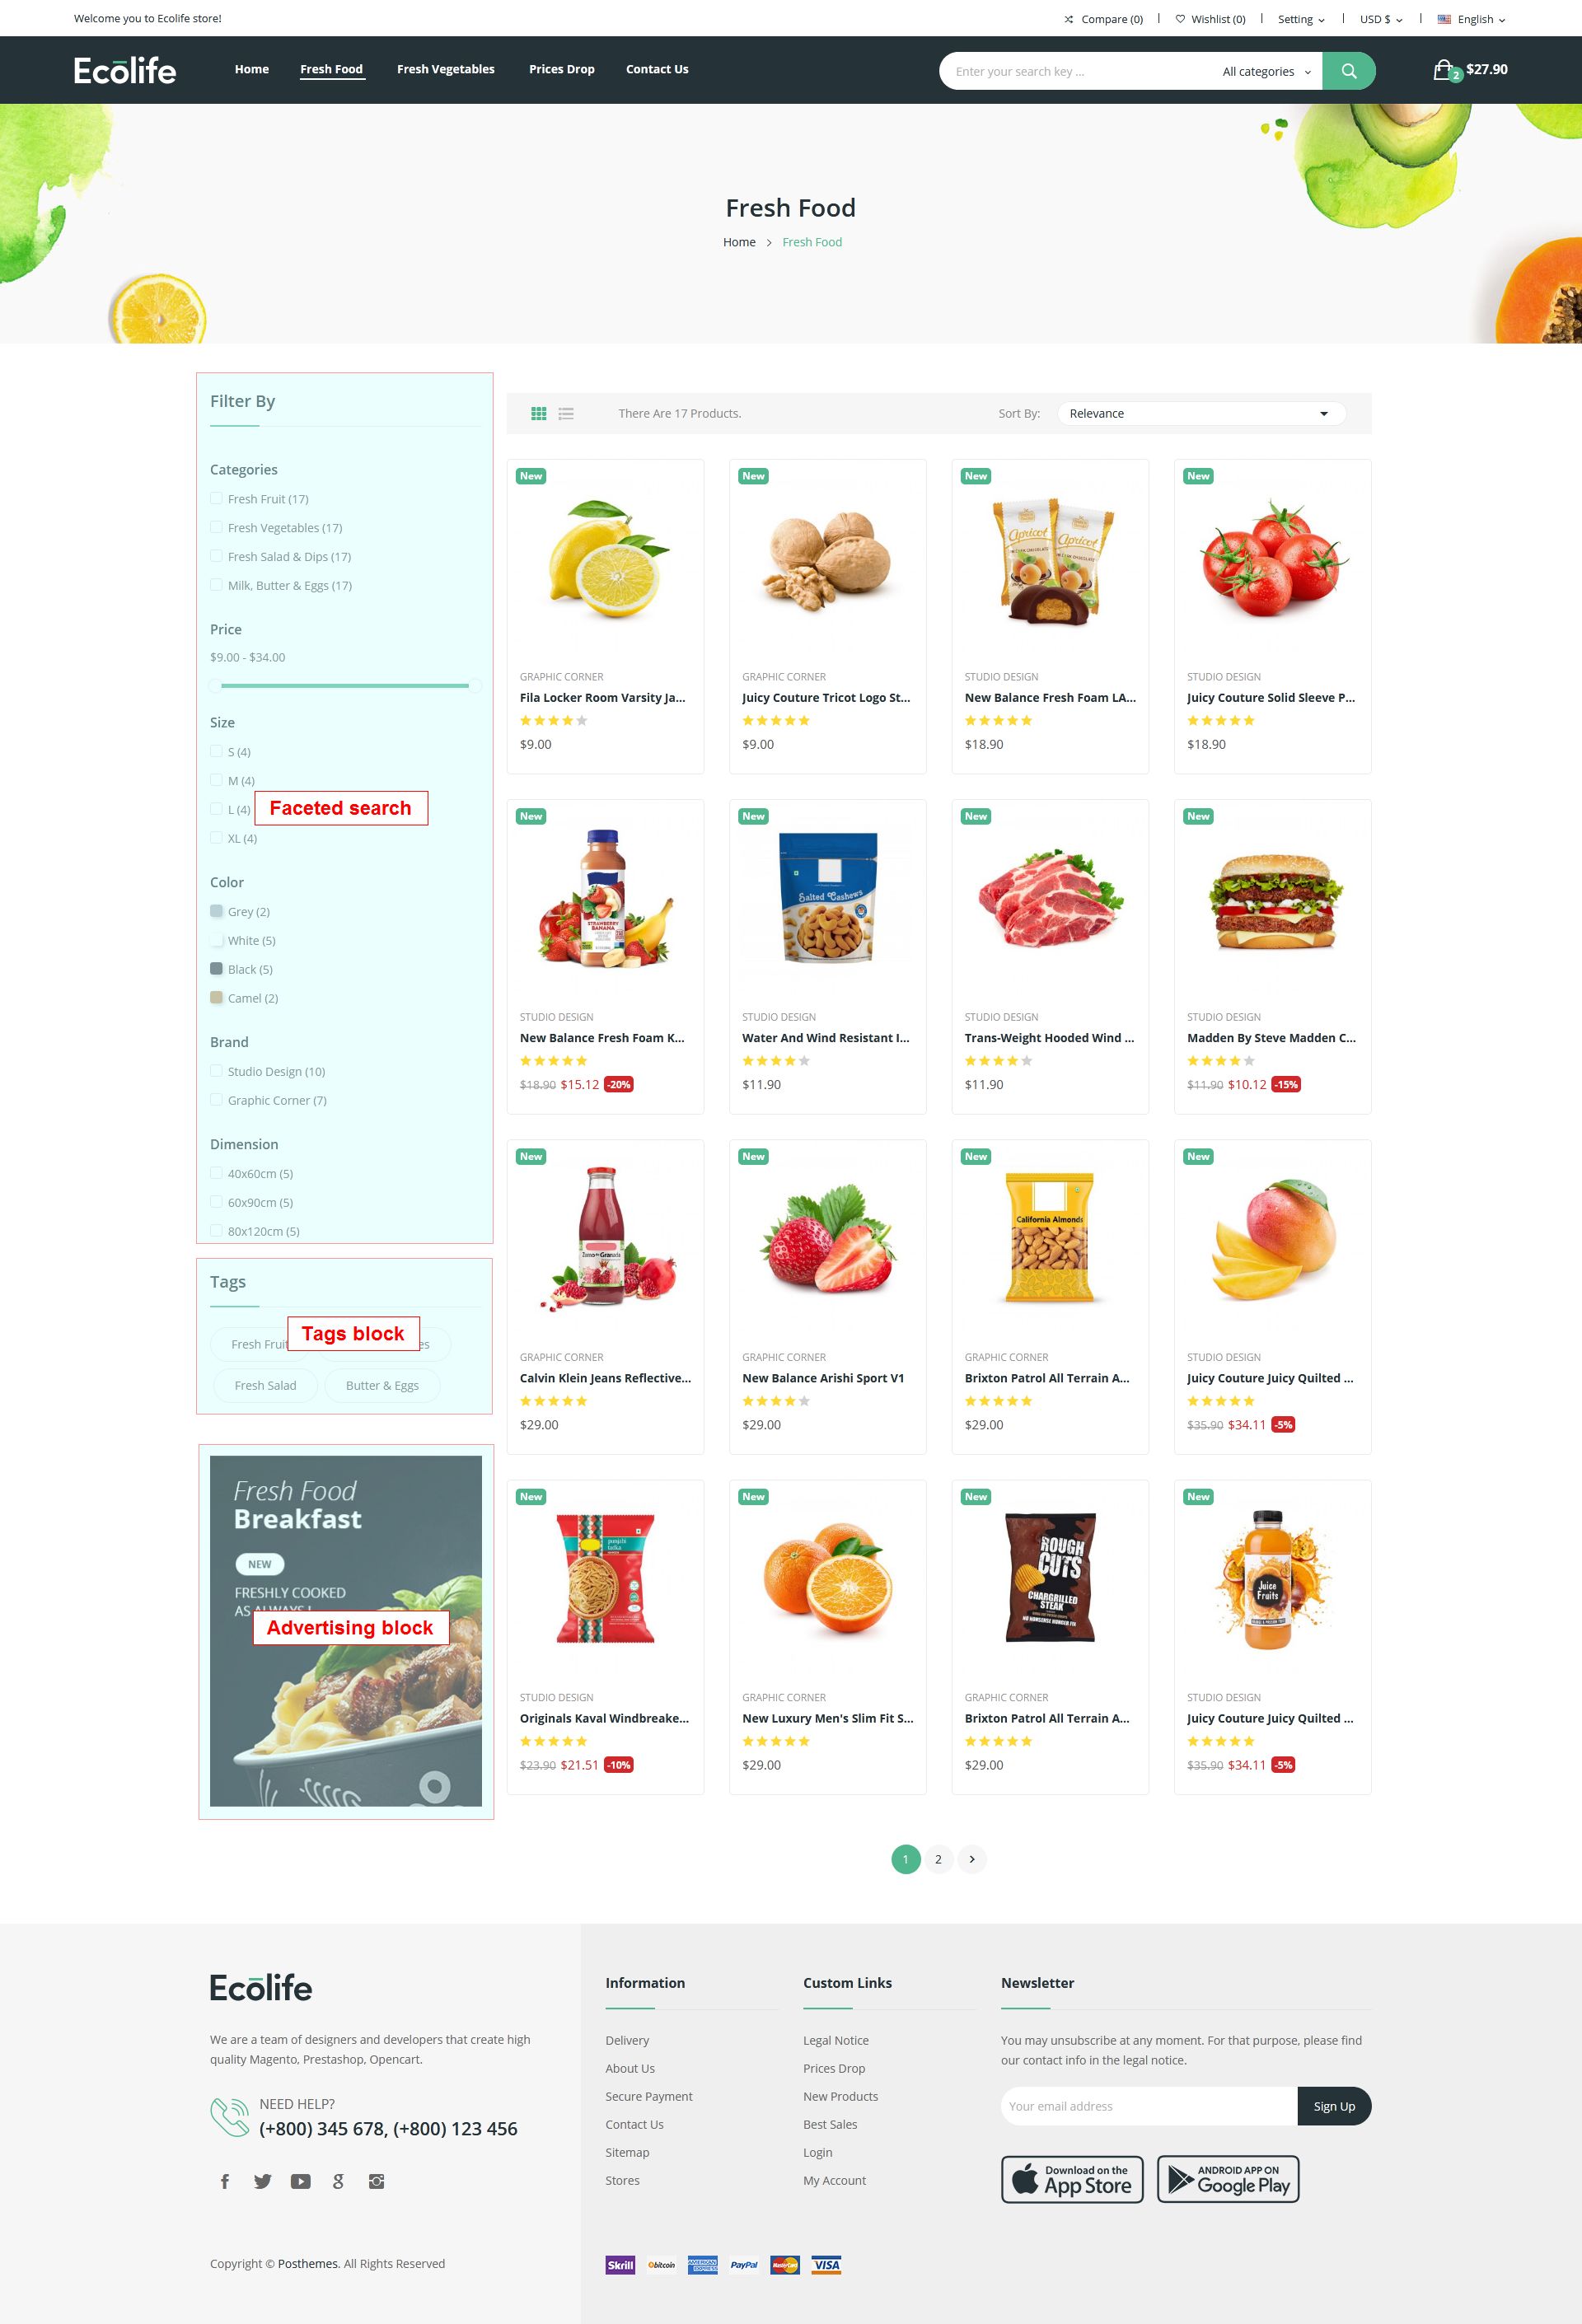
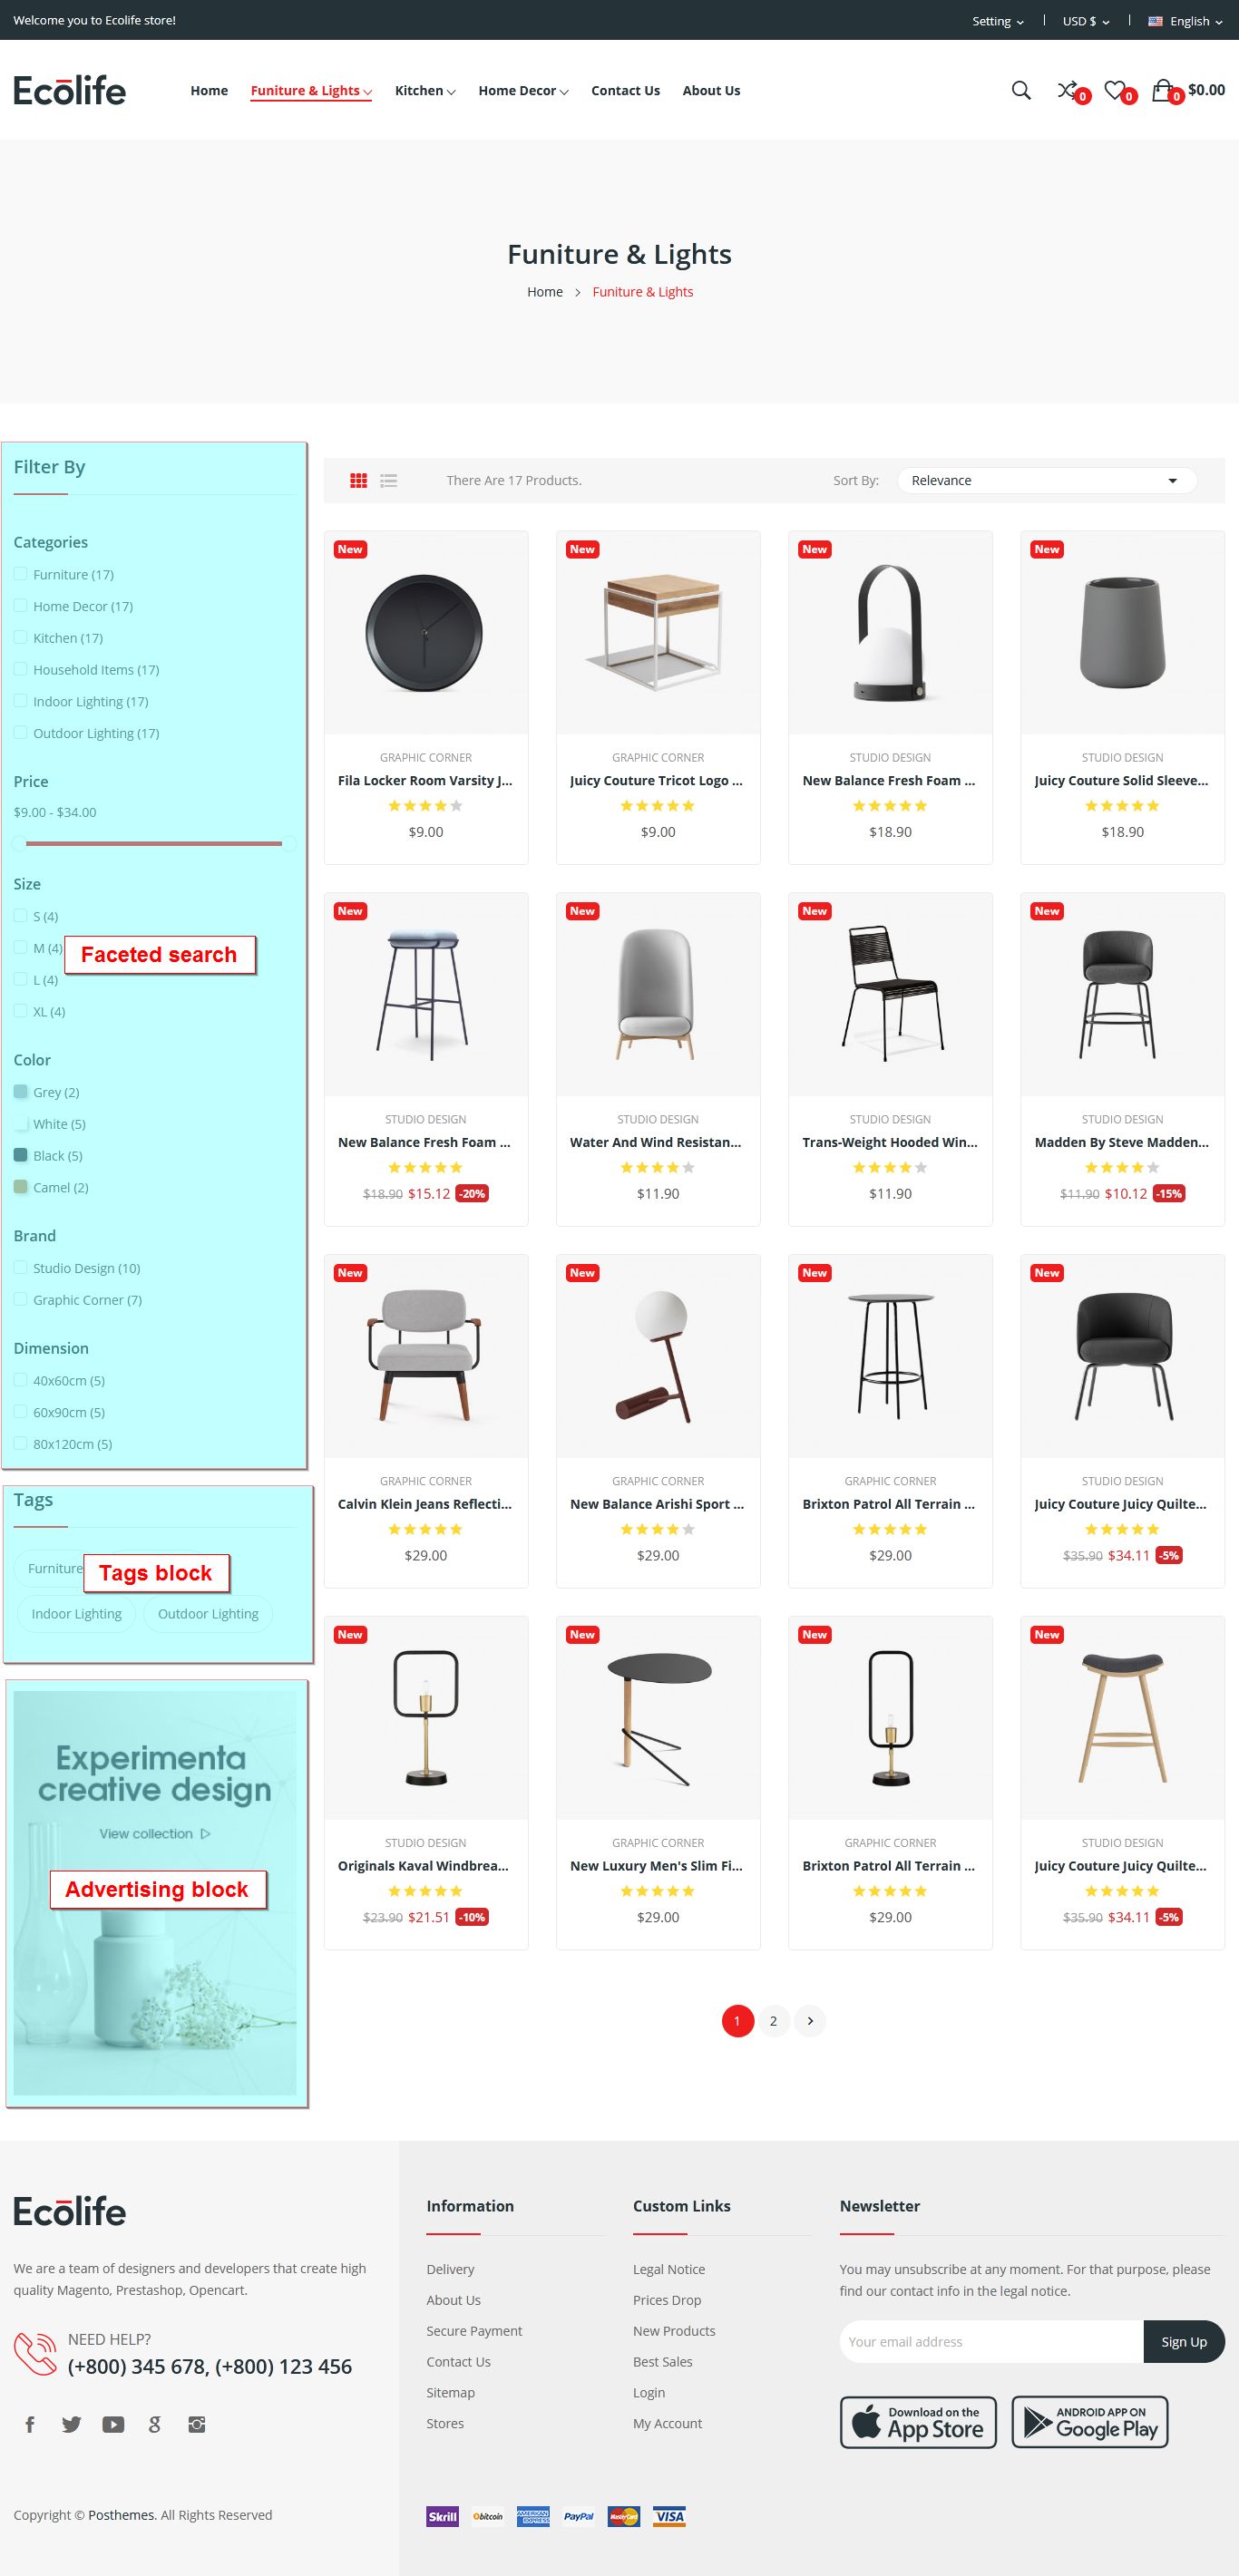
Home page
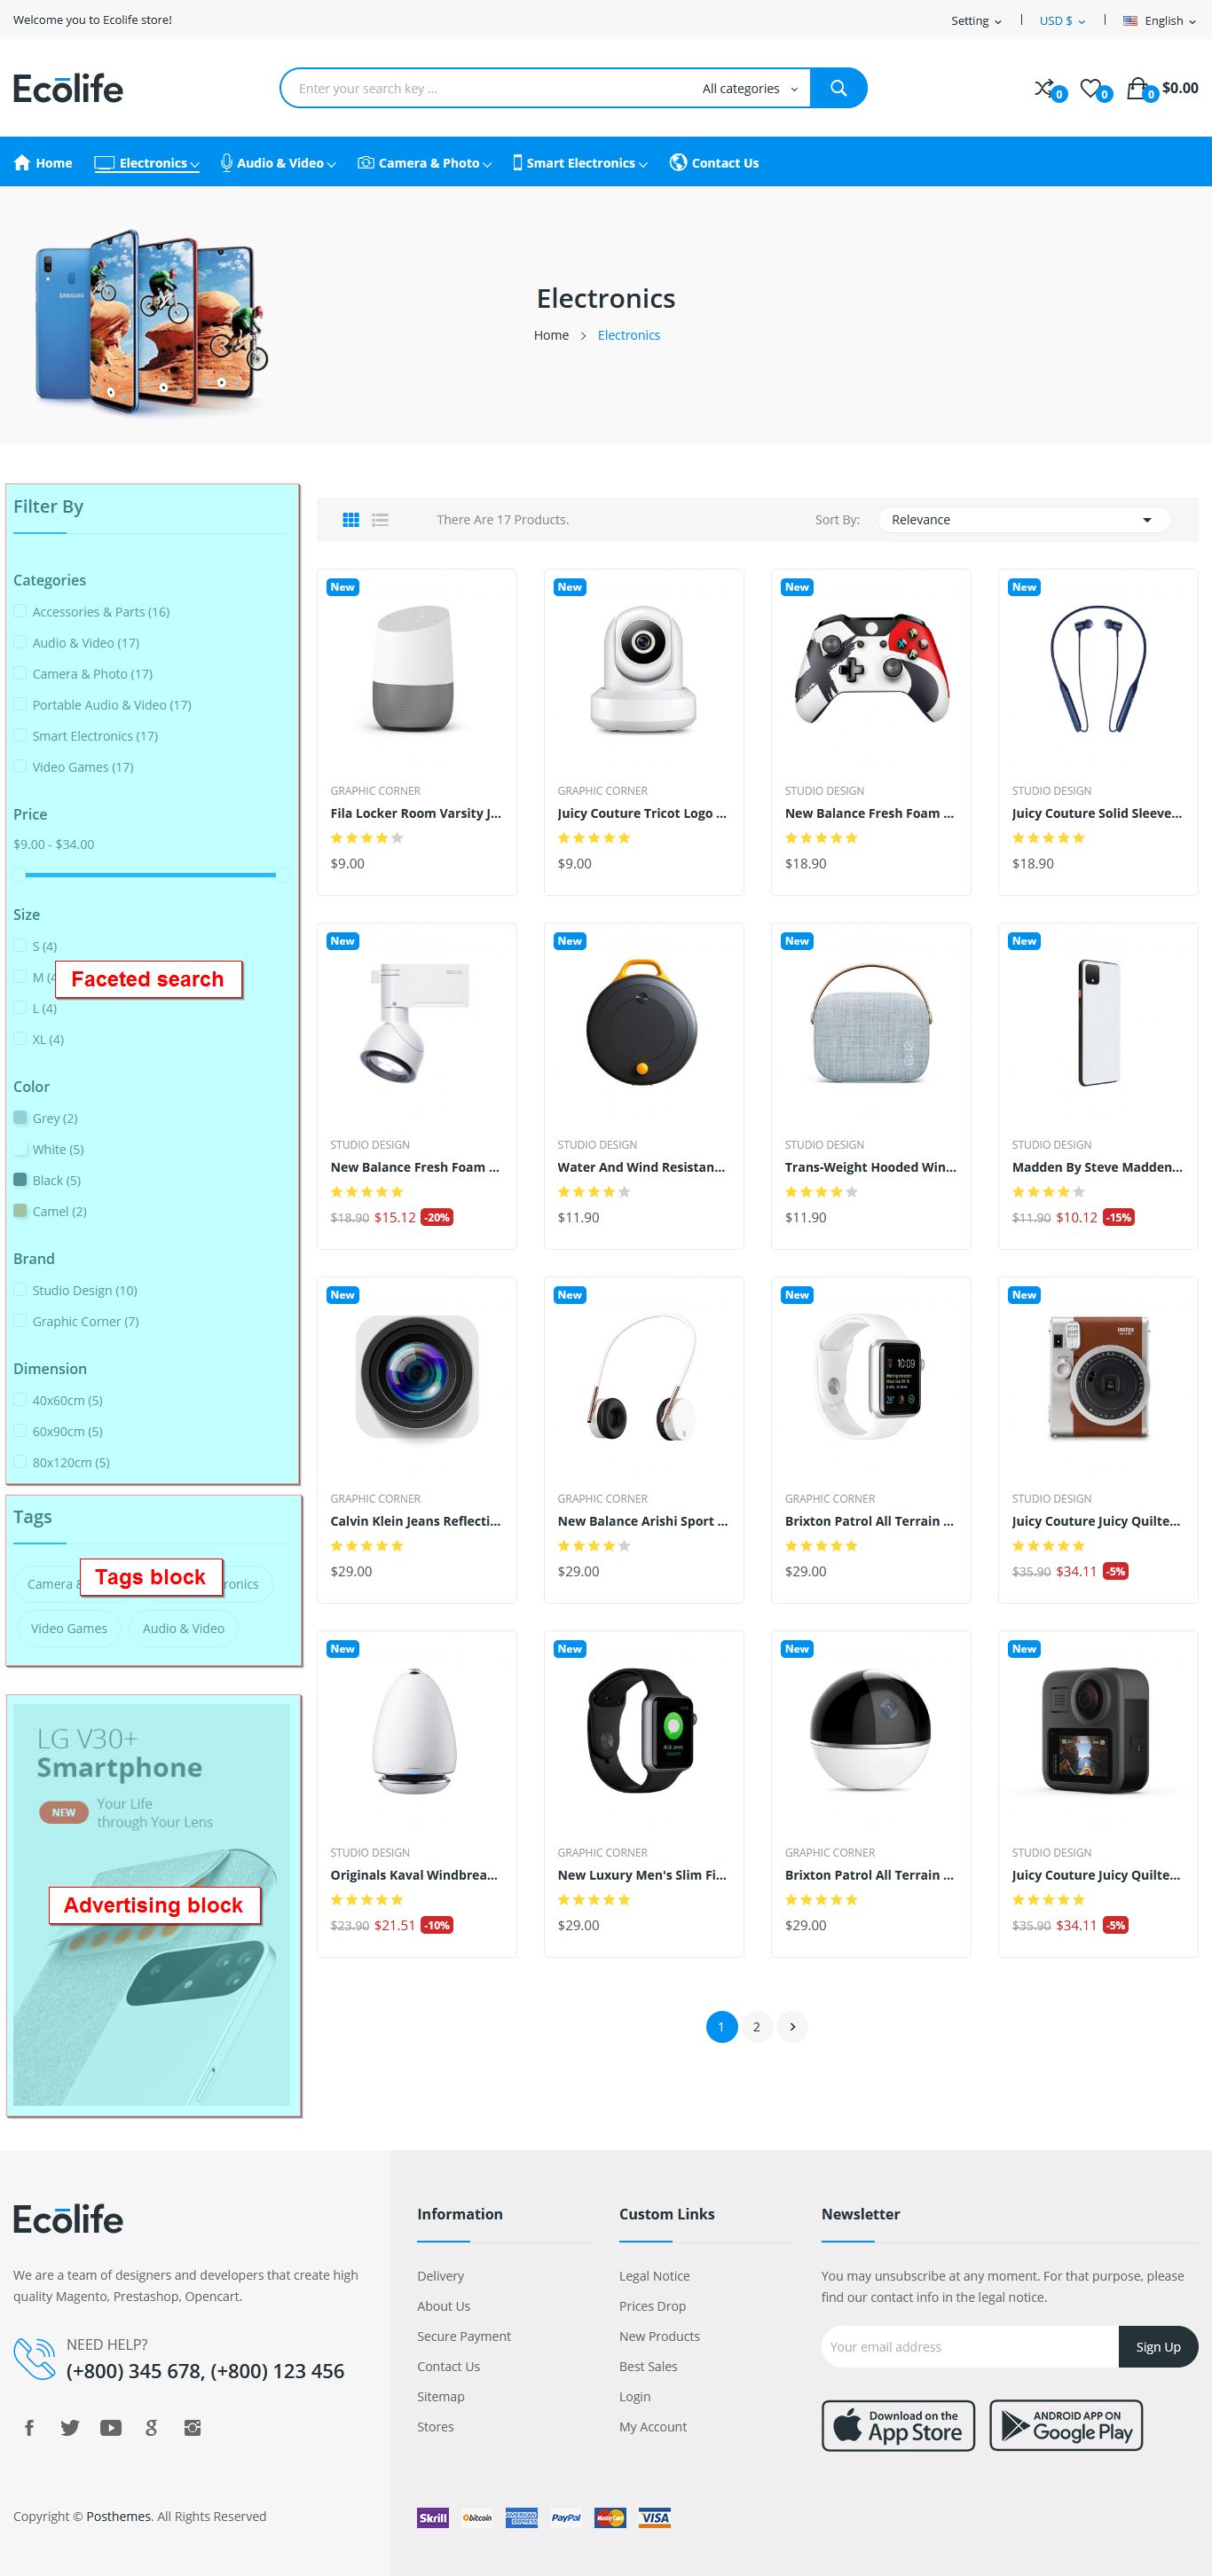
Category page
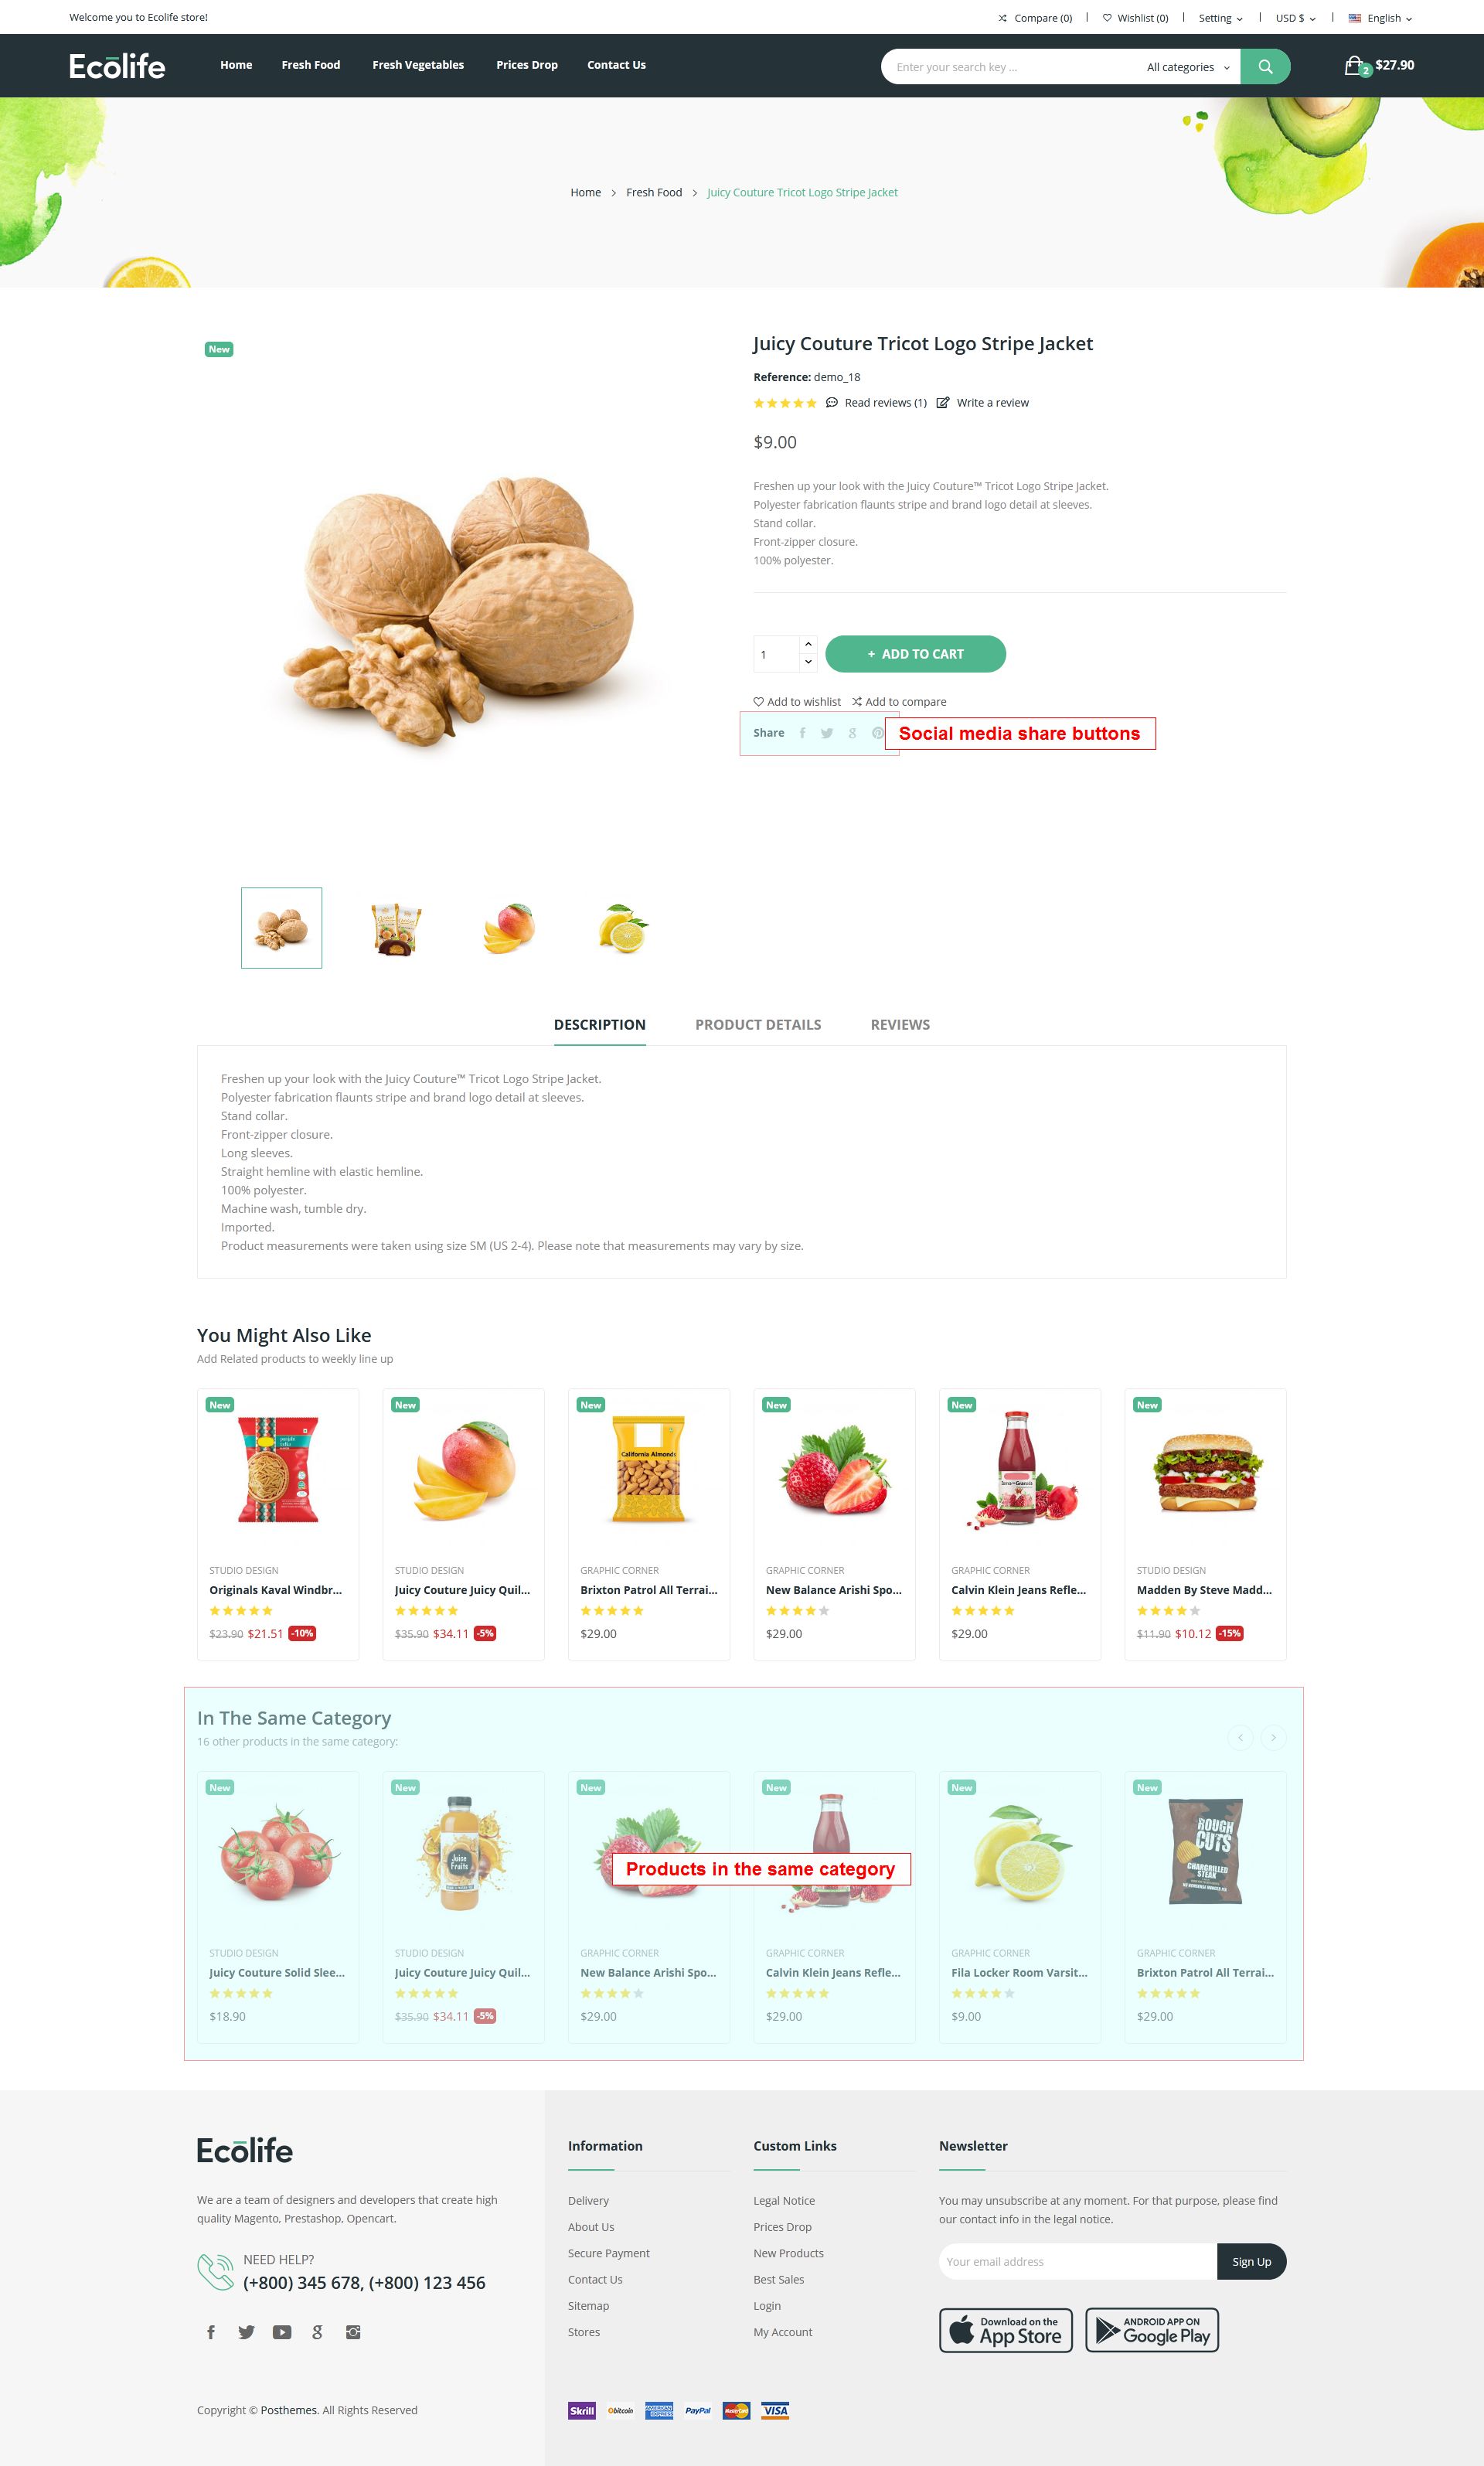
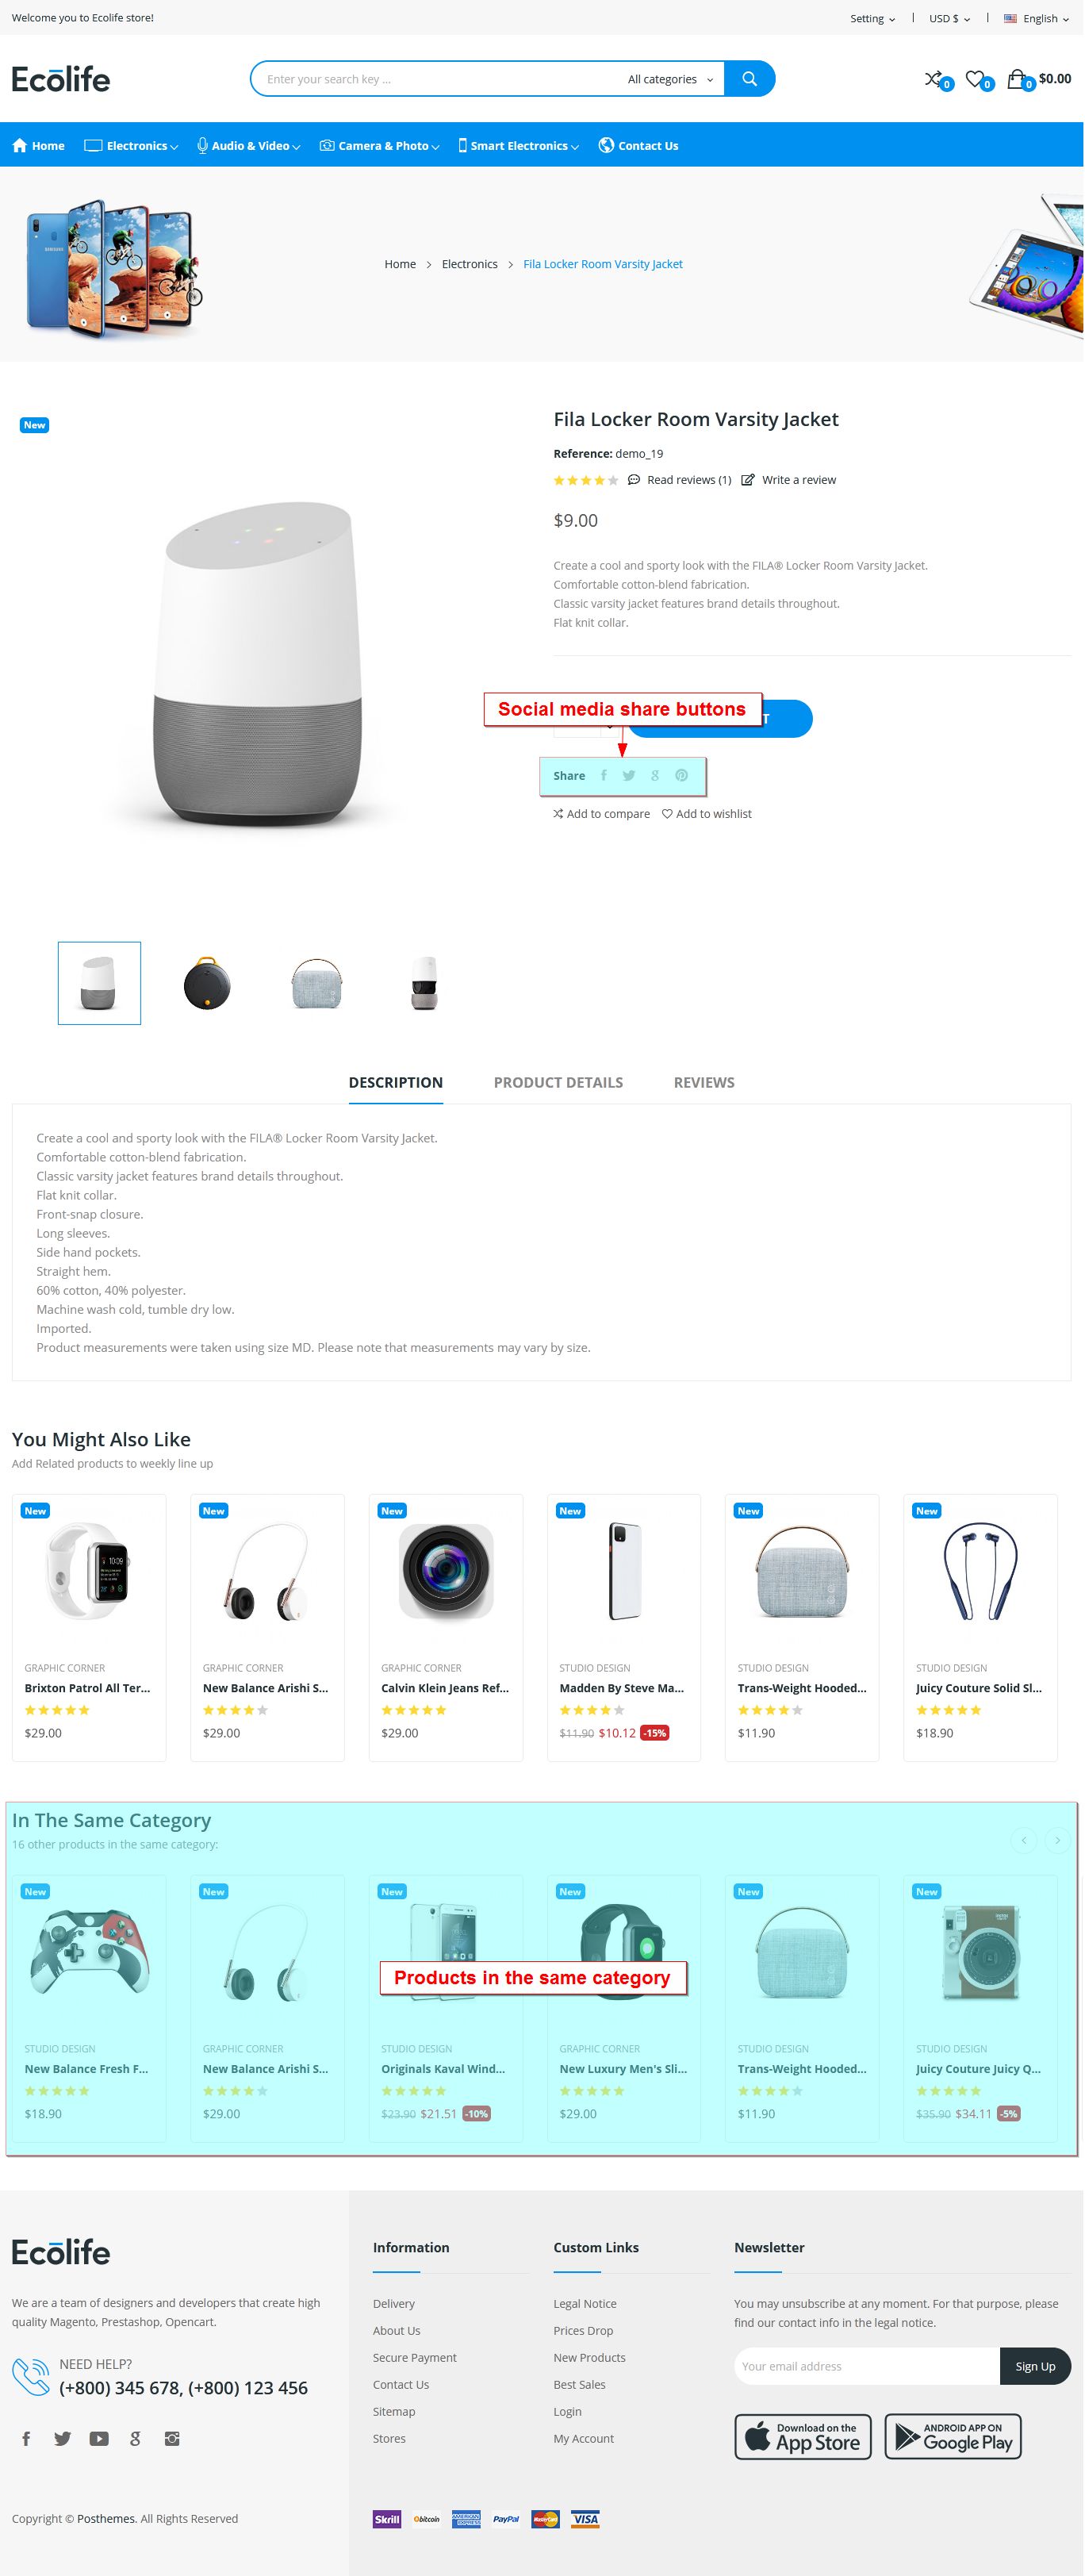
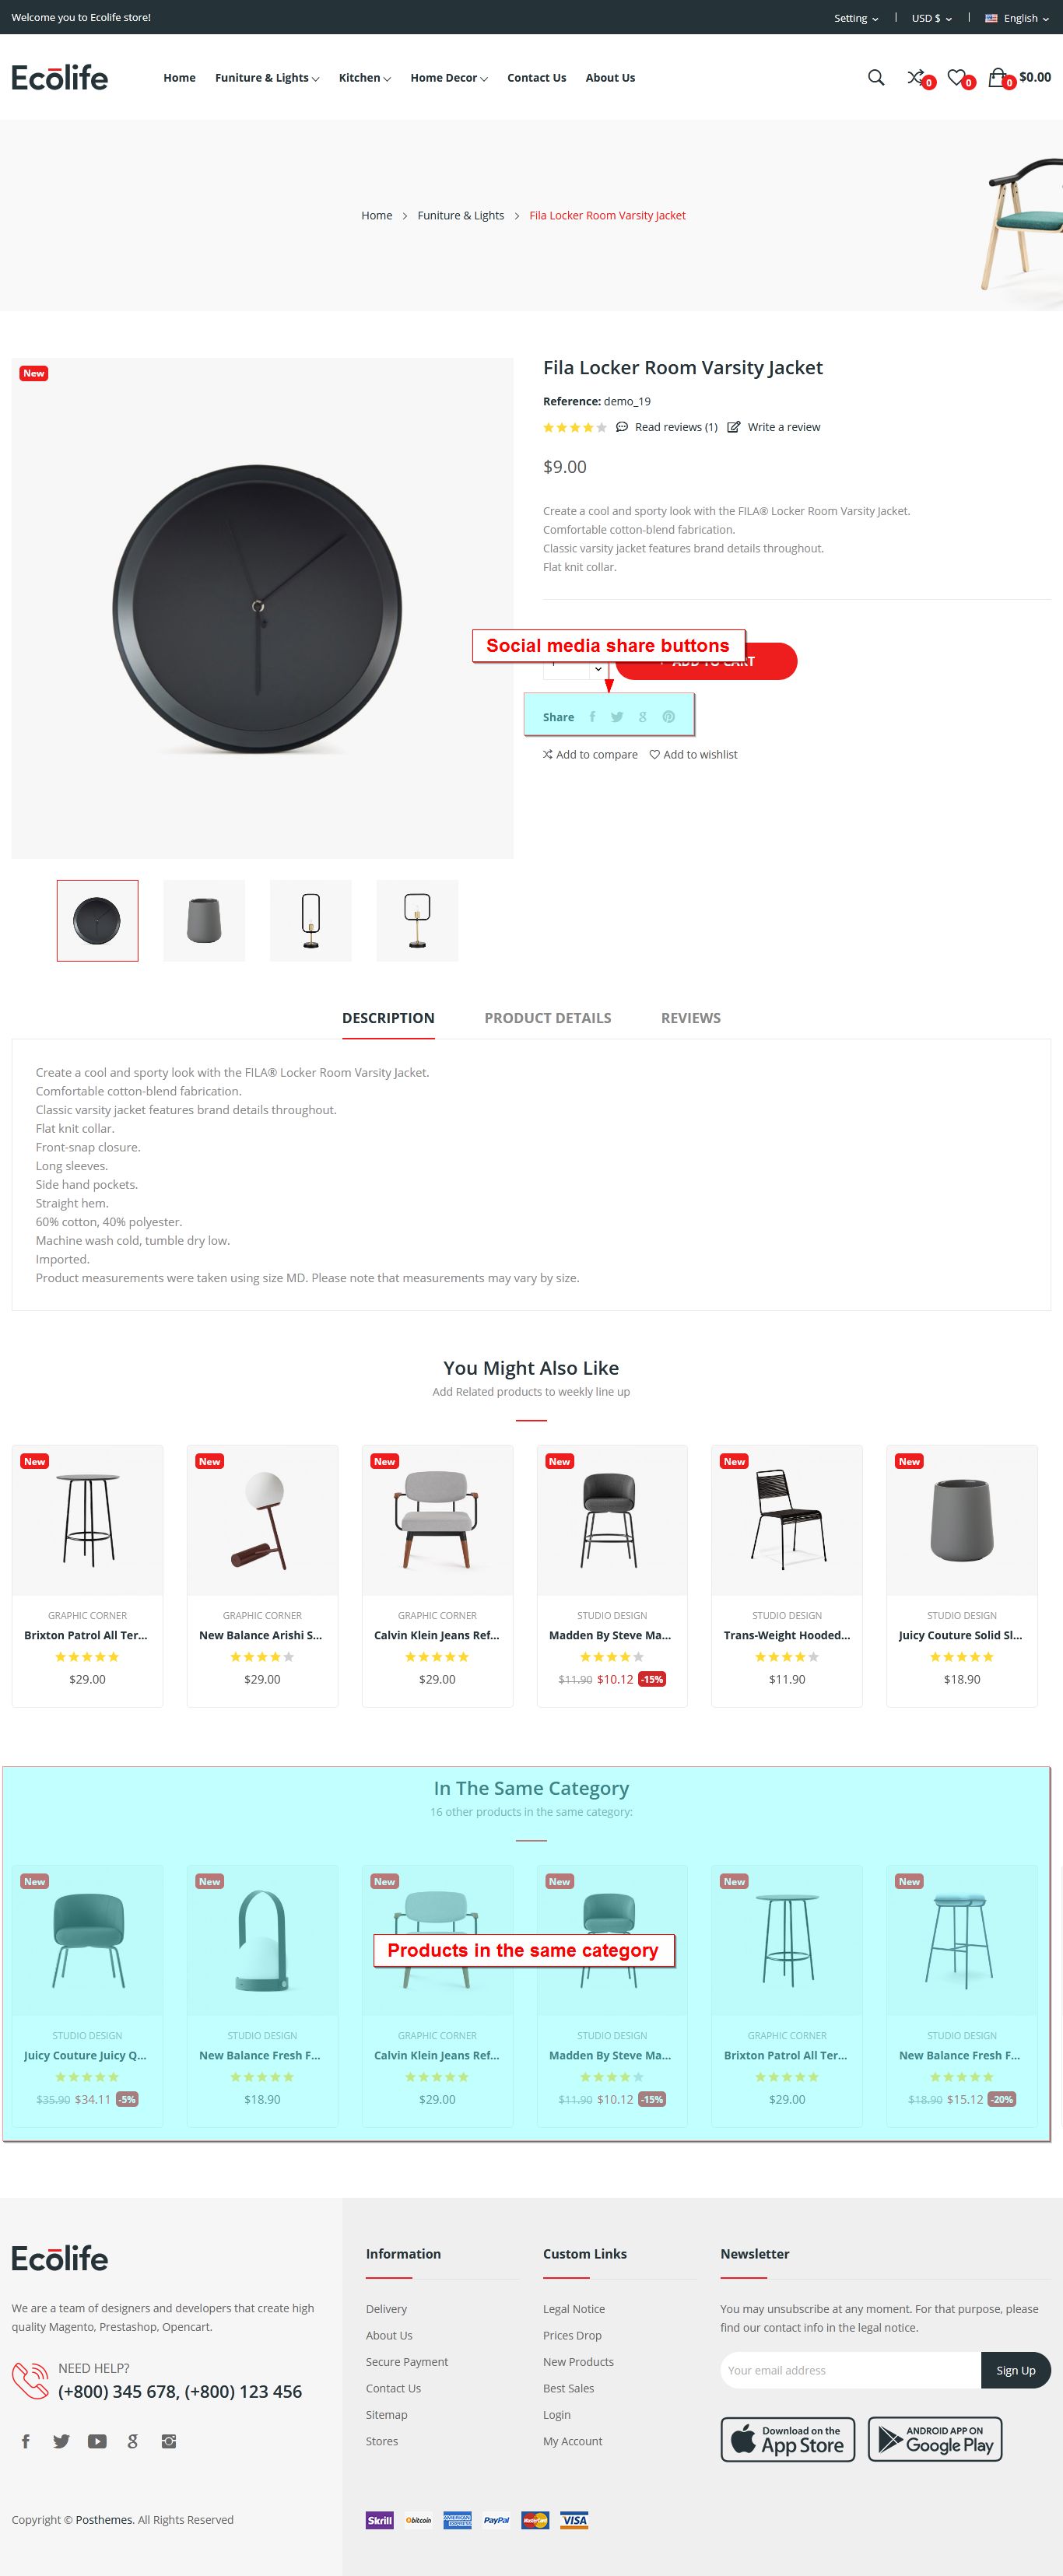
Details page
#Layout Ecolife Organic2
List of Modules
- Megamenu custommer
- Pos Slideshow Slider
- Pos list categories
- Pos Special Products module
- Pos Countdown time price
- Pos Featured Products module
- Pos New Products module
- Pos Themeoptions
- Pos search products by category
- Rotator img
- Pos Testimonials
- Pos Logo
List of Pos Static Blocks
- static nav
- Static Cms
- Home Banner
- Home Banner2
List of Pos Static Footer
- About Us (included Social media follow links)
- Information (included Link List)
- Custom Links (included Link List)
- Newsletter(included Newsletter subscription)
- Copyright Block
- Payment Block
Home page
Category page
Details page
#Layout Ecolife Organic3
List of Modules
- Megamenu custommer
- Pos Slideshow Slider
- Pos list categories
- Pos Special Products module
- Pos Countdown time price
- Pos Featured Products module
- Pos New Products module
- Pos bestsellers Products module
- Pos Themeoptions
- Pos search products by category
- Rotator img
- Pos Logo
List of Pos Static Blocks
- static nav
- Static Cms
- Home Banner
List of Pos Static Footer
- About Us (included Social media follow links)
- Information (included Link List)
- Custom Links (included Link List)
- Newsletter(included Newsletter subscription)
- Copyright Block
- Payment Block
Home page
Category page
Details page
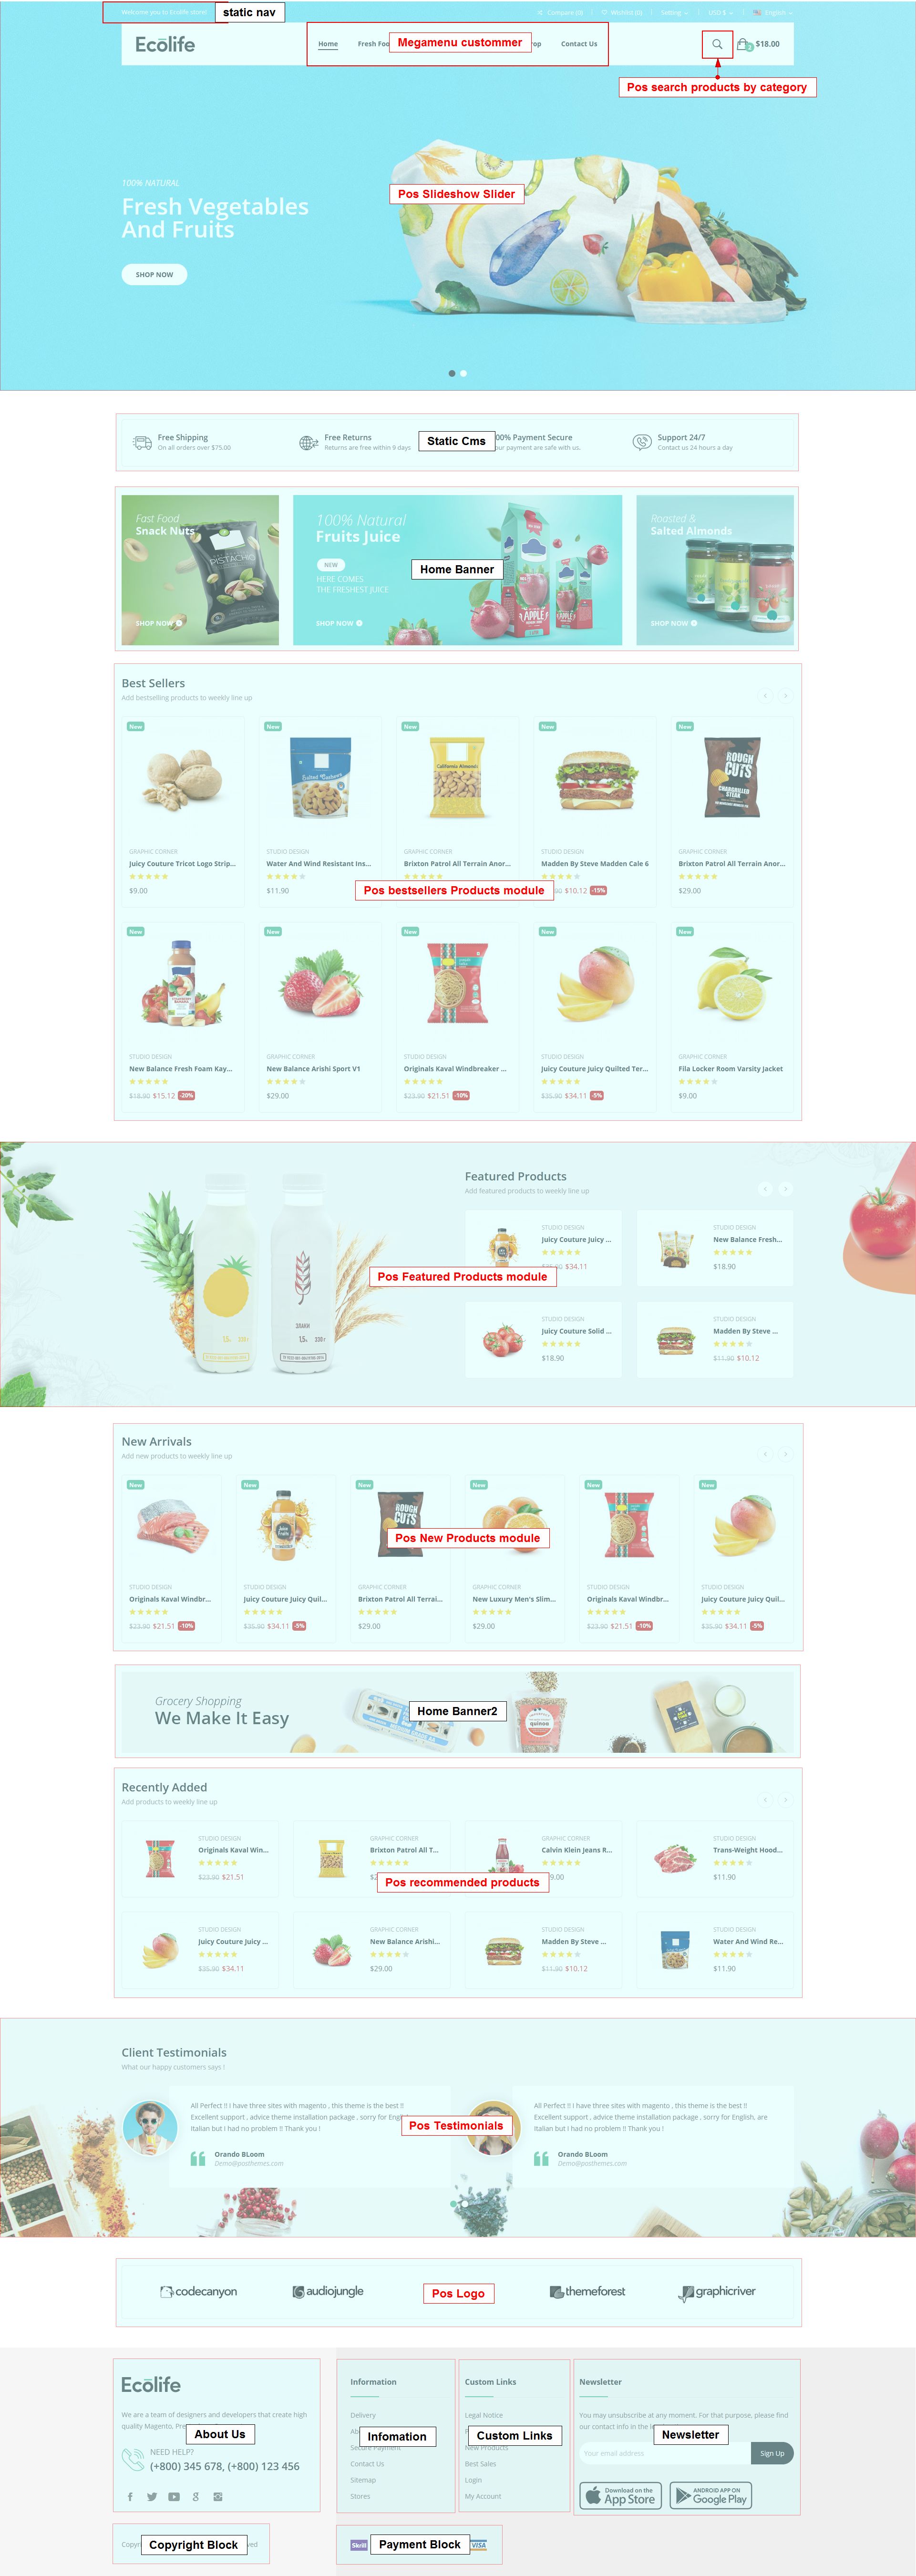
#Layout Ecolife Organic4
List of Modules
- Megamenu custommer
- Pos Slideshow Slider
- Pos Featured Products module
- Pos New Products module
- Pos bestsellers Products module
- Pos recommended products
- Pos Themeoptions
- Pos search products by category
- Rotator img
- Pos Testimonials
- Pos Logo
List of Pos Static Blocks
- static nav
- Static Cms
- Home Banner
- Home Banner2
List of Pos Static Footer
- About Us (included Social media follow links)
- Information (included Link List)
- Custom Links (included Link List)
- Newsletter(included Newsletter subscription)
- Copyright Block
- Payment Block
Home page
Category page
Details page
#Layout Ecolife Cosmetic1
List of Modules
- Megamenu custommer
- Pos Slideshow Slider
- Pos Special Products module
- Pos Countdown time price
- Pos Featured Products module
- Pos New Products module
- Pos recommended products
- Pos Themeoptions
- Pos search products by category
- Rotator img
- Pos Logo
List of Pos Static Blocks
- static nav
- Static Cms
- Home Banner
- Home Banner2
- Home Banner3
List of Pos Static Footer
- About Us (included Social media follow links)
- Information (included Link List)
- Custom Links (included Link List)
- Newsletter(included Newsletter subscription)
- Copyright Block
- Payment Block
Home page
Category page
Details page
#Layout Ecolife Cosmetic2
List of Modules
- Megamenu custommer
- Pos Slideshow Slider
- Pos Special Products module
- Pos Countdown time price
- Pos bestsellers Products module
- Pos New Products module
- Pos Themeoptions
- Pos search products by category
- Rotator img
- Pos Logo
List of Pos Static Blocks
- static nav
- Home Banner
- Home Banner2
List of Pos Static Footer
- About Us (included Social media follow links)
- Information (included Link List)
- Custom Links (included Link List)
- Newsletter(included Newsletter subscription)
- Copyright Block
- Payment Block
Home page
Category page
Details page

#Layout Ecolife Cosmetic3
List of Modules
- Megamenu custommer
- Pos Slideshow Slider
- Pos bestsellers Products module
- Pos Special Products module
- Pos Countdown time price
- Pos Featured Products module
- Pos New Products module
- Pos recommended products
- Pos Testimonials
- Pos Themeoptions
- Pos search products by category
- Rotator img
- Pos Logo
List of Pos Static Blocks
- static nav
- Home Banner
- Home Banner2
List of Pos Static Footer
- About Us (included Social media follow links)
- Information (included Link List)
- Custom Links (included Link List)
- Newsletter(included Newsletter subscription)
- Copyright Block
- Payment Block
Home page
Category page
Details page
#Layout Ecolife Cosmetic4
List of Modules
- Megamenu custommer
- Vertical Megamenu
- Pos Slideshow Slider
- Pos bestsellers Products module
- Pos Special Products module
- Pos Countdown time price
- Pos Featured Products module
- Pos New Products module
- Pos Themeoptions
- Pos search products by category
- Rotator img
- Pos Logo
List of Pos Static Blocks
- static nav
- Static Cms
- Home Banner
- Home Banner Top
List of Pos Static Footer
- About Us (included Social media follow links)
- Information (included Link List)
- Custom Links (included Link List)
- Newsletter(included Newsletter subscription)
- Copyright Block
- Payment Block
Home page
Category page

Details page
#Layout Ecolife Digital1
List of Modules
- Megamenu custommer
- Vertical Megamenu
- Pos Slideshow Slider
- Pos bestsellers Products module
- Pos Special Products module
- Pos Countdown time price
- Pos list categories
- Pos list category products
- Pos Themeoptions
- Pos search products by category
- Rotator img
- Pos Logo
List of Pos Static Blocks
- static nav
- Static Cms
- Home Banner
List of Pos Static Footer
- About Us (included Social media follow links)
- Information (included Link List)
- Custom Links (included Link List)
- Newsletter(included Newsletter subscription)
- Copyright Block
- Payment Block
Home page
Category page

Details page
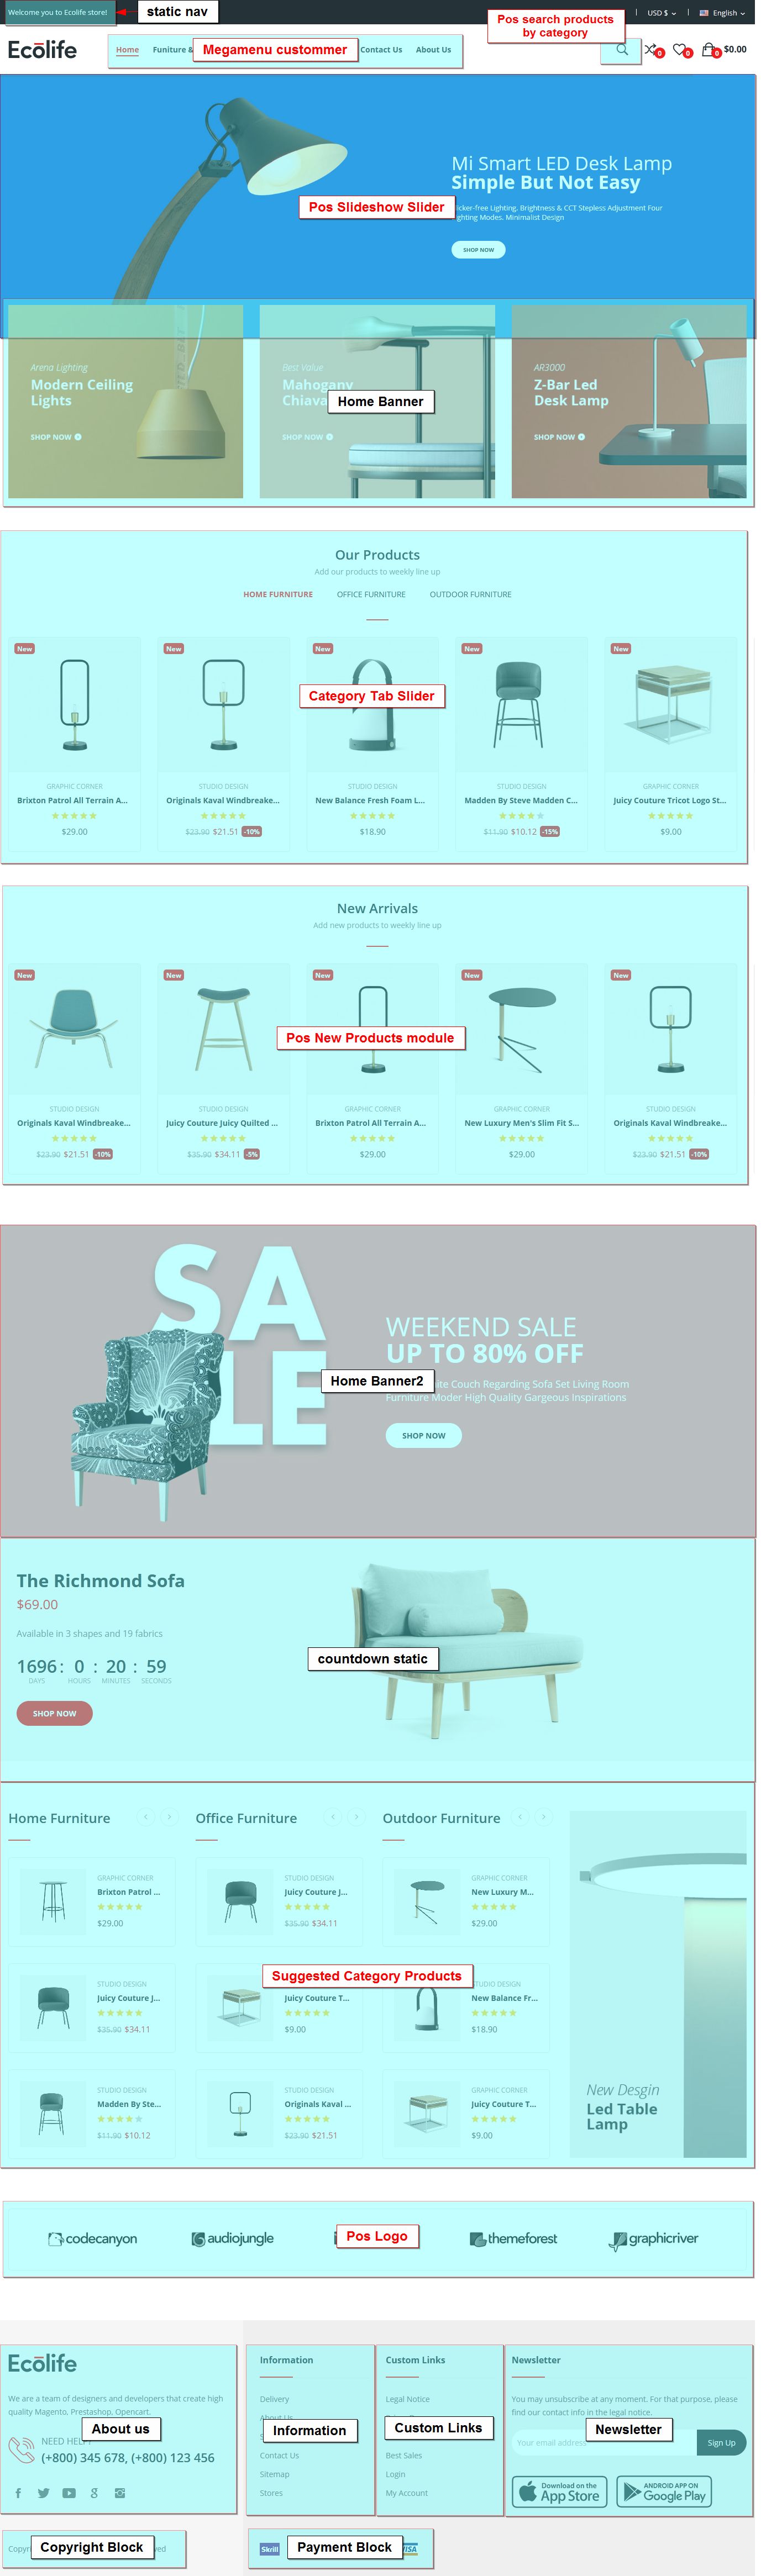
#Layout Ecolife Digital2
List of Modules
- Megamenu custommer
- Vertical Megamenu
- Pos Slideshow Slider
- Pos bestsellers Products module
- Pos list categories
- Pos New Products module
- Suggested Category Products
- Pos Themeoptions
- Pos search products by category
- Rotator img
- Pos Logo
List of Pos Static Blocks
- static nav
- Static Cms
- Home Banner
- Home Banner2
List of Pos Static Footer
- About us (included Social media follow links)
- Information (included Link List)
- Custom Links (included Link List)
- Newsletter(included Newsletter subscription)
- Copyright Block
- Payment Block
Home page
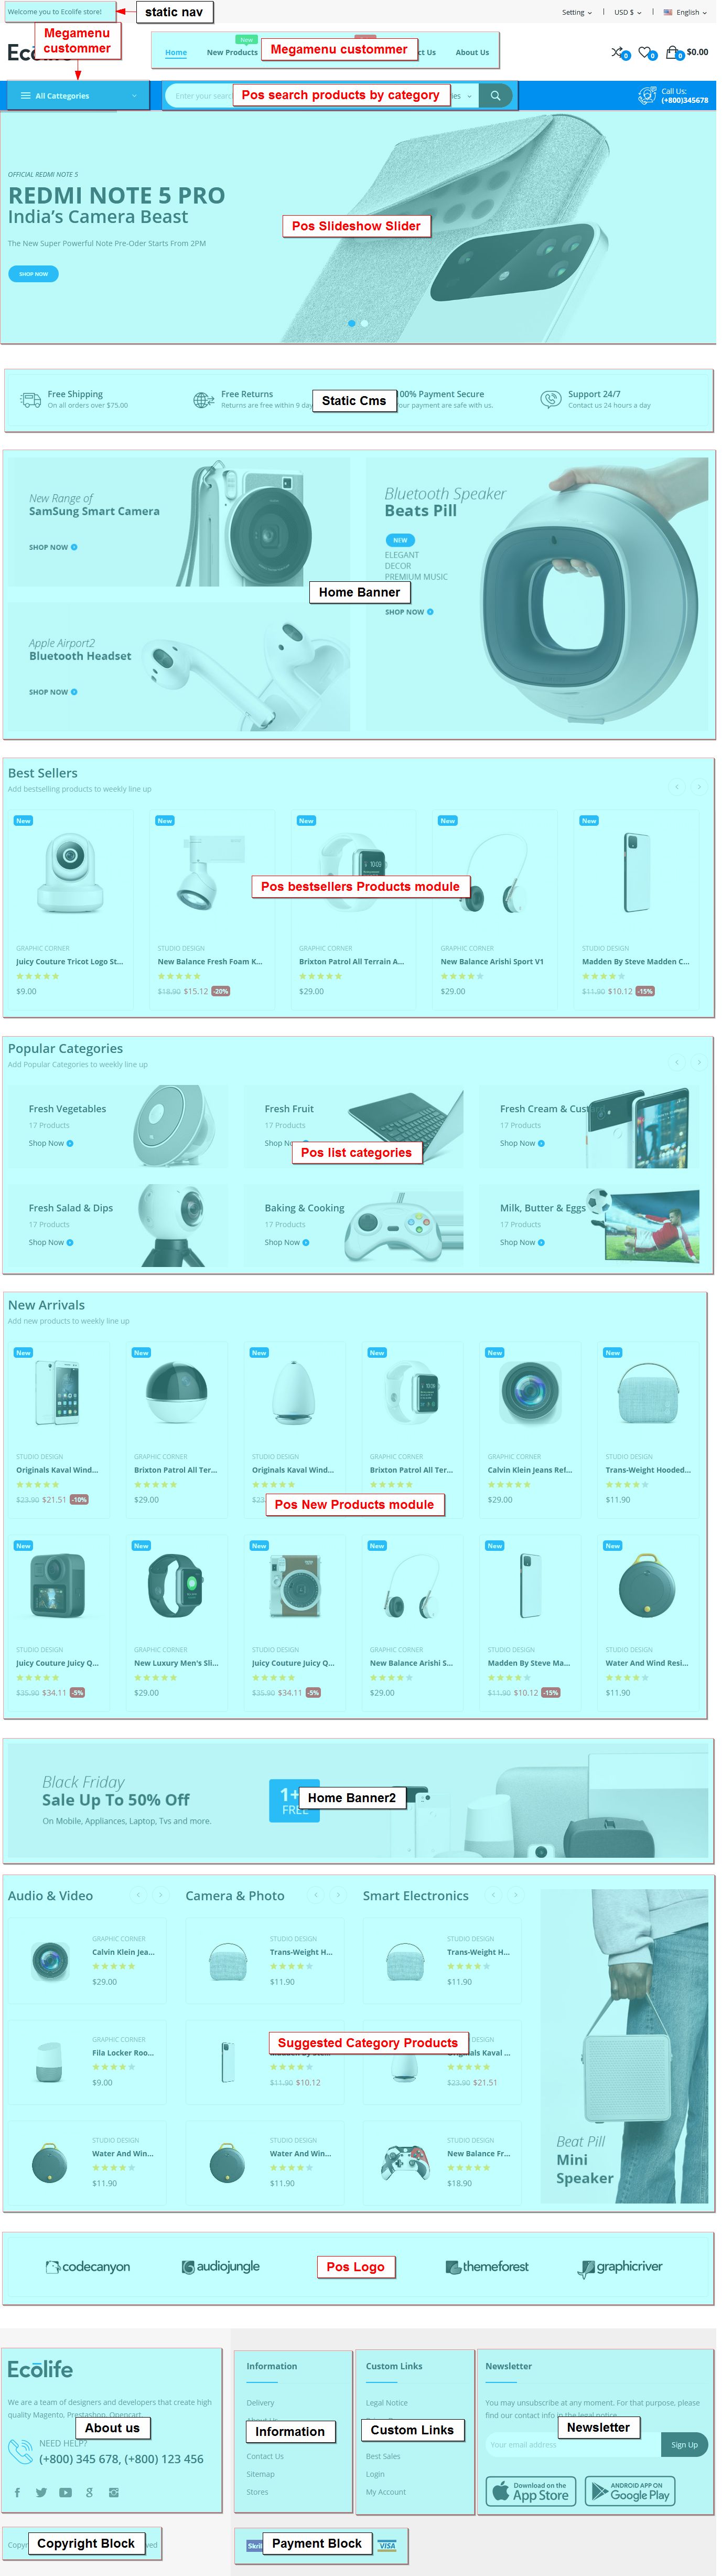
Category page
Details page
#Layout Ecolife Digital3
List of Modules
- Megamenu custommer
- Pos Slideshow Slider
- Product Tabs Slider
- Pos list categories
- Pos New Products module
- Suggested Category Products
- Pos Themeoptions
- Pos search products by category
- Rotator img
- Pos Logo
List of Pos Static Blocks
- static nav
- Home Banner
- Home Banner2
List of Pos Static Footer
- About us (included Social media follow links)
- Information (included Link List)
- Custom Links (included Link List)
- Newsletter(included Newsletter subscription)
- Copyright Block
- Payment Block
Home page
Category page
Details page
#Layout Ecolife Digital4
List of Modules
- Megamenu custommer
- Pos Slideshow Slider
- Category Tab Slider
- Pos list categories
- Pos New Products module
- Pos Special Products module
- Pos Countdown time price
- Suggested Category Products
- Pos Themeoptions
- Pos search products by category
- Rotator img
- Pos Logo
List of Pos Static Blocks
- static nav
- Static Cms
- Home Banner
- Home Banner2
List of Pos Static Footer
- About us (included Social media follow links)
- Information (included Link List)
- Custom Links (included Link List)
- Newsletter(included Newsletter subscription)
- Copyright Block
- Payment Block
Home page
Category page
Details page
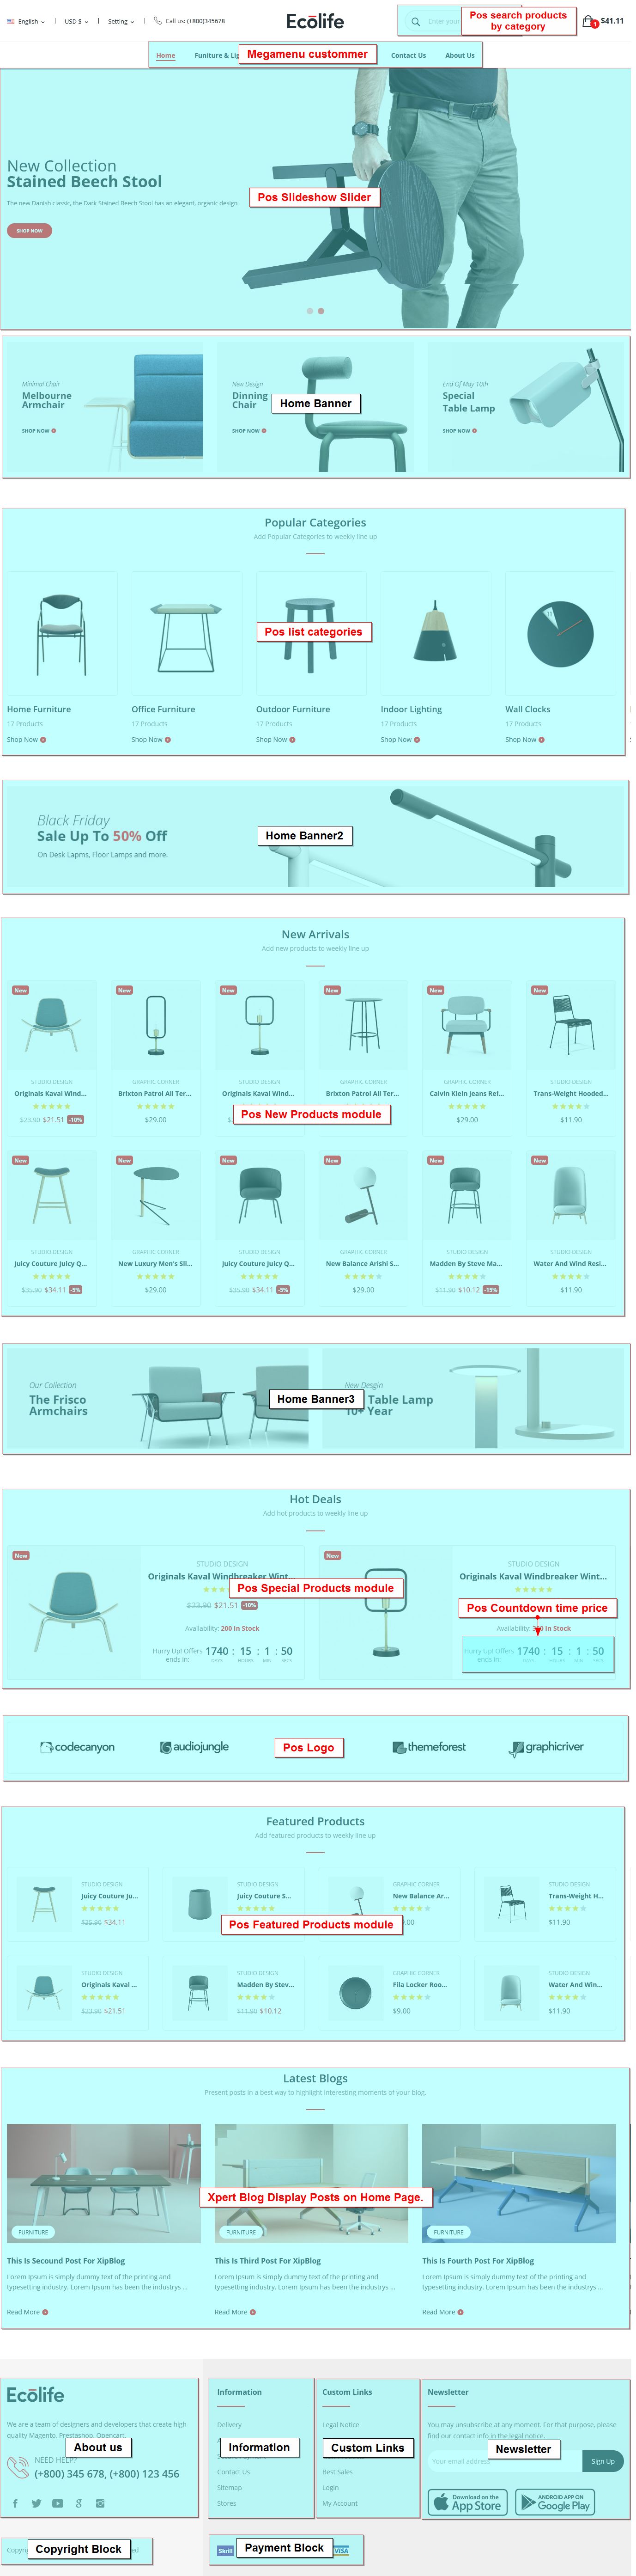
#Layout Ecolife Furniture1
List of Modules
- Megamenu custommer
- Pos Slideshow Slider
- Pos list categories
- Pos New Products module
- Pos Featured Products module
- Pos Special Products module
- Pos Countdown time price
- Pos Themeoptions
- Pos search products by category
- Rotator img
- Pos Logo
List of Pos Static Blocks
- Home Banner
- Home Banner2
- Home Banner3
List of Pos Static Footer
- About us (included Social media follow links)
- Information (included Link List)
- Custom Links (included Link List)
- Newsletter(included Newsletter subscription)
- Copyright Block
- Payment Block
Home page
Category page
Details page
#Layout Ecolife Furniture2
List of Modules
- Megamenu custommer
- Vertical Megamenu
- Pos Slideshow Slider
- Pos list categories
- Pos New Products module
- Suggested Category Products
- Pos Themeoptions
- Pos search products by category
- Rotator img
- Pos Logo
List of Pos Static Blocks
- static nav
- Home Banner
List of Pos Static Footer
- About us (included Social media follow links)
- Information (included Link List)
- Custom Links (included Link List)
- Newsletter(included Newsletter subscription)
- Copyright Block
- Payment Block
Home page
Category page

Details page
#Layout Ecolife Furniture3
List of Modules
- Megamenu custommer
- Pos Slideshow Slider
- Category Tab Slider
- Pos Featured Products module
- Pos Themeoptions
- Pos search products by category
- Rotator img
- Pos Logo
List of Pos Static Blocks
- static nav
- Home Banner
- Home Banner2
- countdown static
List of Pos Static Footer
- About us (included Social media follow links)
- Information (included Link List)
- Custom Links (included Link List)
- Newsletter(included Newsletter subscription)
- Copyright Block
- Payment Block
Home page
Category page
Details page
#Layout Ecolife Furniture4
List of Modules
- Megamenu custommer
- Pos Slideshow Slider
- Category Tab Slider
- Pos New Products module
- Suggested Category Products
- Pos Themeoptions
- Pos search products by category
- Rotator img
- Pos Logo
List of Pos Static Blocks
- static nav
- Home Banner
- Home Banner2
- countdown static
List of Pos Static Footer
- About us (included Social media follow links)
- Information (included Link List)
- Custom Links (included Link List)
- Newsletter(included Newsletter subscription)
- Copyright Block
- Payment Block
Home page
Category page

Details page
Upload your store logo and icon
- Login your prestashop admin
-
Go to Design > Theme & Logo

- Upload Header logo, Mail logo, Invoice logo or Favicon then click "Save"
How to edit contact information on header
- Login your prestashop admin
- Navigate to Shop Parameters > Contact
- Choose tab Stores. At CONTACT DETAILS section, edit contact information of your store
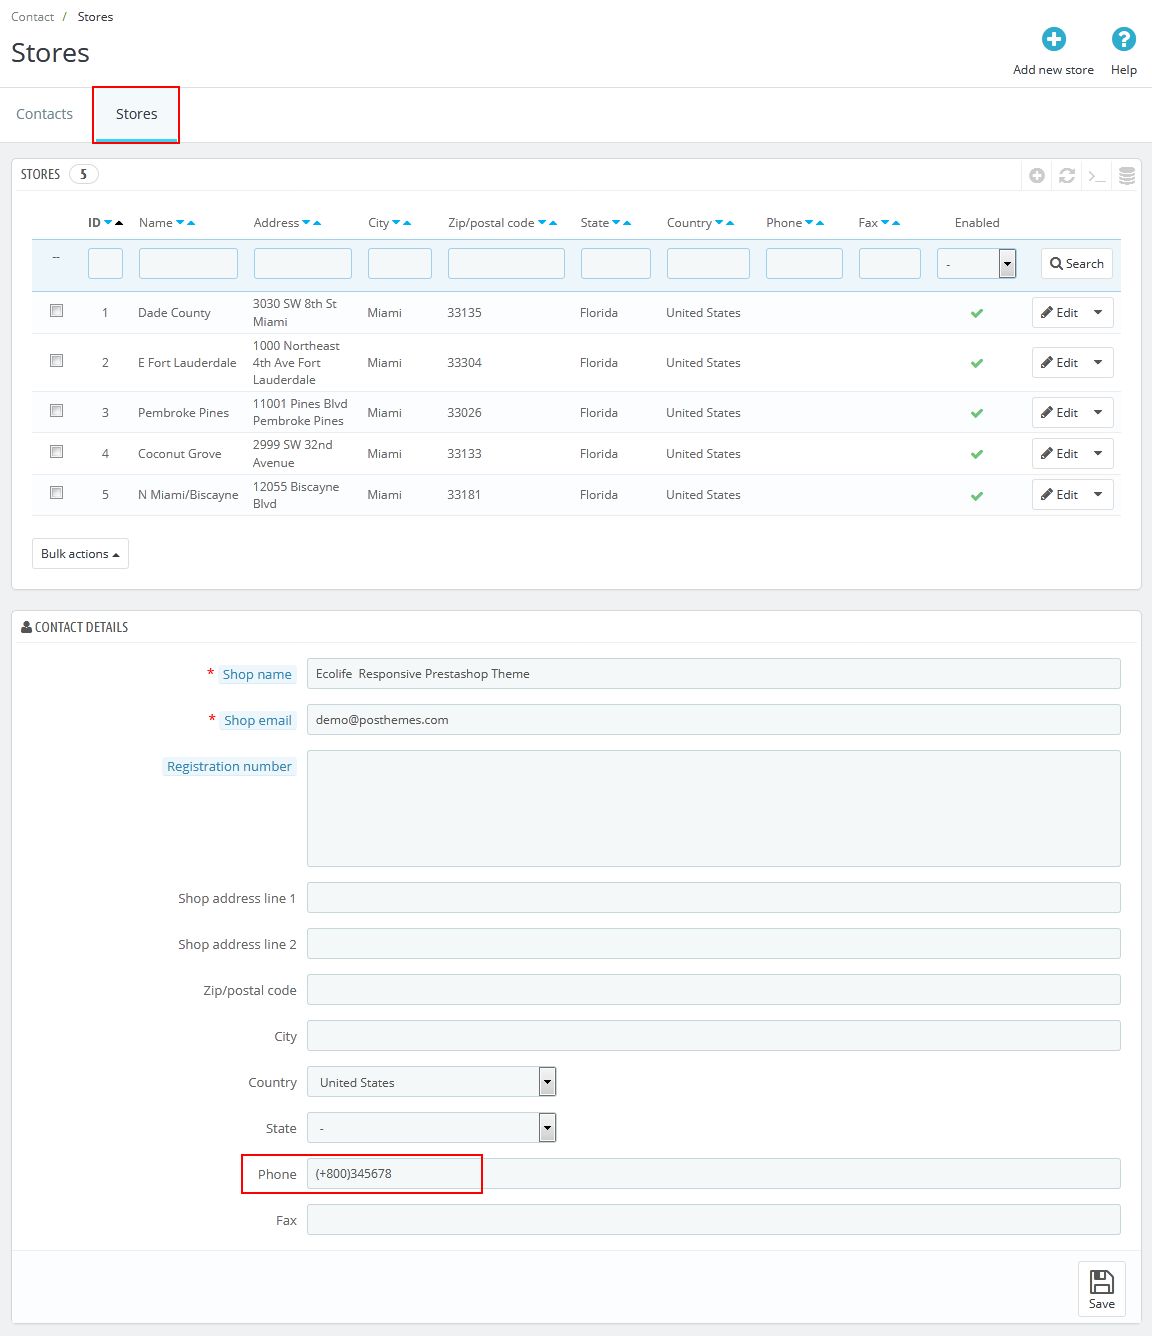
- Click “Save” button to save changes
How to display related products on product detail page
- Login your prestashop admin
-
Go to Catalog > Products
-
Choose item you want to edit, click

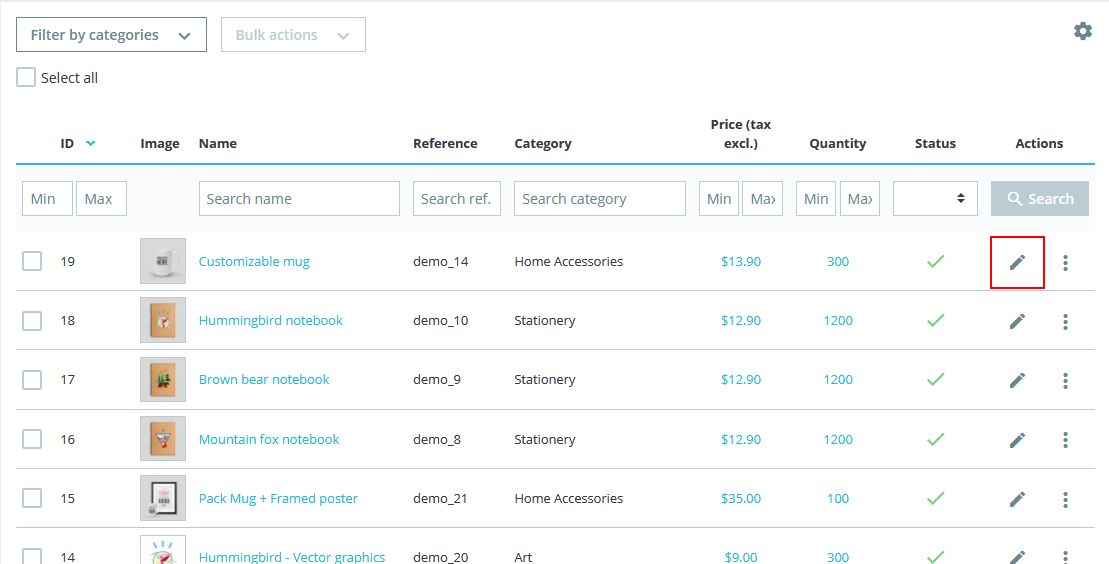
- At tab Basic settings, then click Add a related product button
-
Then search and add a related product
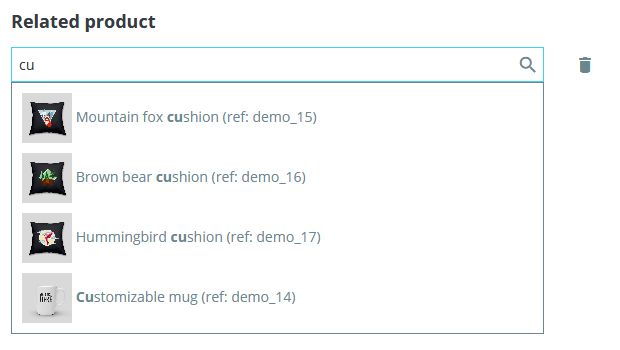
- Click “Save” button when you finish.
Module Config
Name and position of the modules are shown in layout.
General Configuration
- Login your Prestashop admin
-
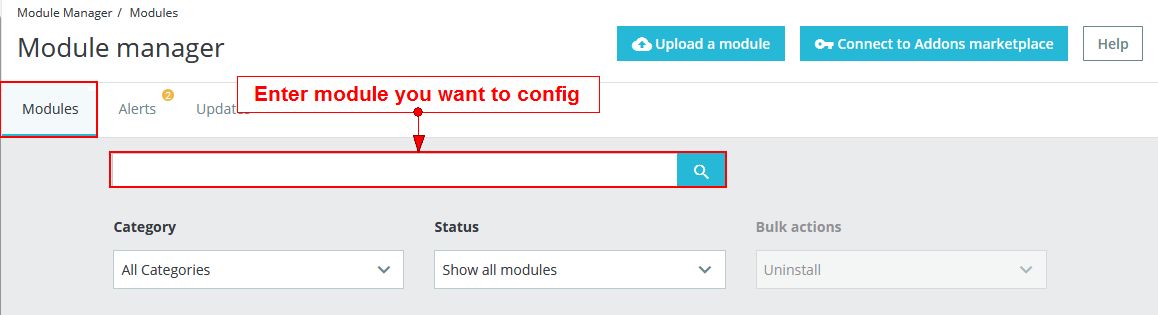
Go to Modules > Modules Manager
-
Choose “Installed modules” tab
-
On selected module, click "Configure" button.
You will get a form with parameters of the module. Let's change the specified parameter with one suitable for your theme.
- Click “Update” button to save config.
Posthemes Module Configuration
Below is a list of all modules in Ecolife theme. Click on the name of module you want to read configuration guide.
- Megamenu custommer
- Vertical Megamenu
- Pos Slideshow Slider
- Pos list categories
- Pos list category products
- Pos Special Products module
- Pos Countdown time price
- Pos Featured Products module
- Pos New Products module
- Pos bestsellers Products module
- Pos recommended products
- Suggested Category Products
- Category Tab Slider
- Product Tabs Slider
- Pos Static Blocks
- Pos Static Footer
- Pos Themeoptions
- Pos search products by category
- Rotator img
- Pos Logo
- Pos Testimonials
Other modules
Included external modules (3rd party developers) and Prestashop module
- Xpert Blog Display Posts on Home Page
- About Xpert Blog Display Posts on Home Page module
- Login your prestashop admin
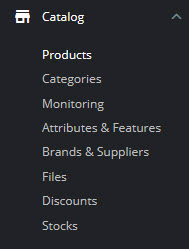
- Go to Xpert Blog
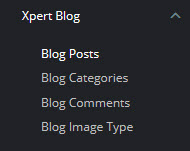
- Blog Posts : Add, Delete or Edit Posts of Blog
- Blog Categories : Add, Delete or Edit Categories of Blog
- Blog Comments : Manage Comments
- Blog Image Type : Manage type of images
- Add Blog Post
- Login your prestashop admin
- Go to Xpert Blog > Blog Posts

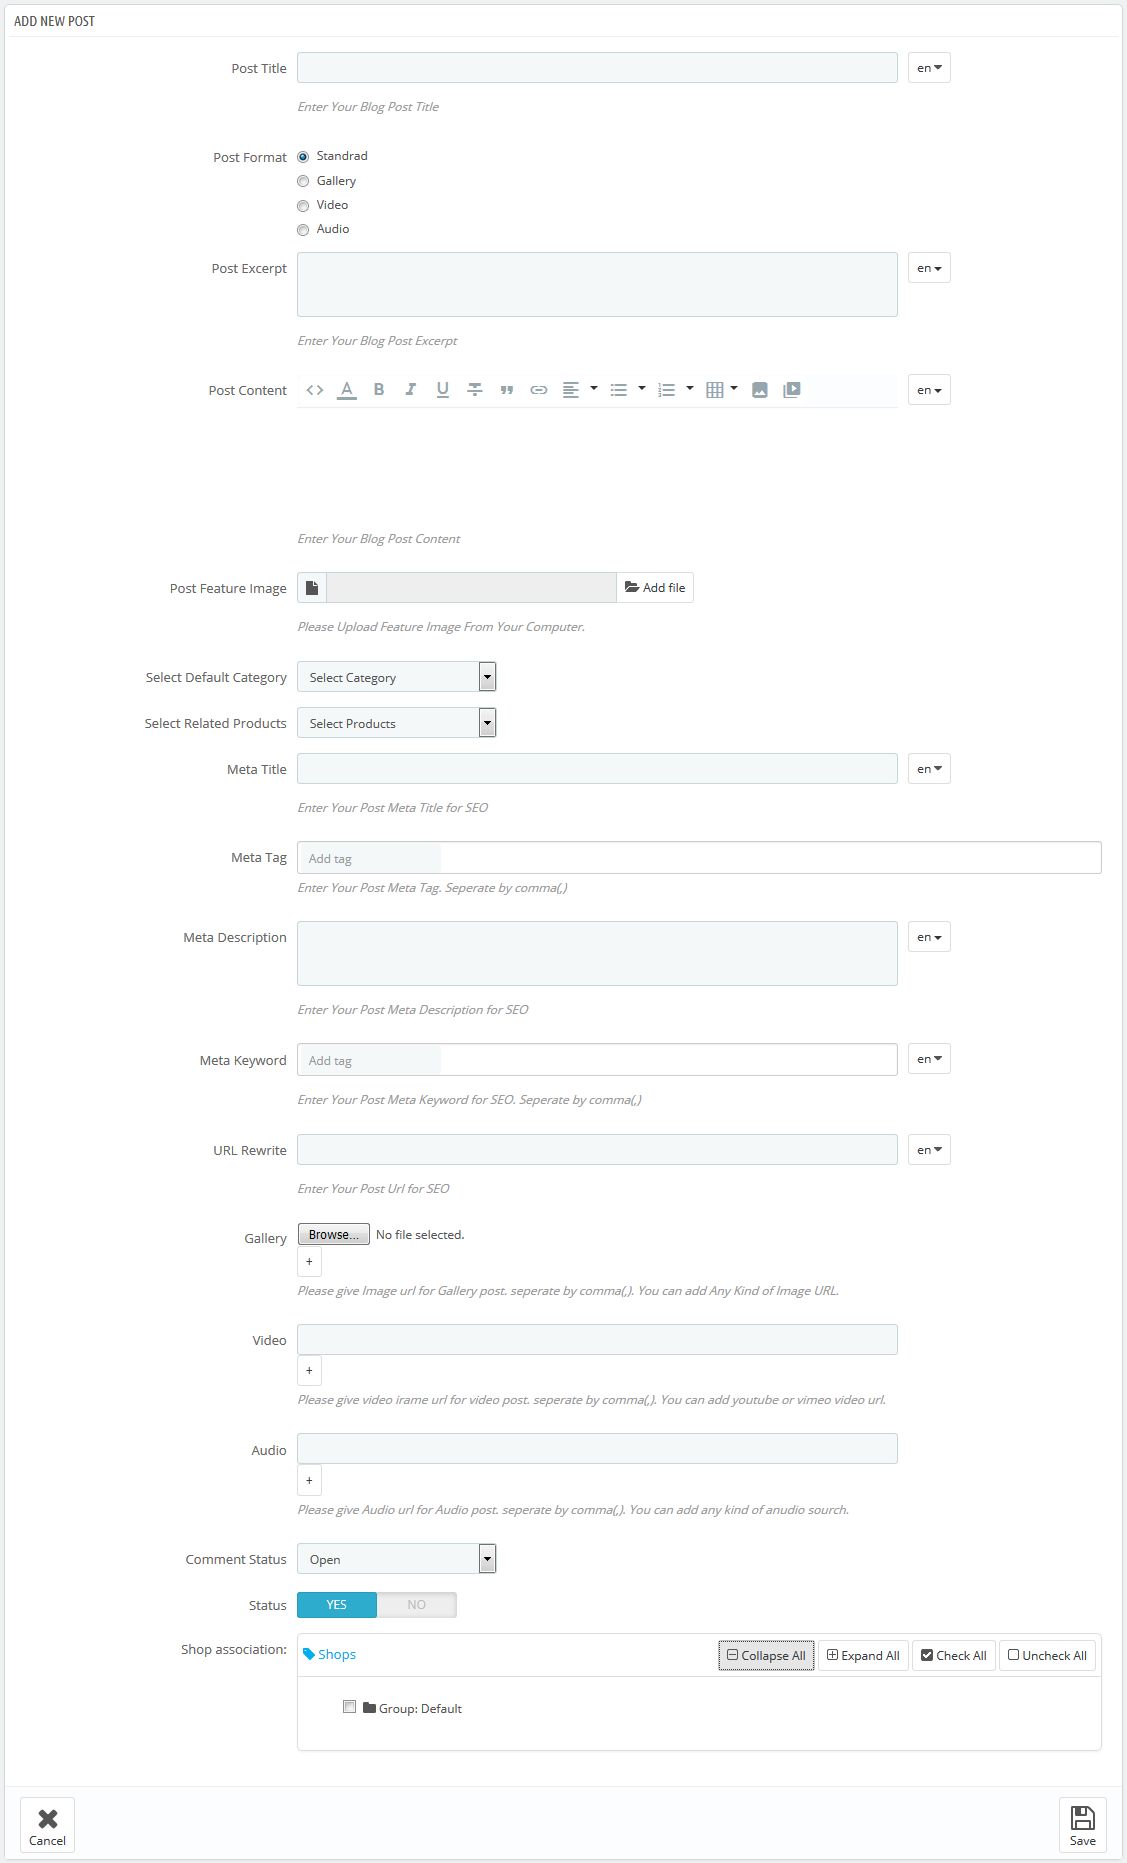
- Click “Save” button when you finish.
- Edit Blog Post
- Login your prestashop admin
- Go to Xpert Blog > Blog Posts
- Choose item you want to edit, click Edit
- Then edit
- Click “Save” button when you finish.
- About Xpert Blog Display Posts on Home Page module
- Newsletter subscription
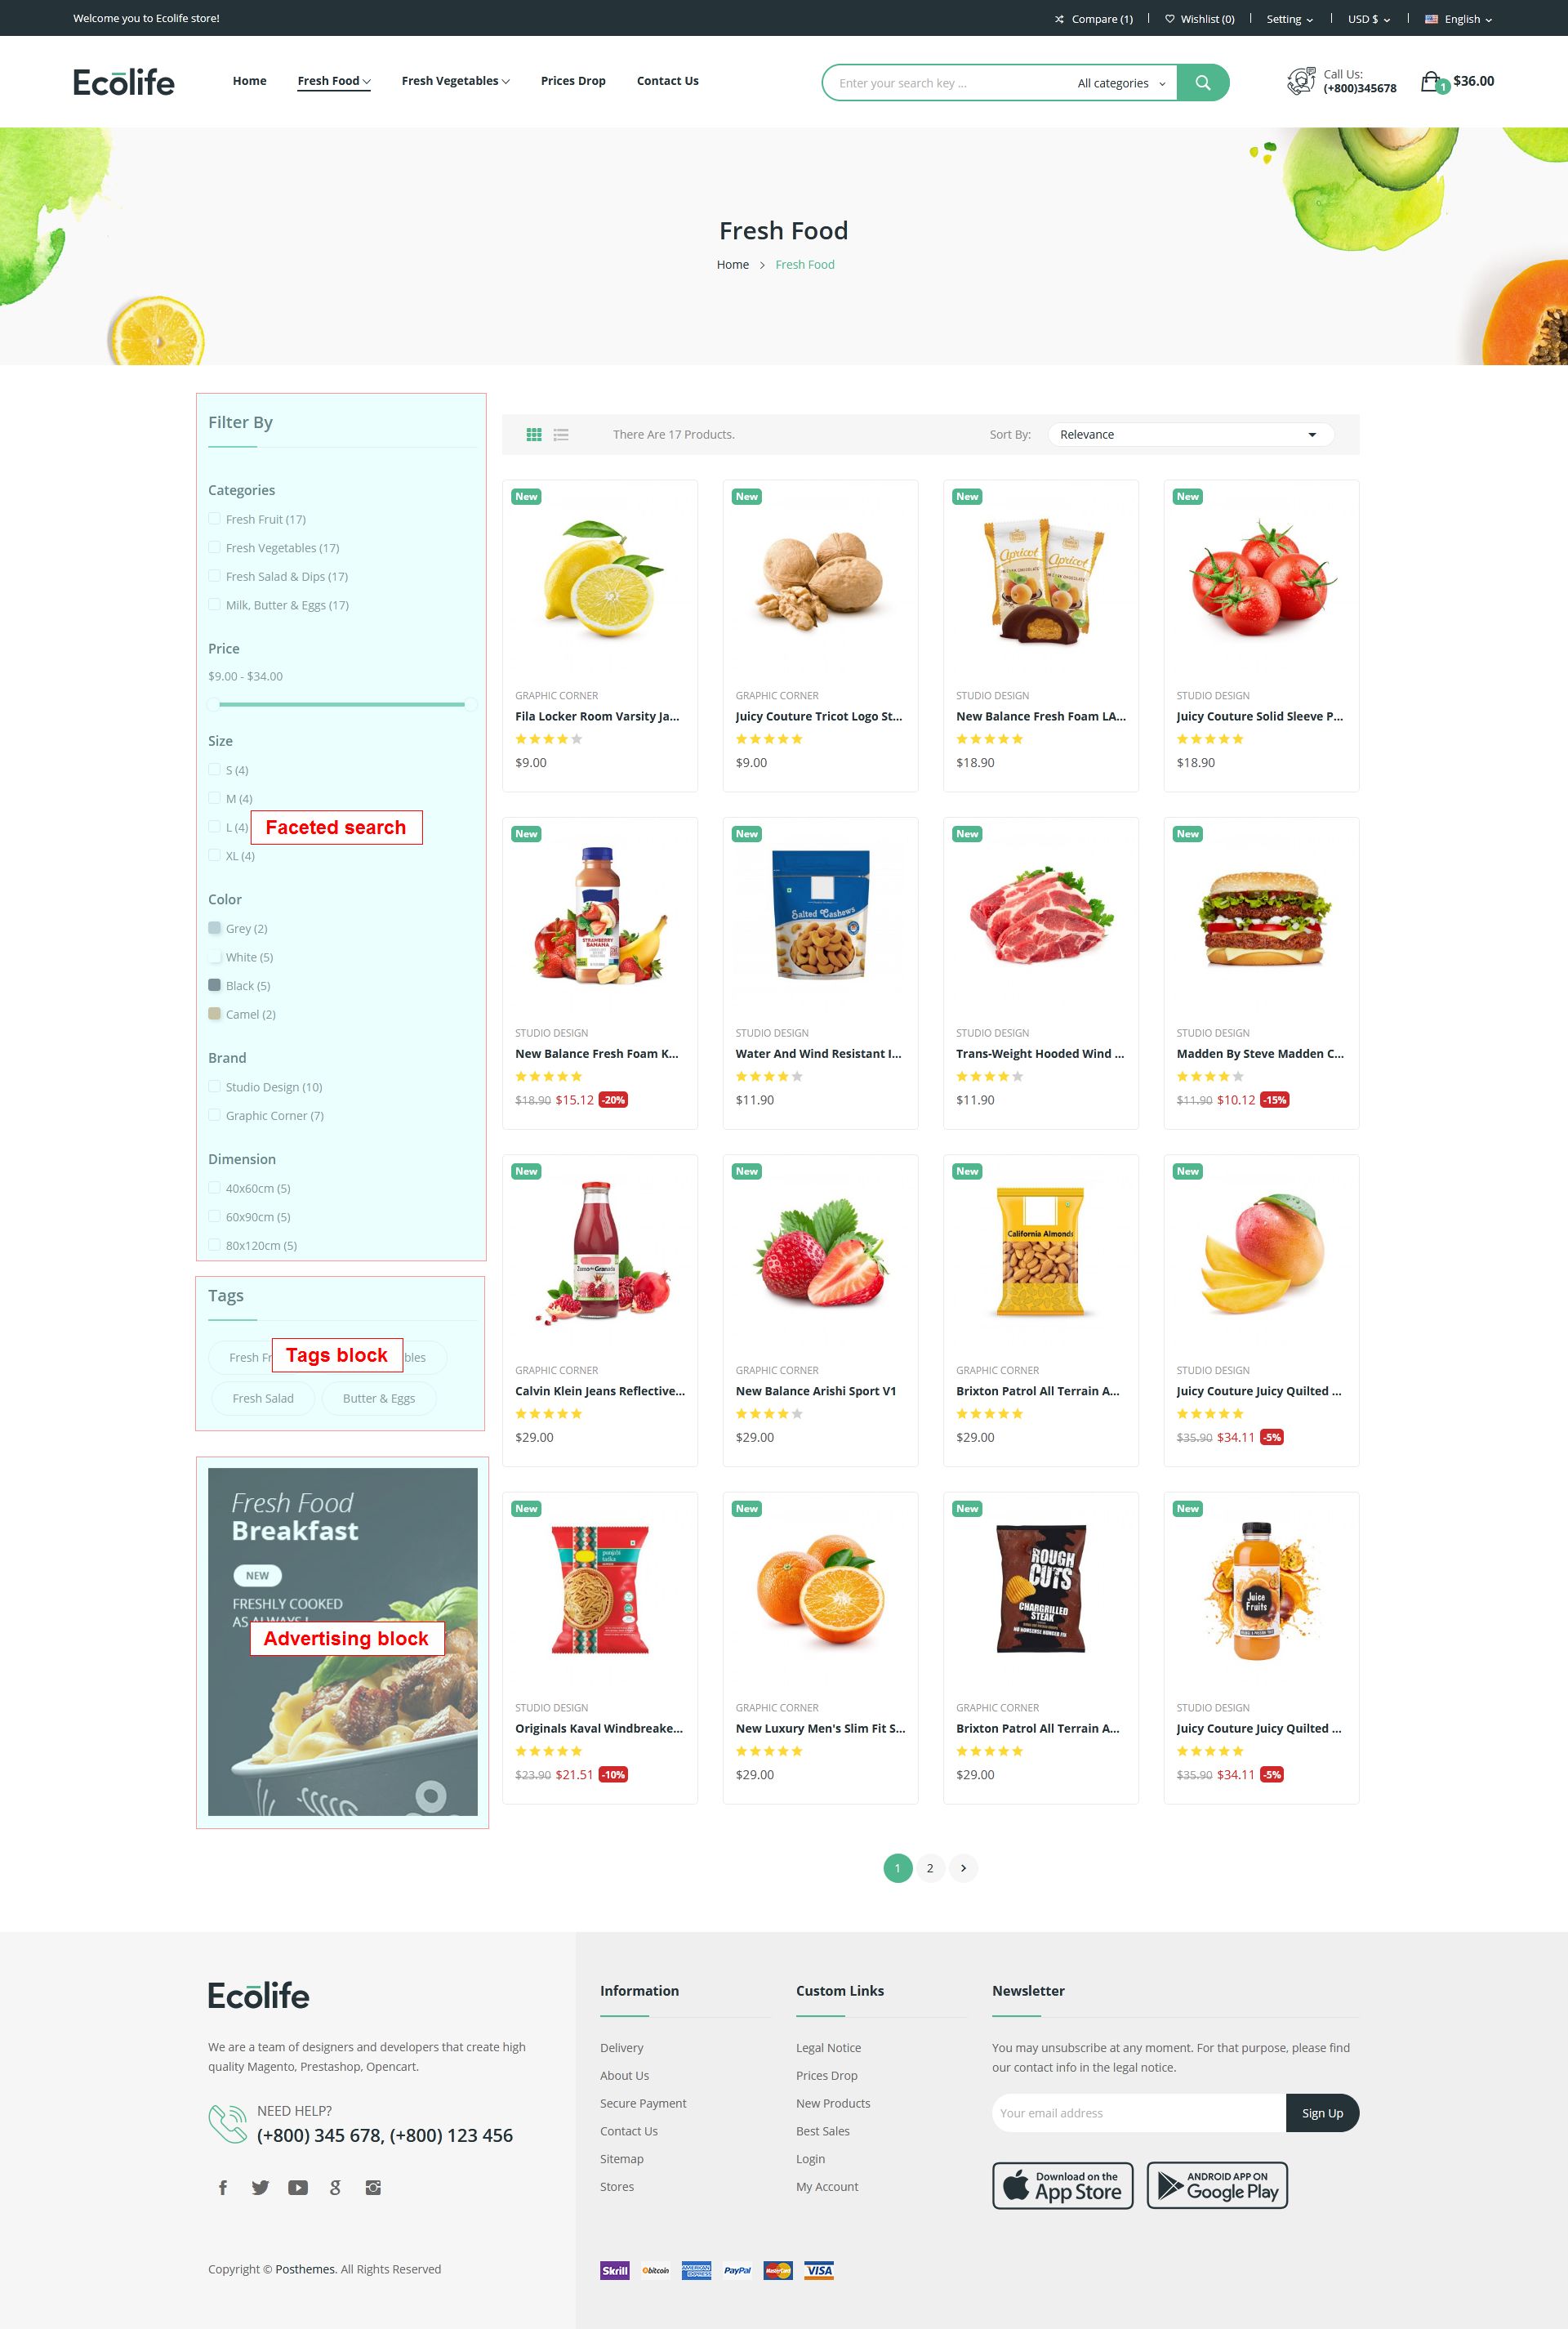
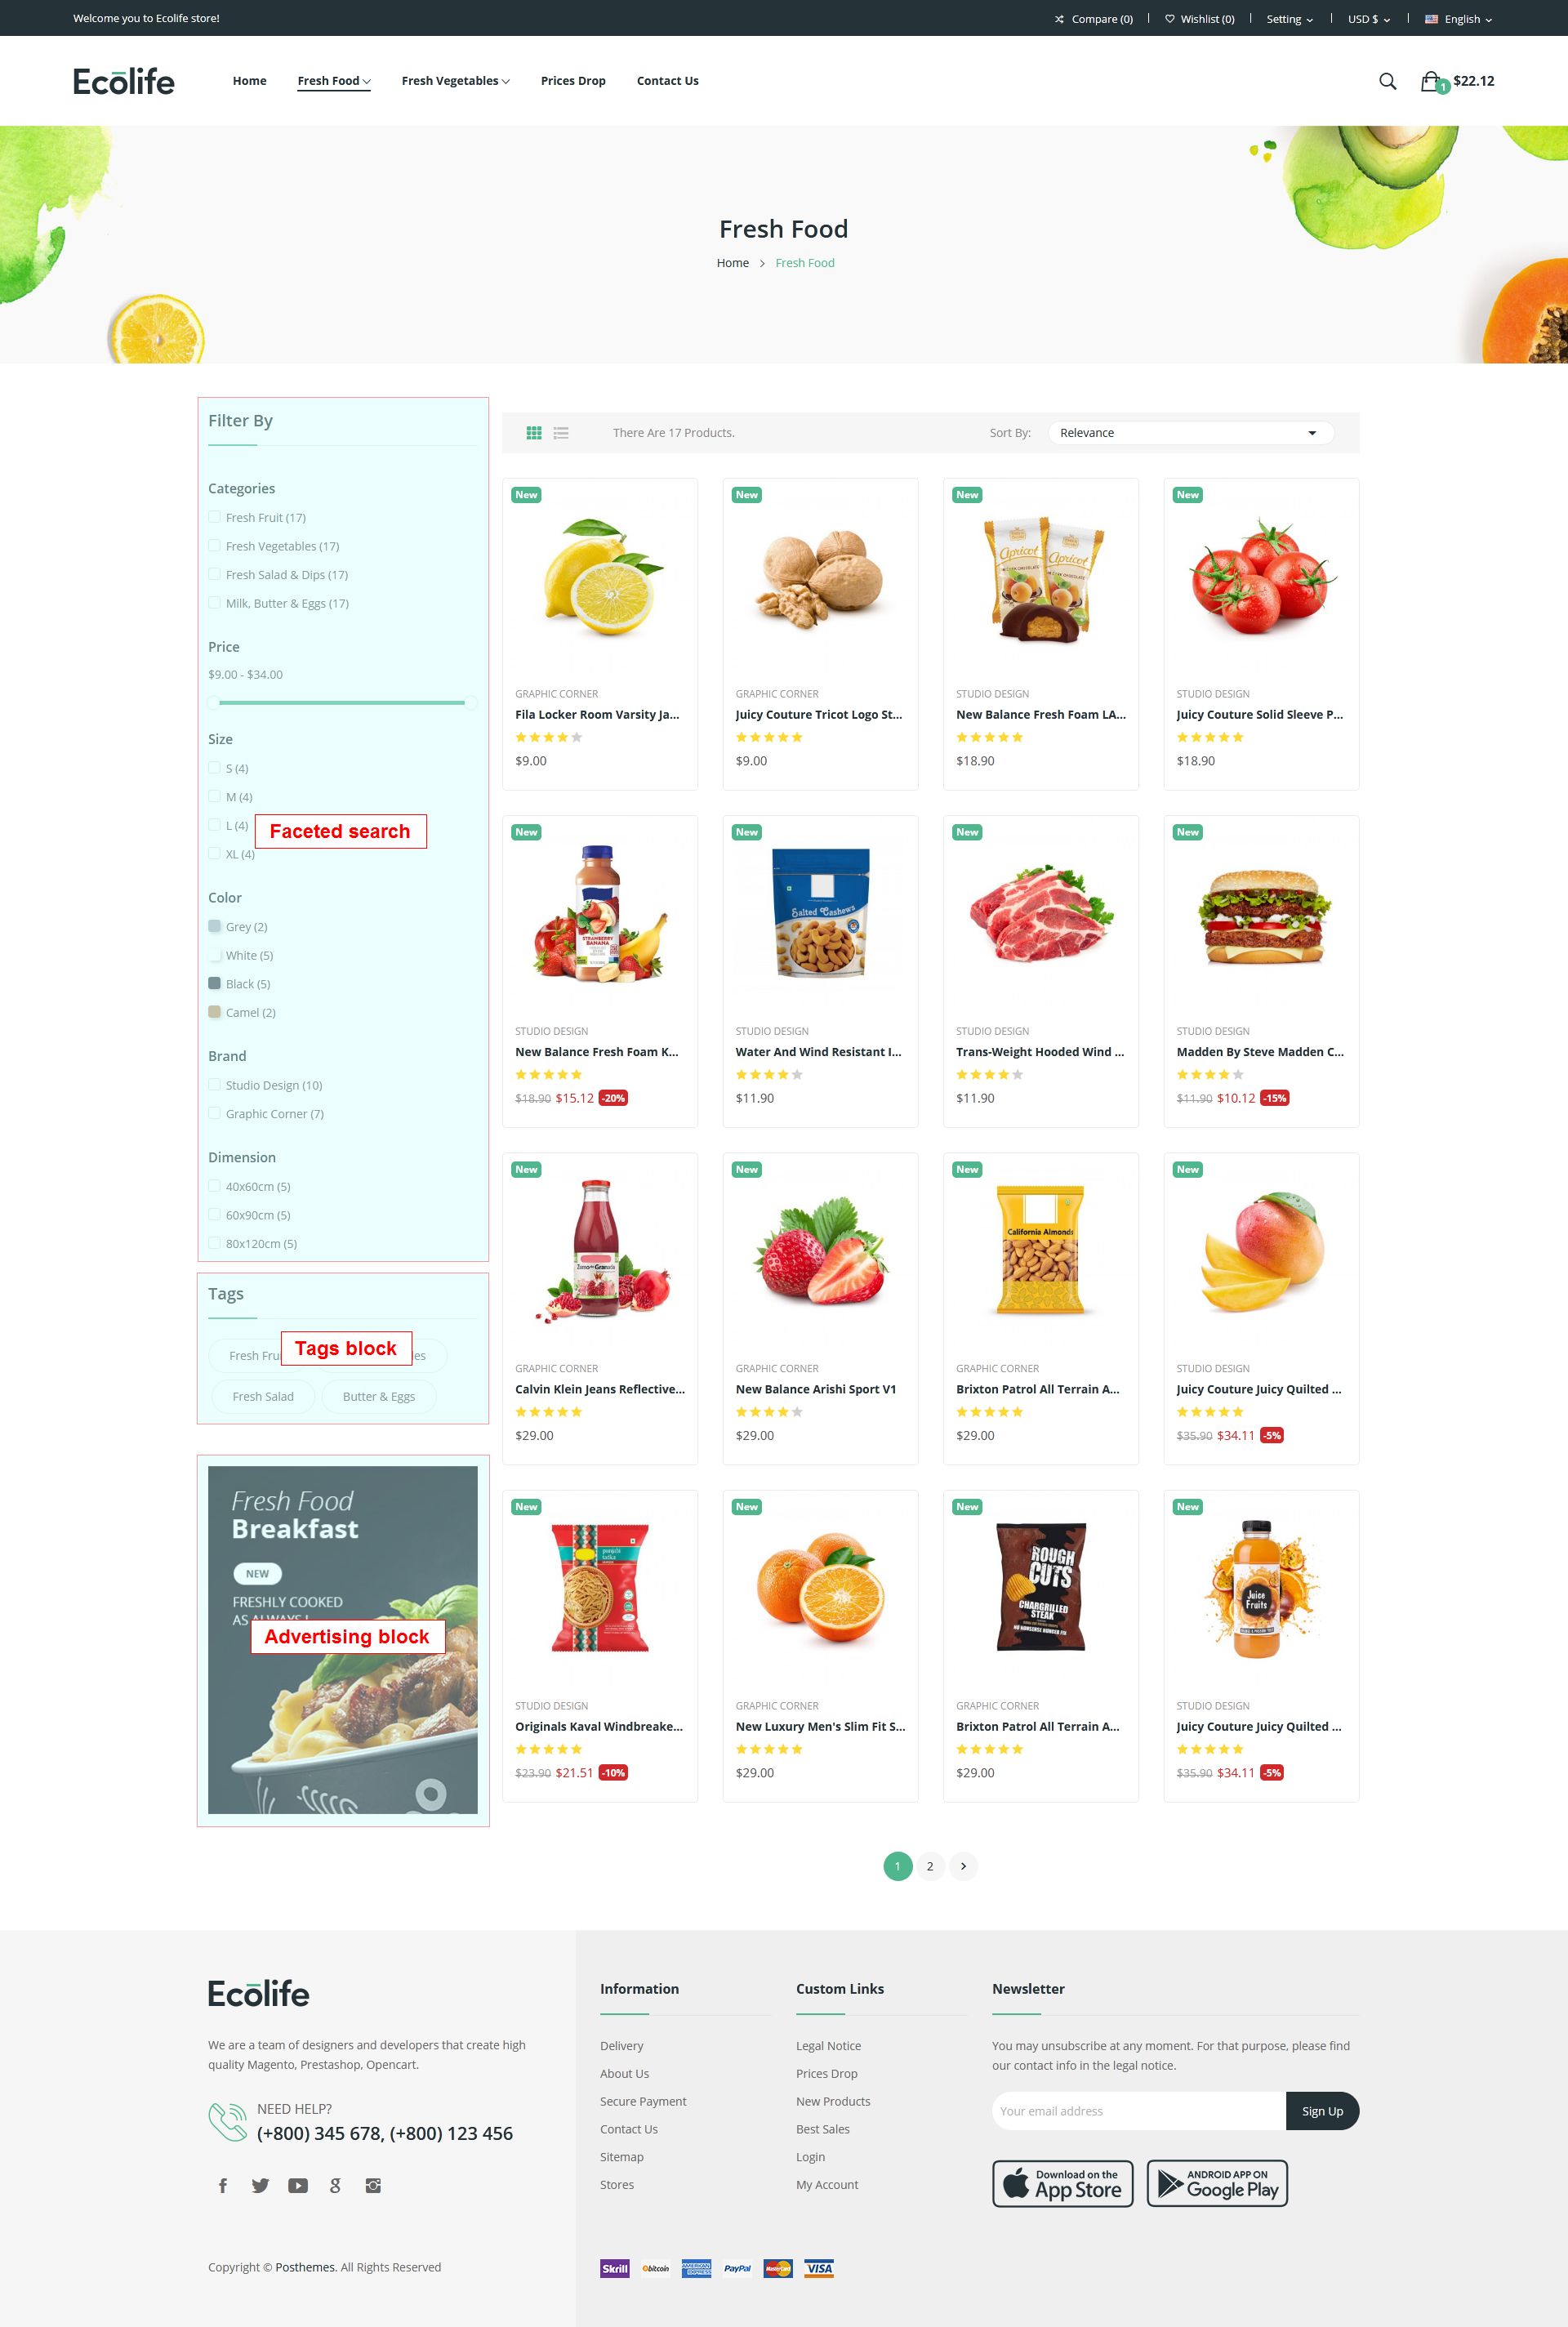
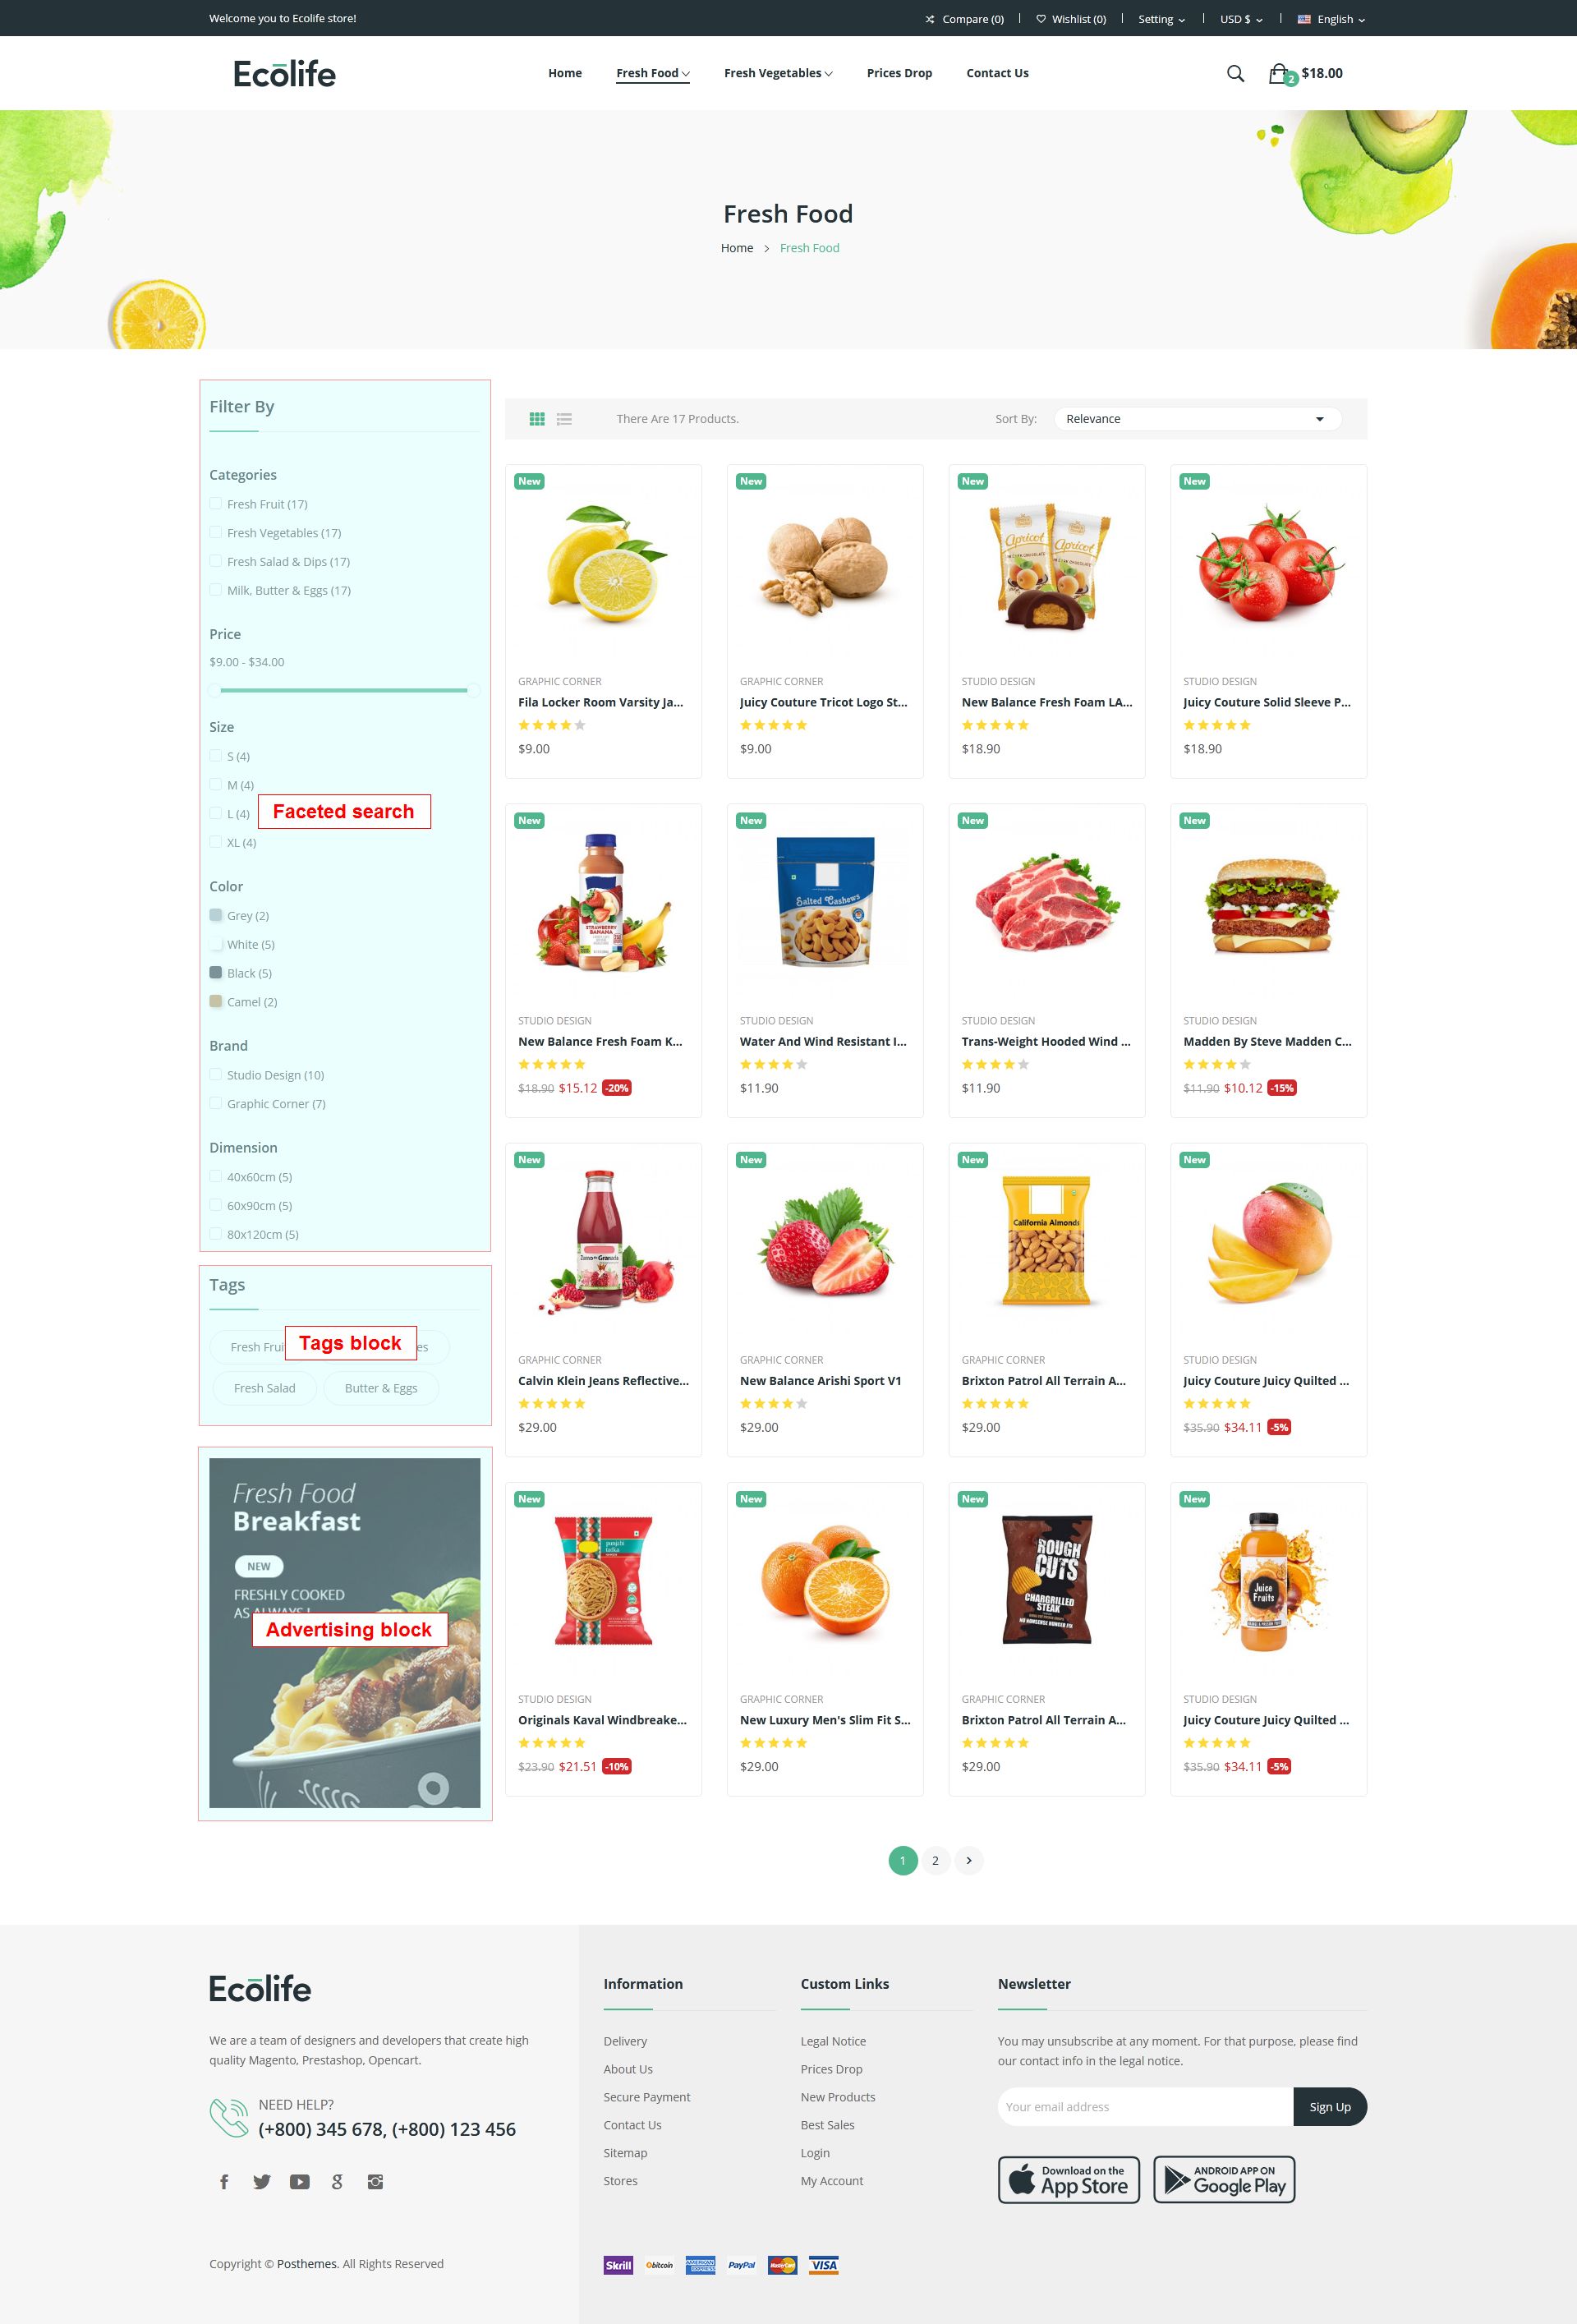
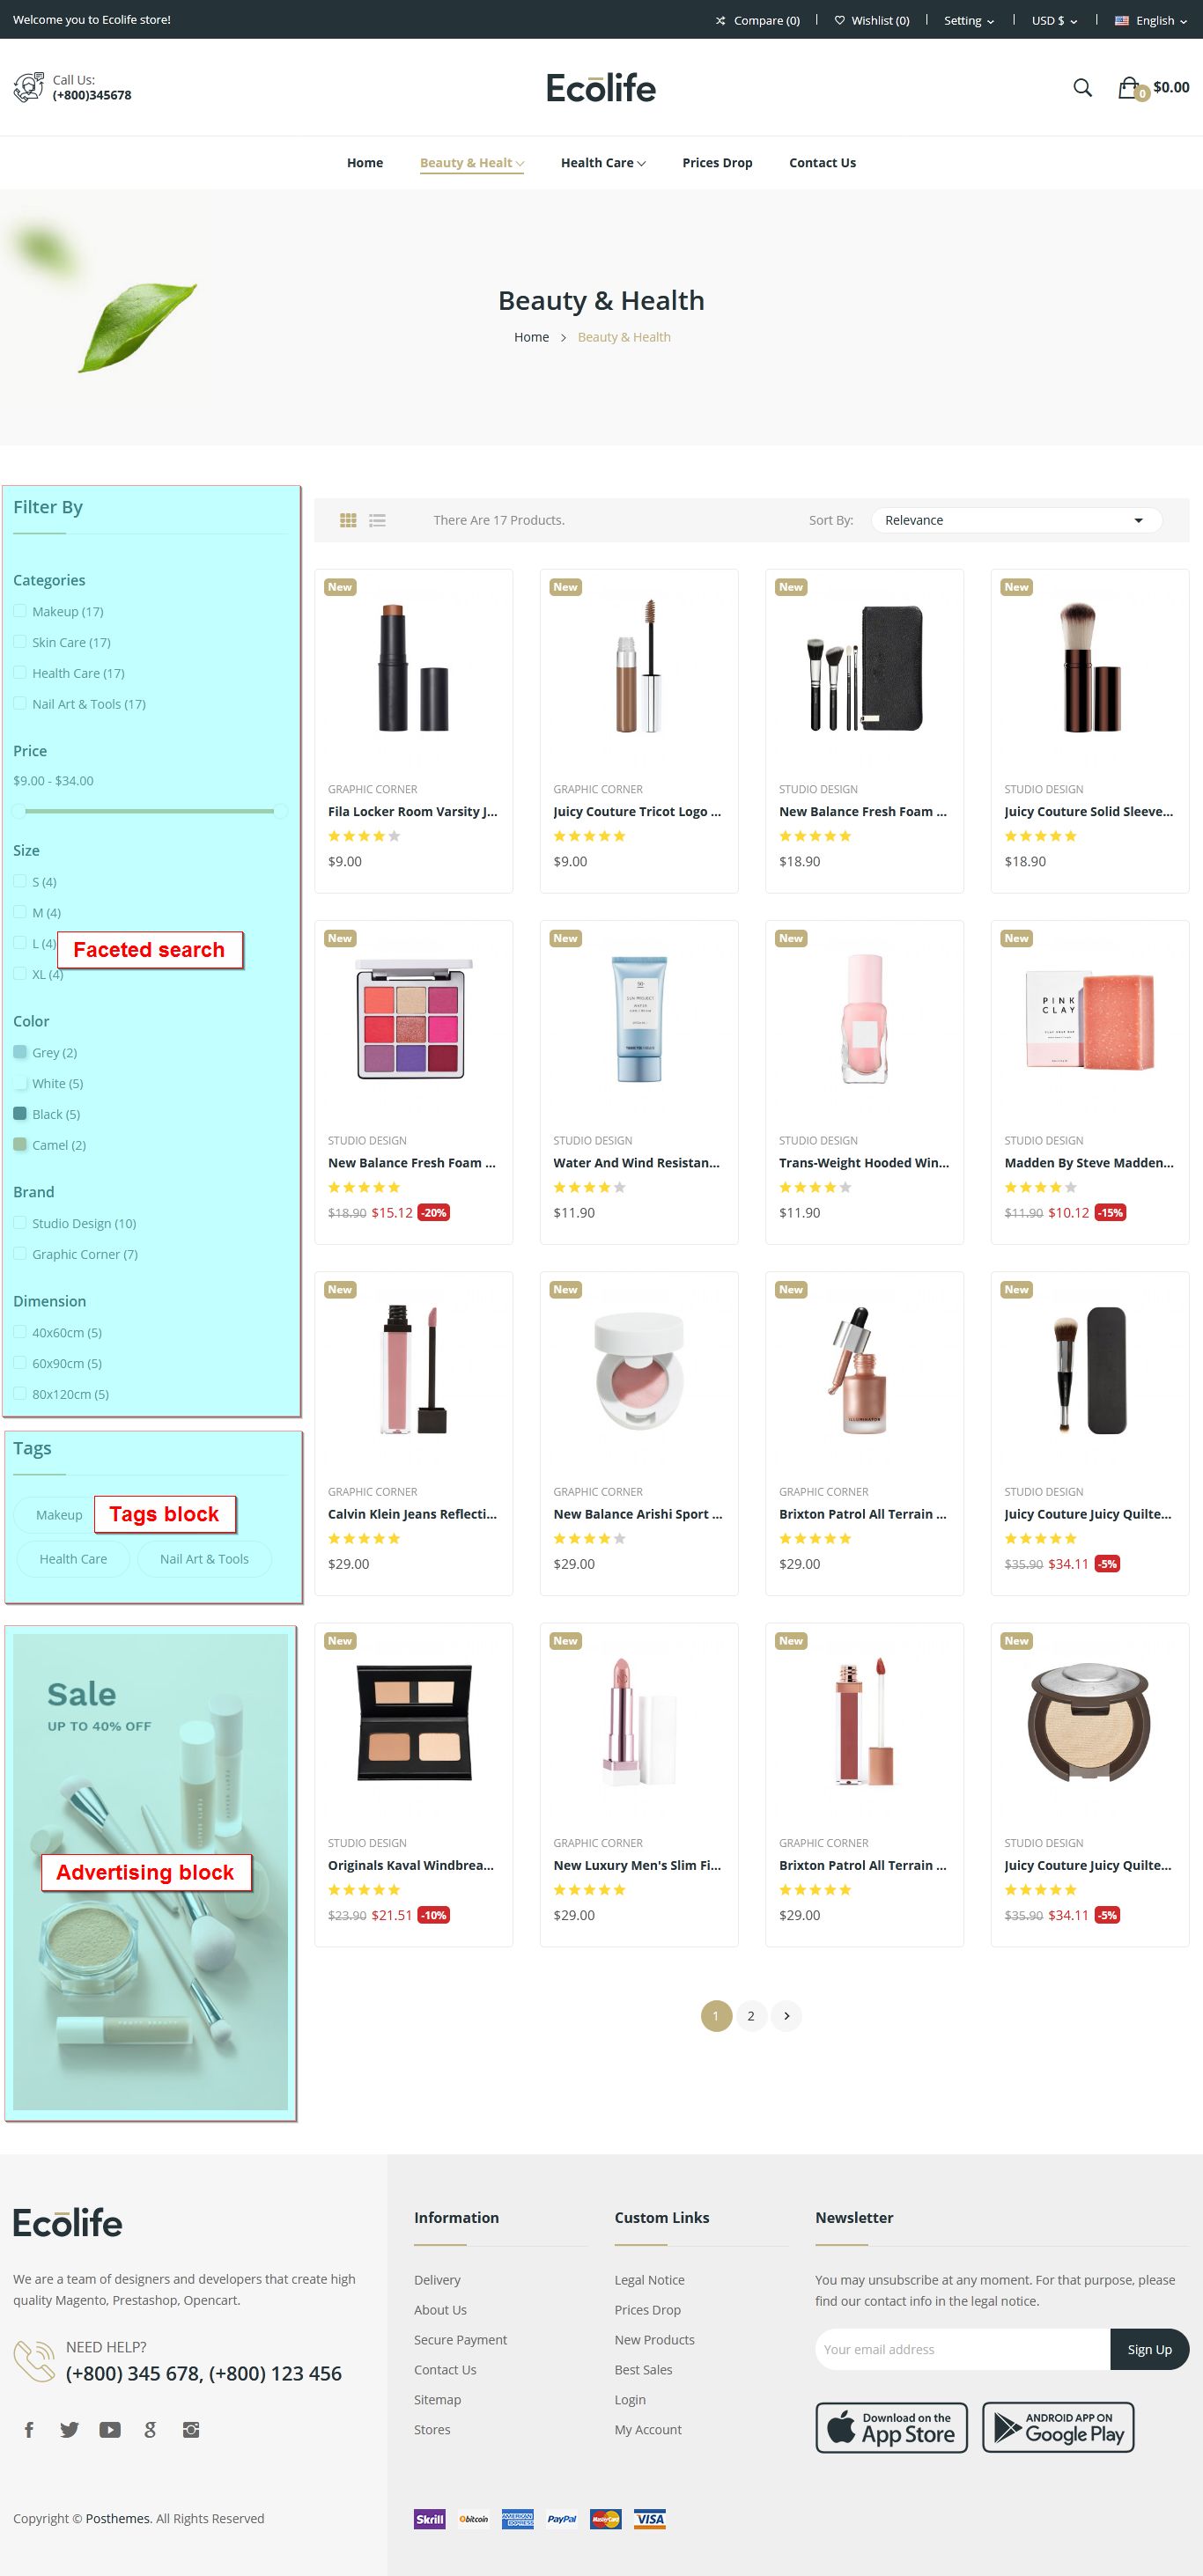
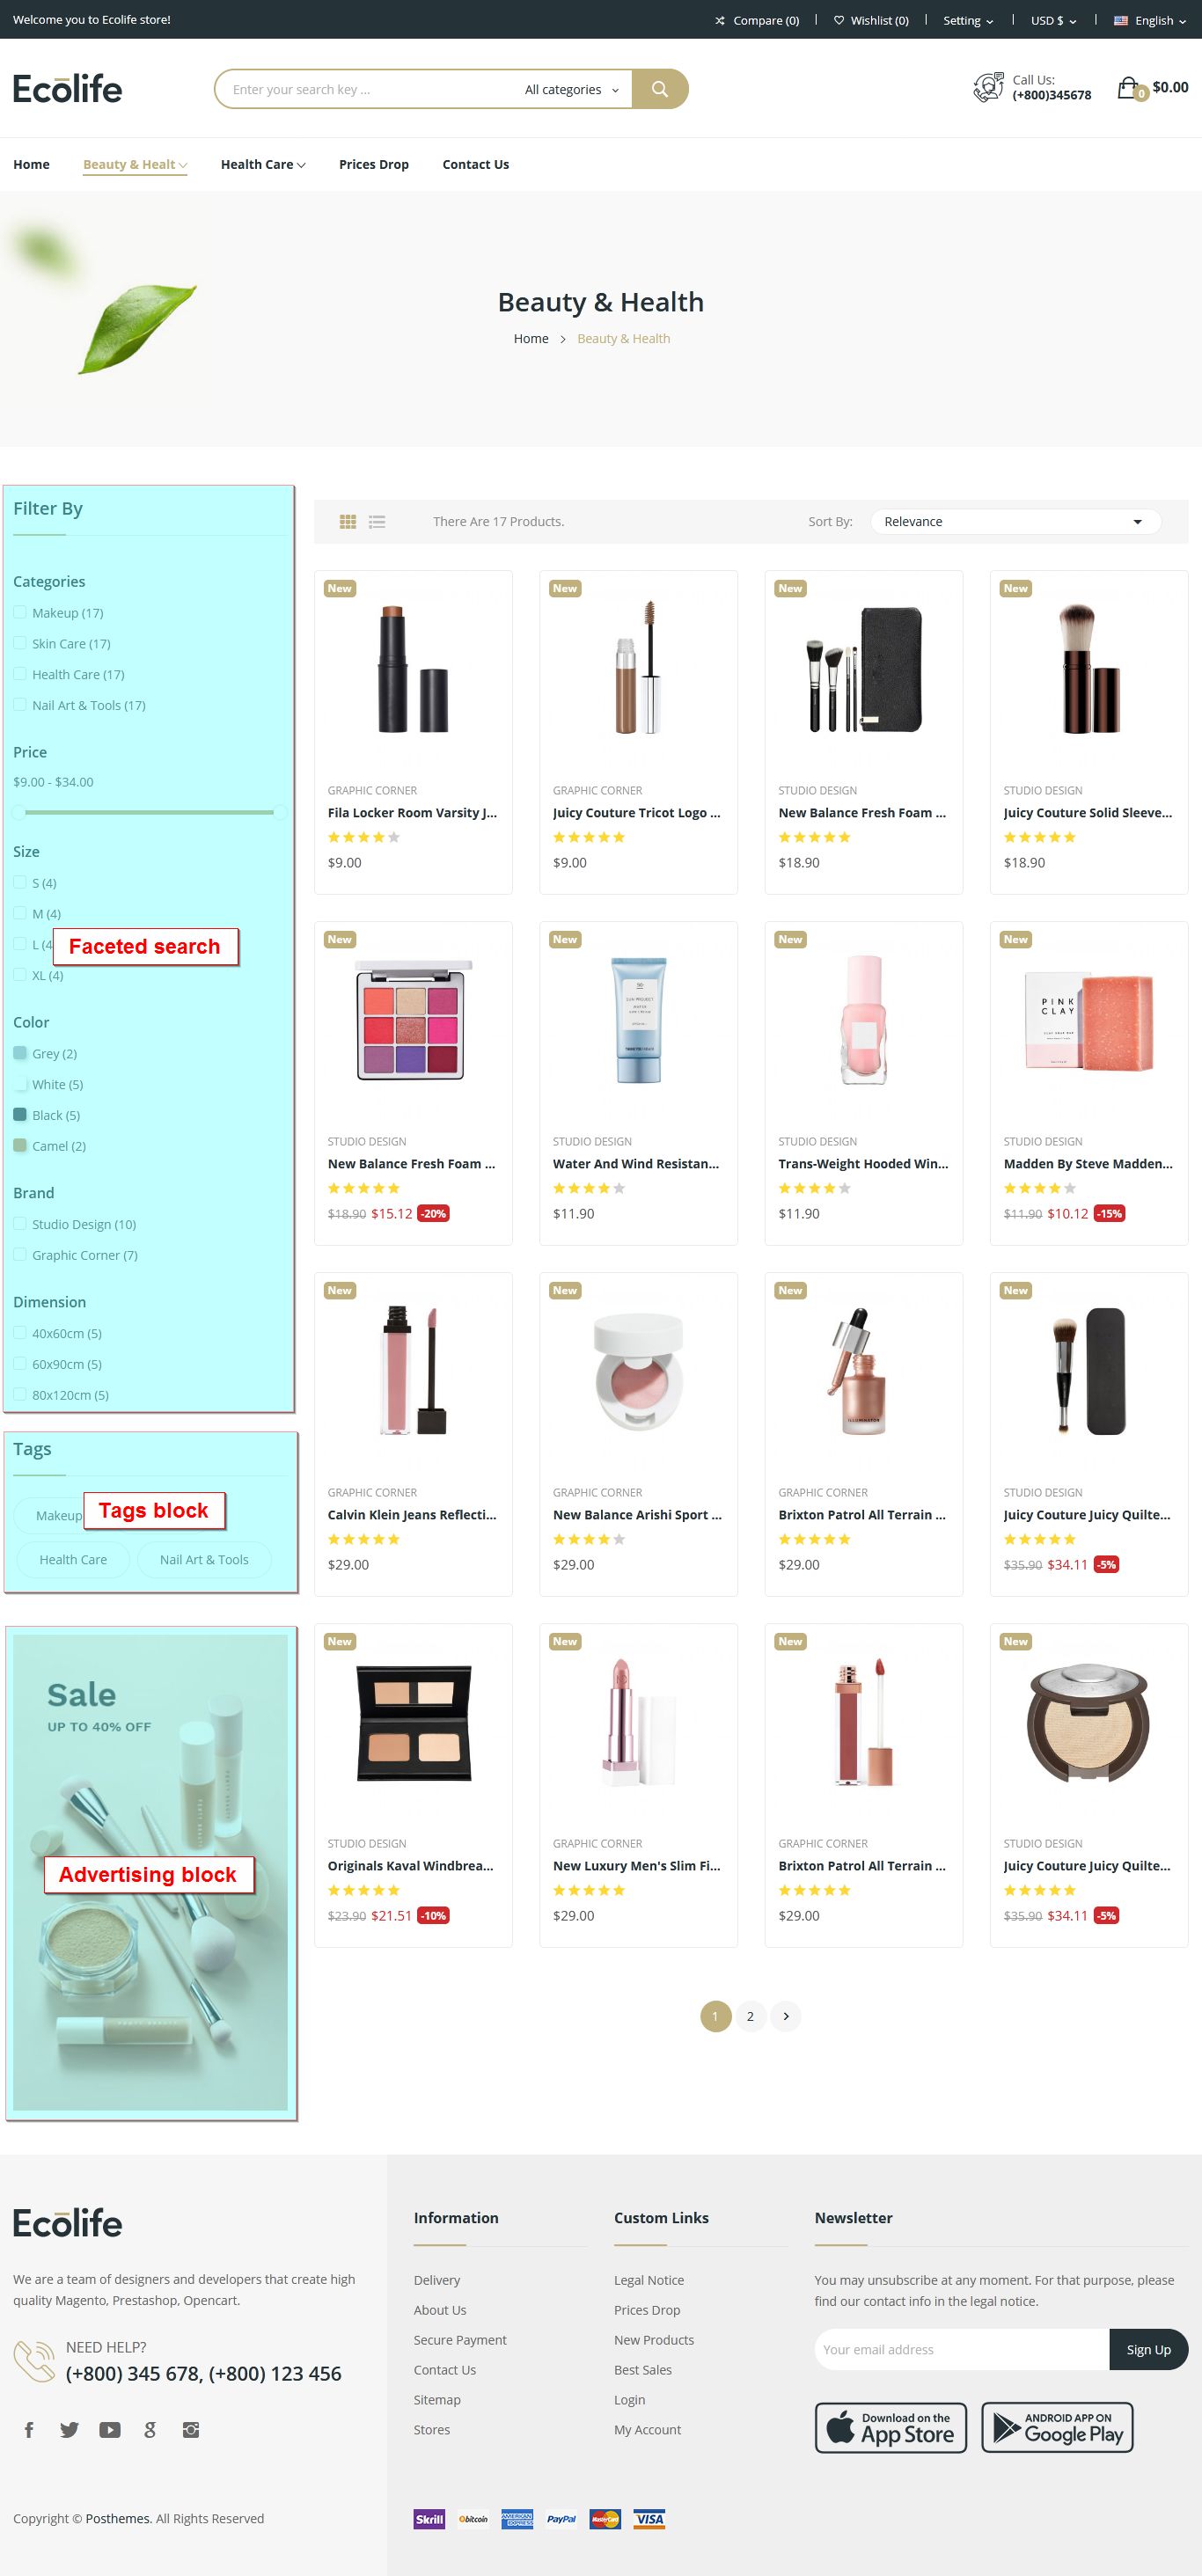
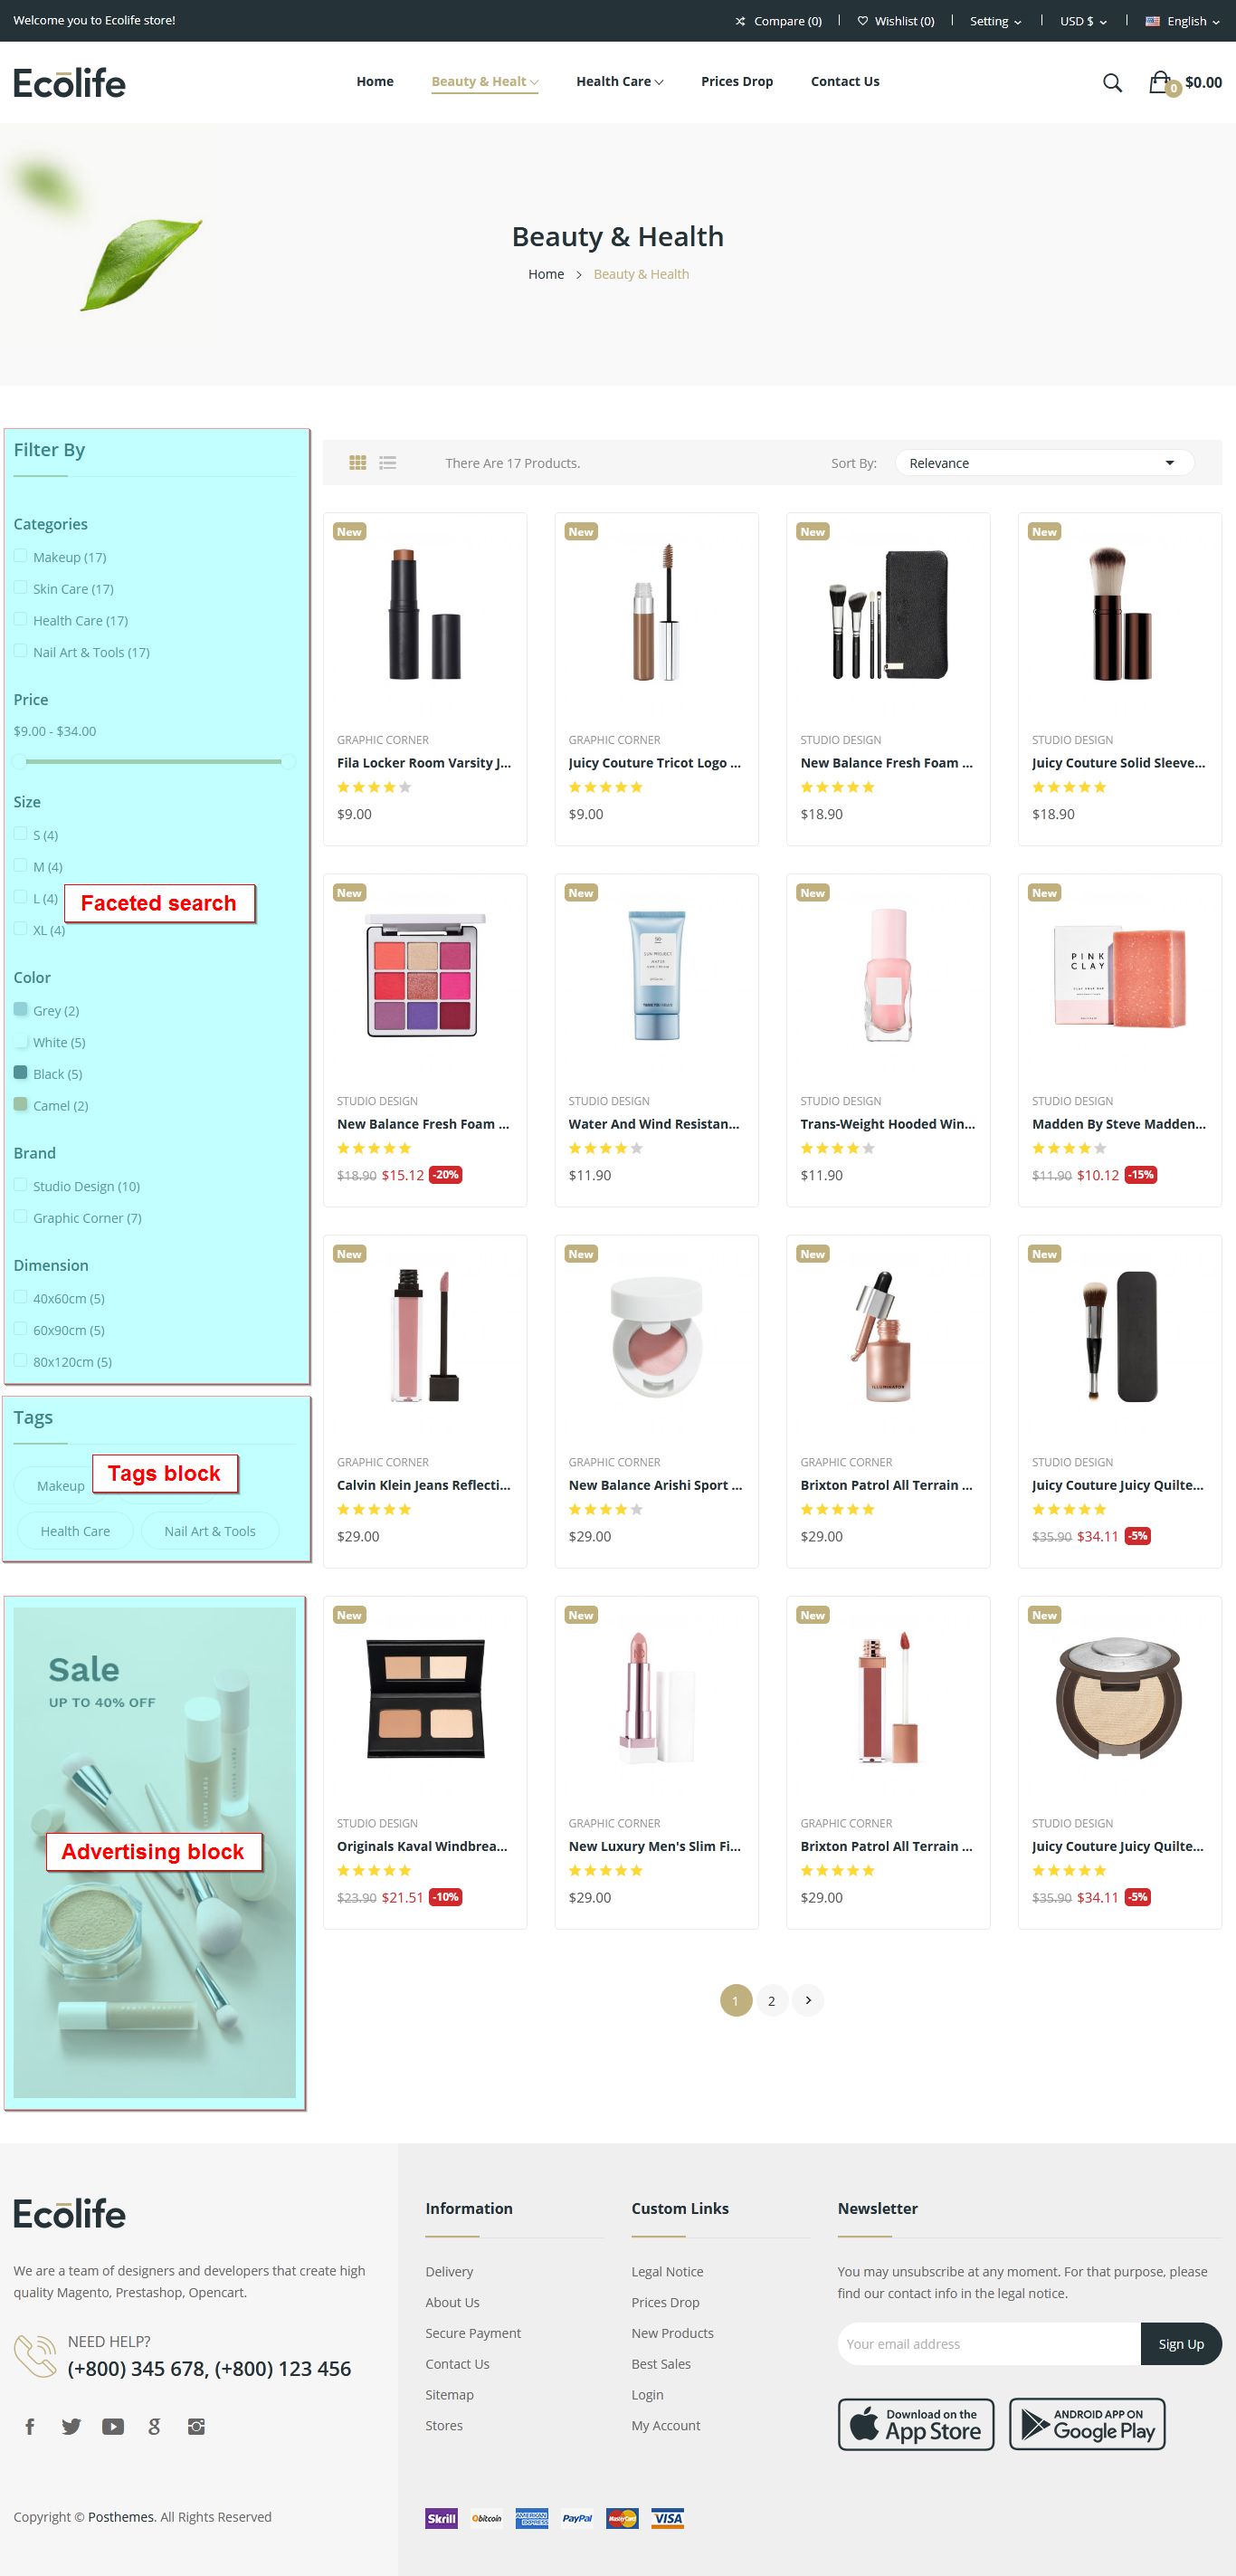
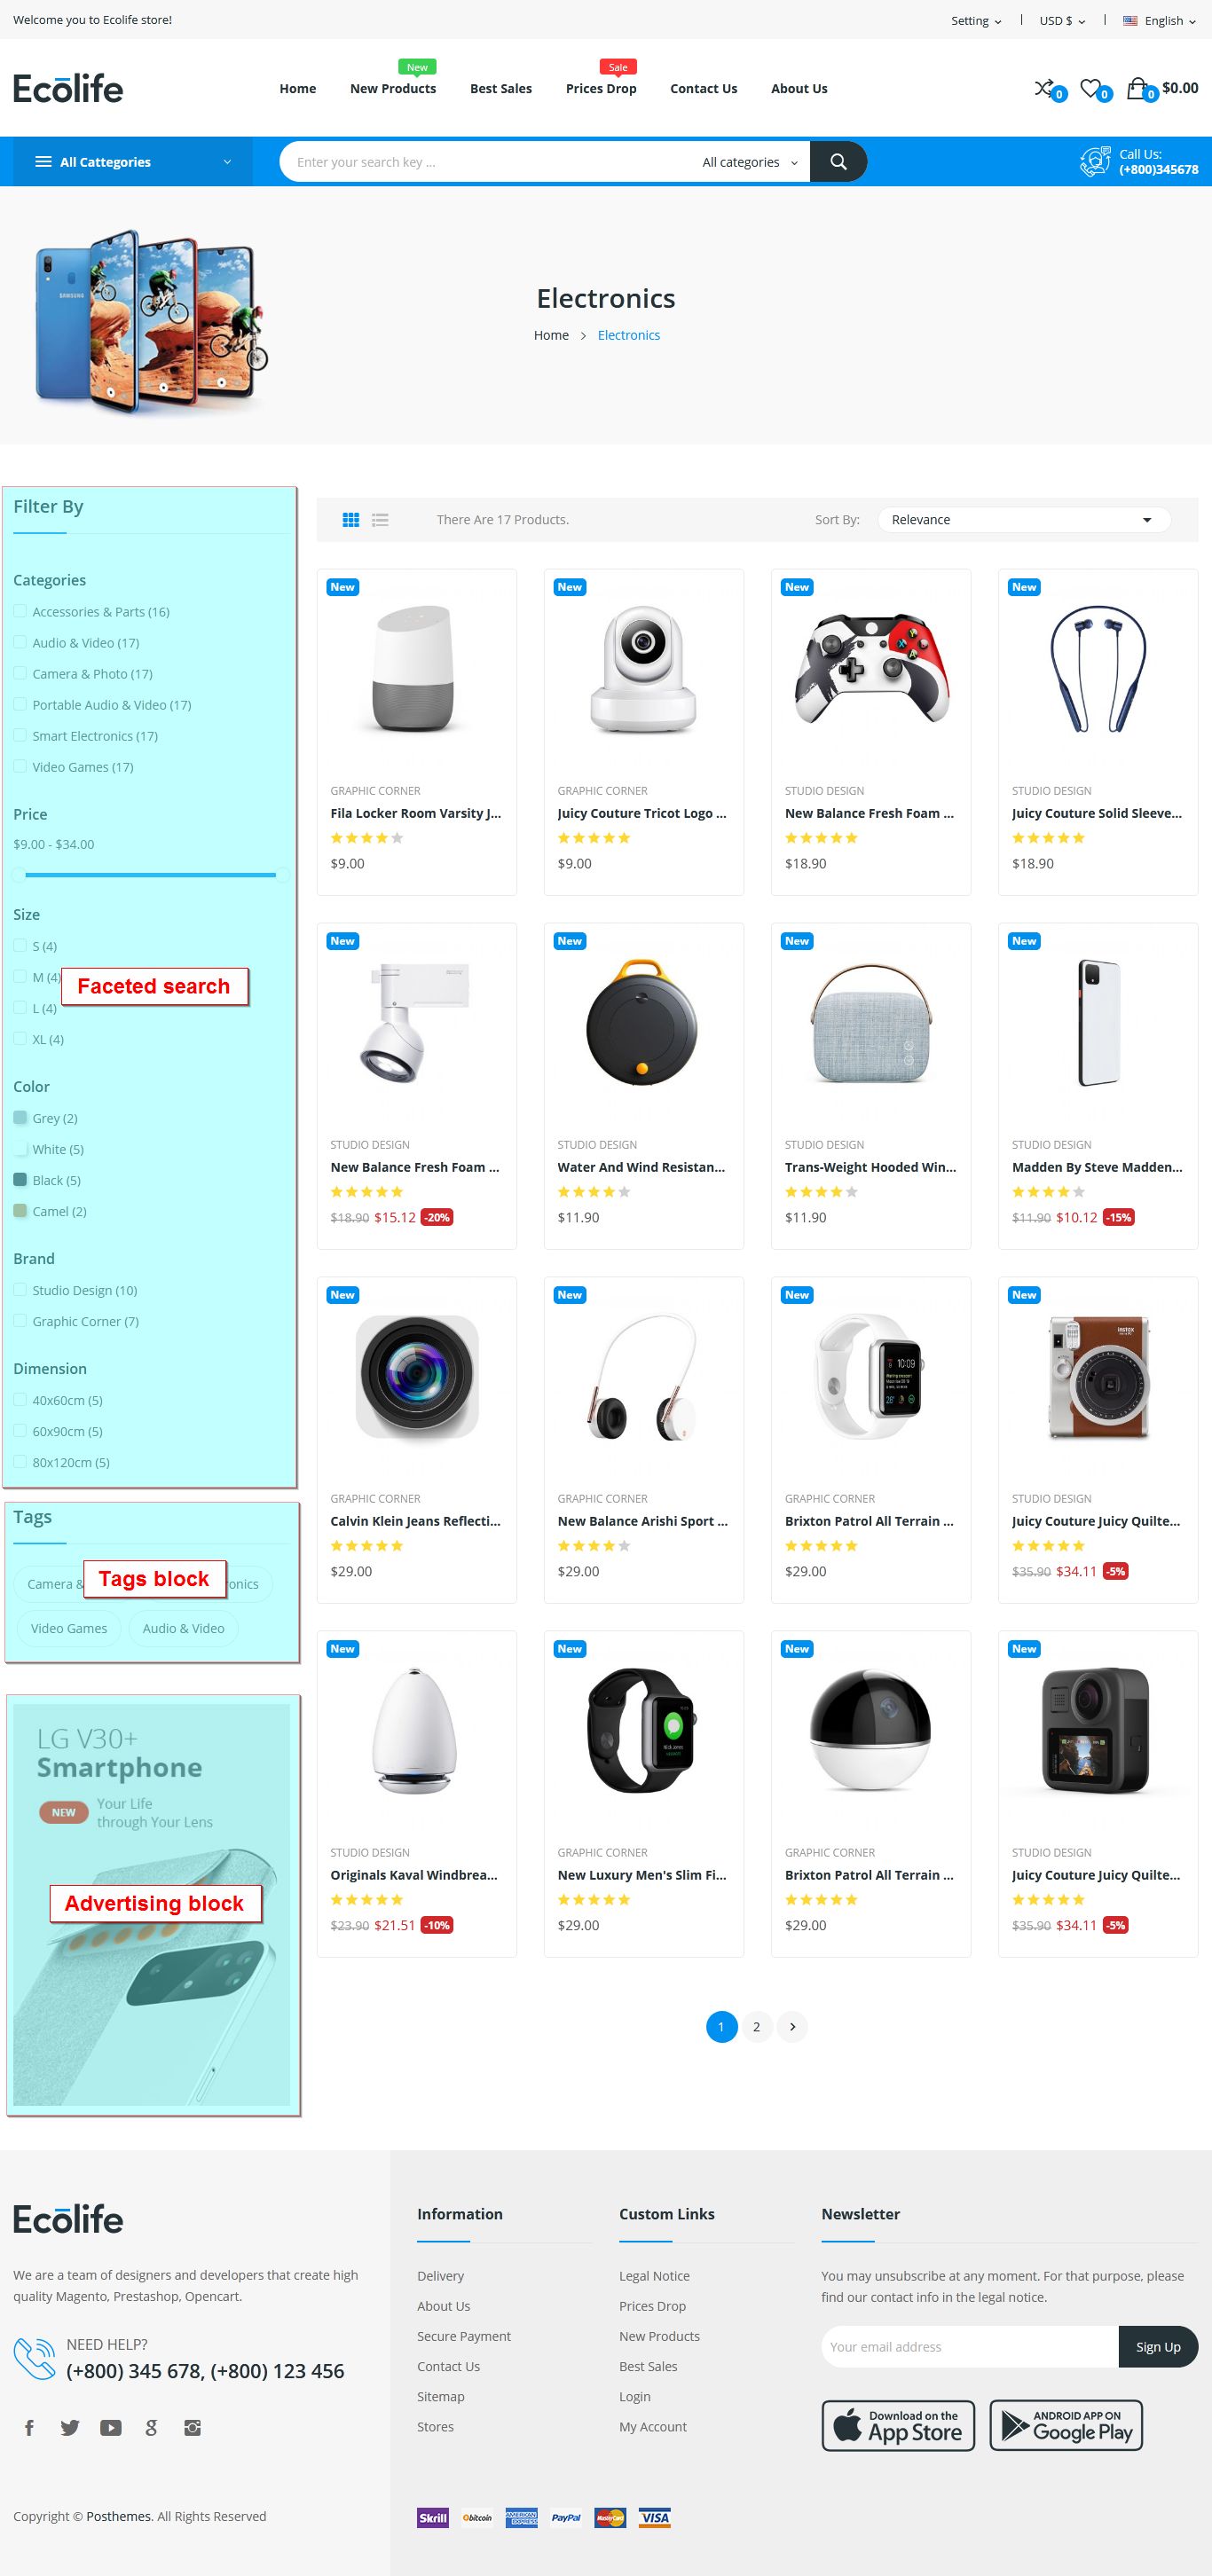
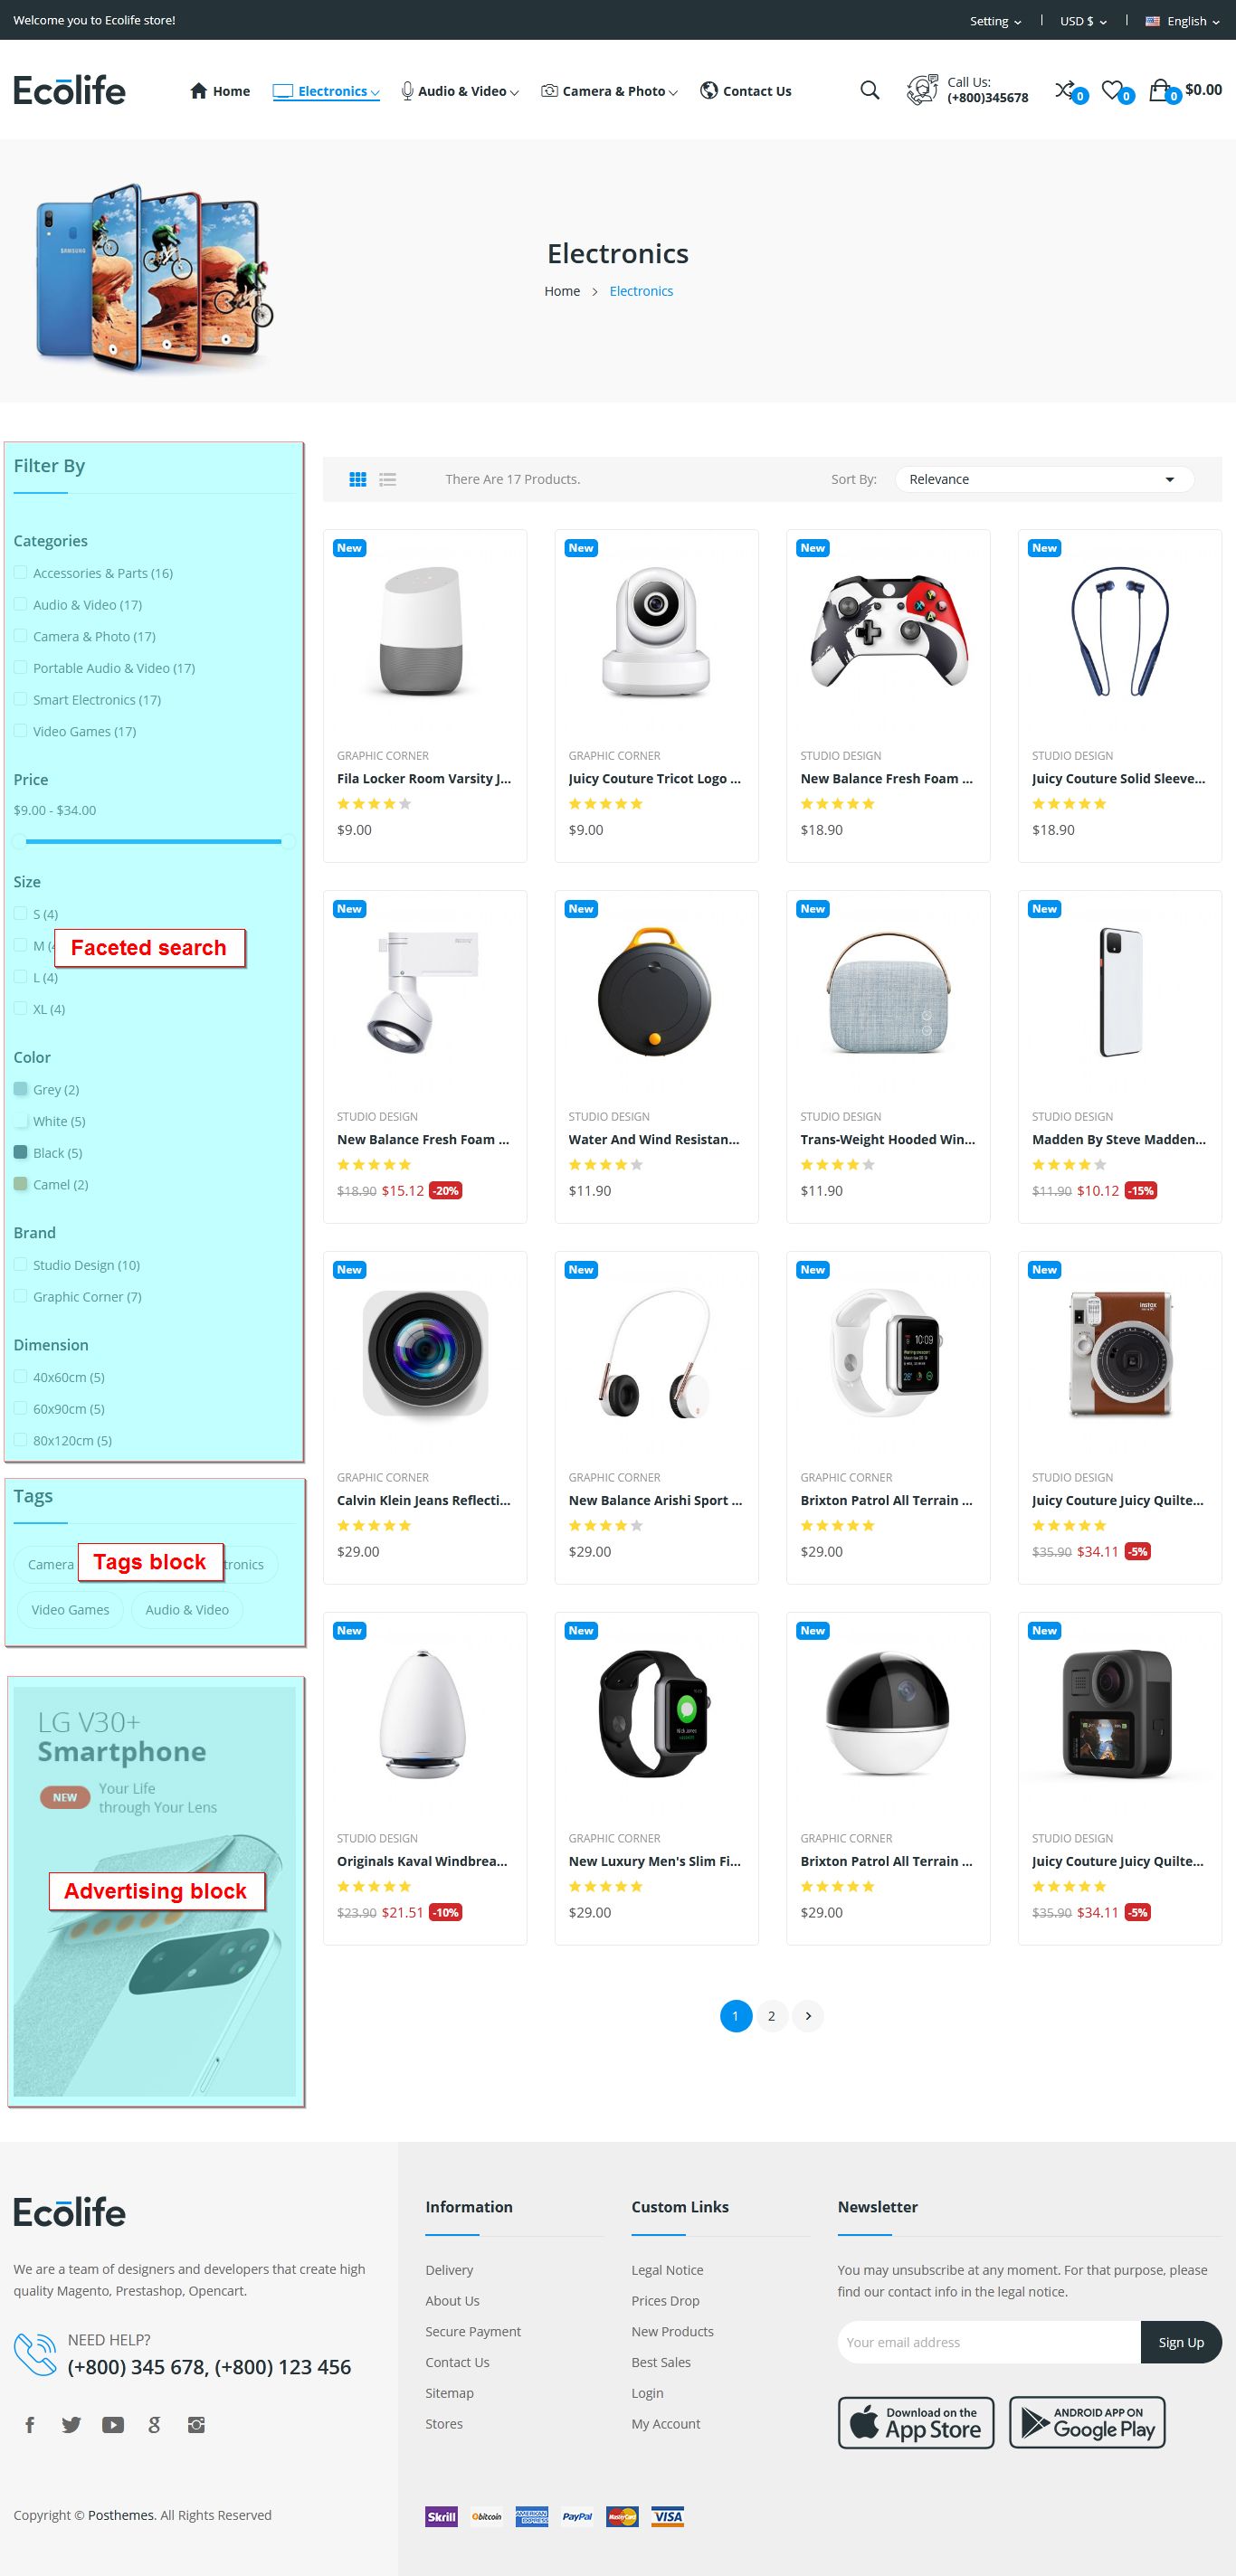
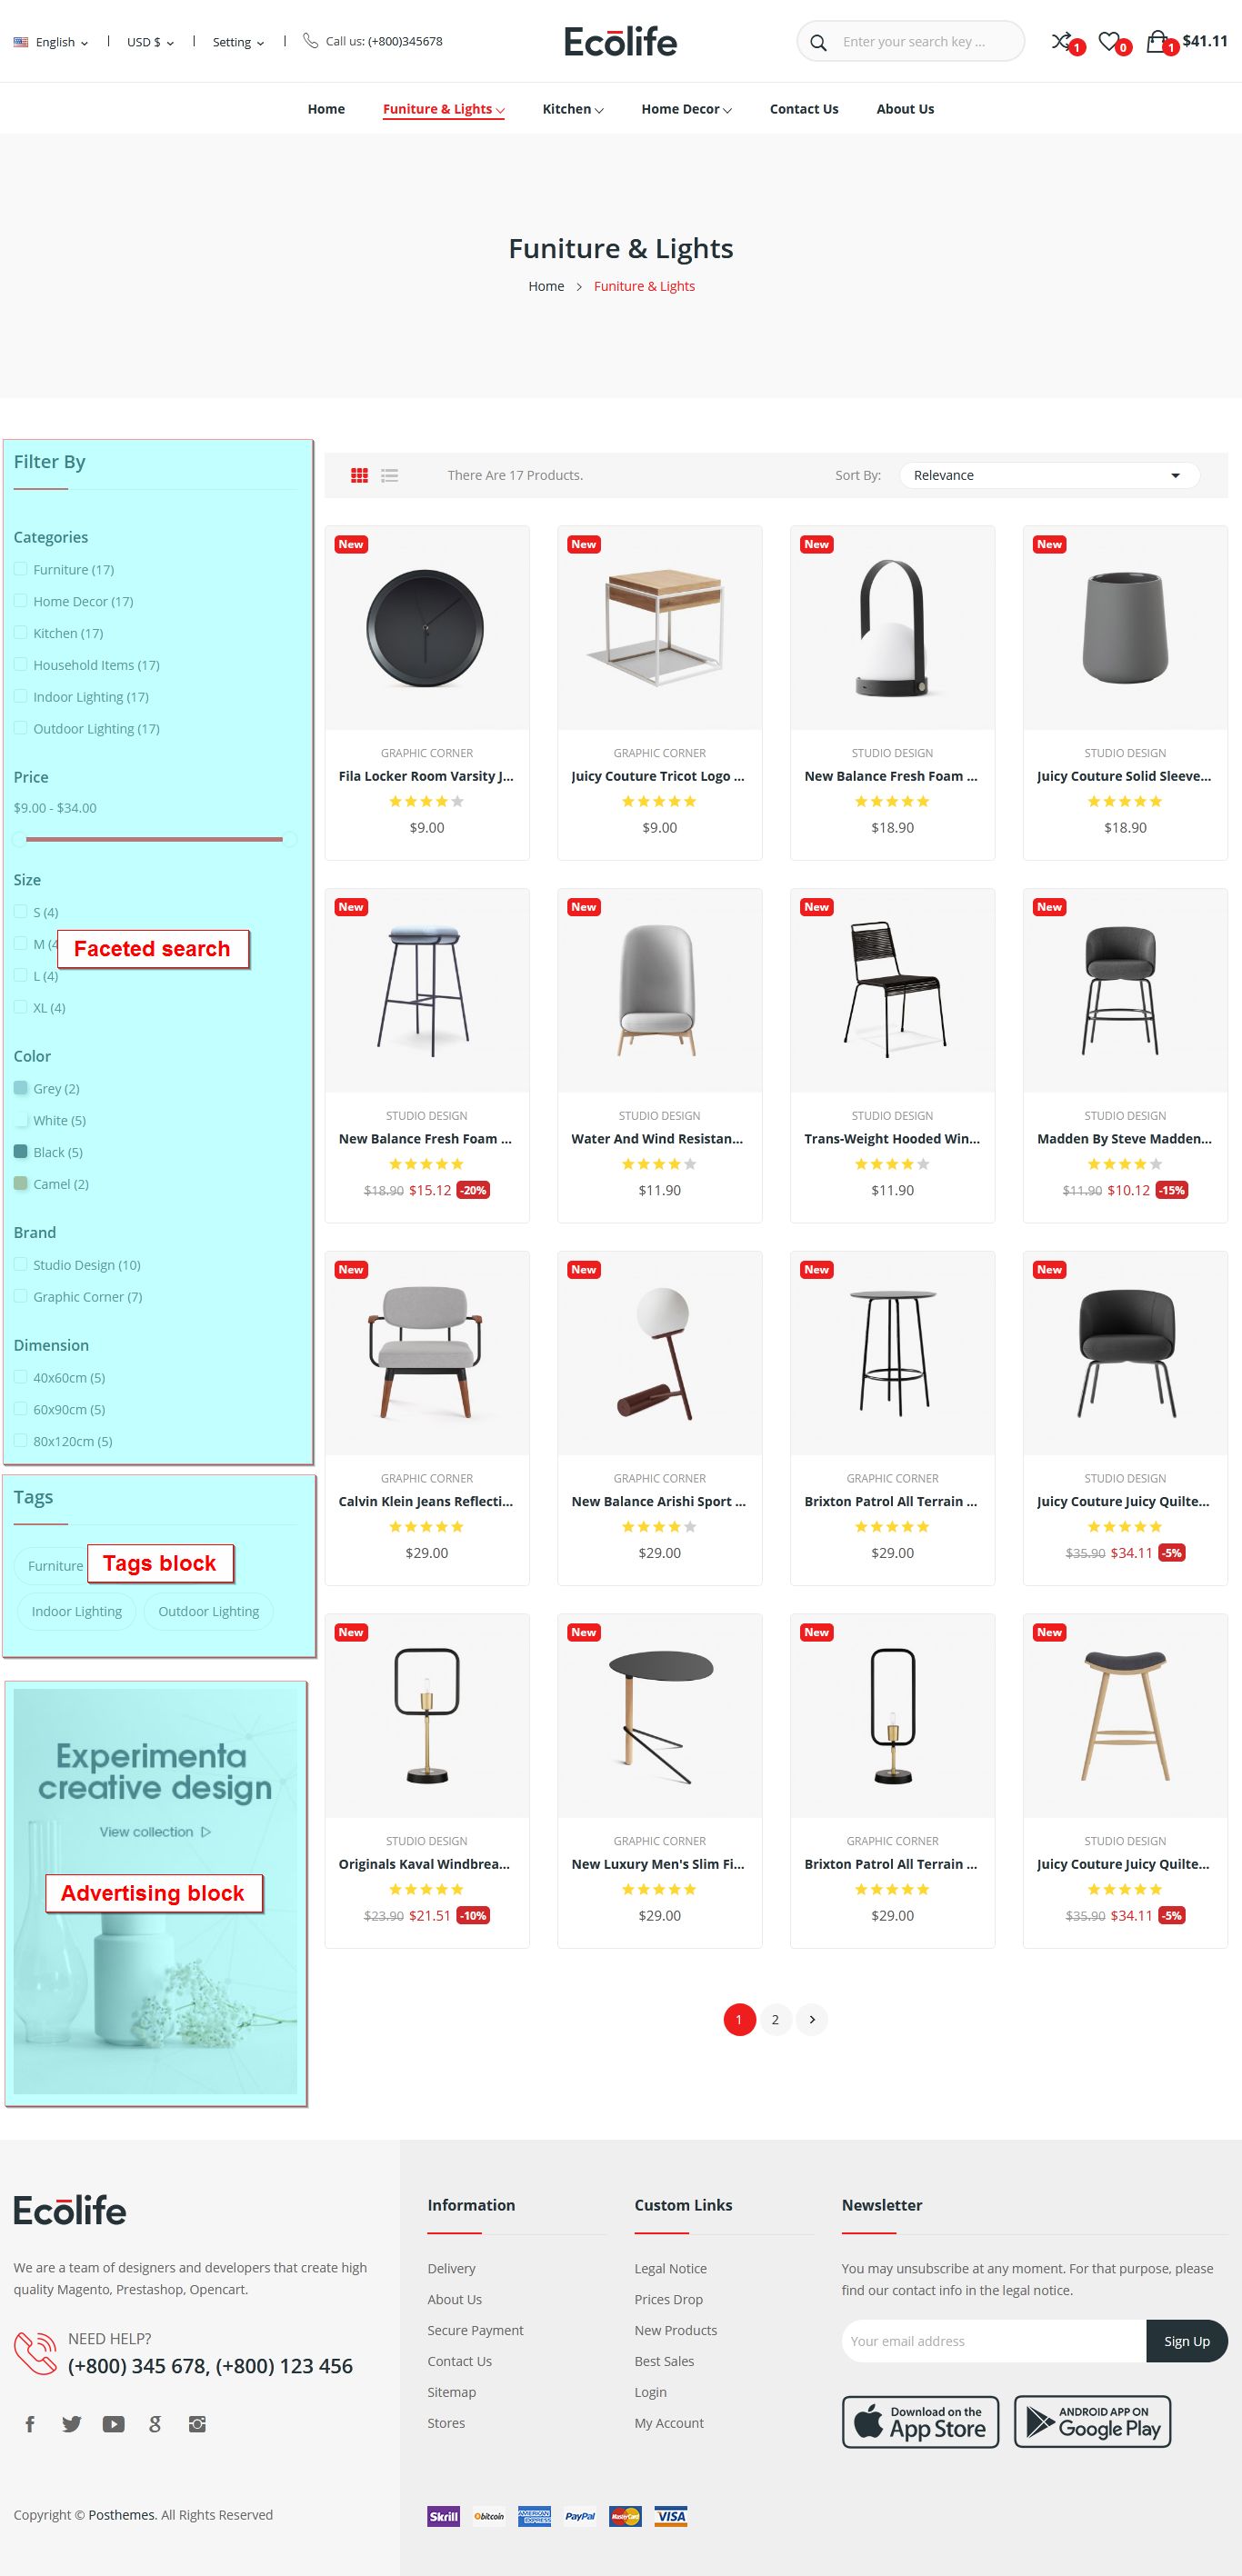
- Faceted search
Displays a block allowing multiple filters.
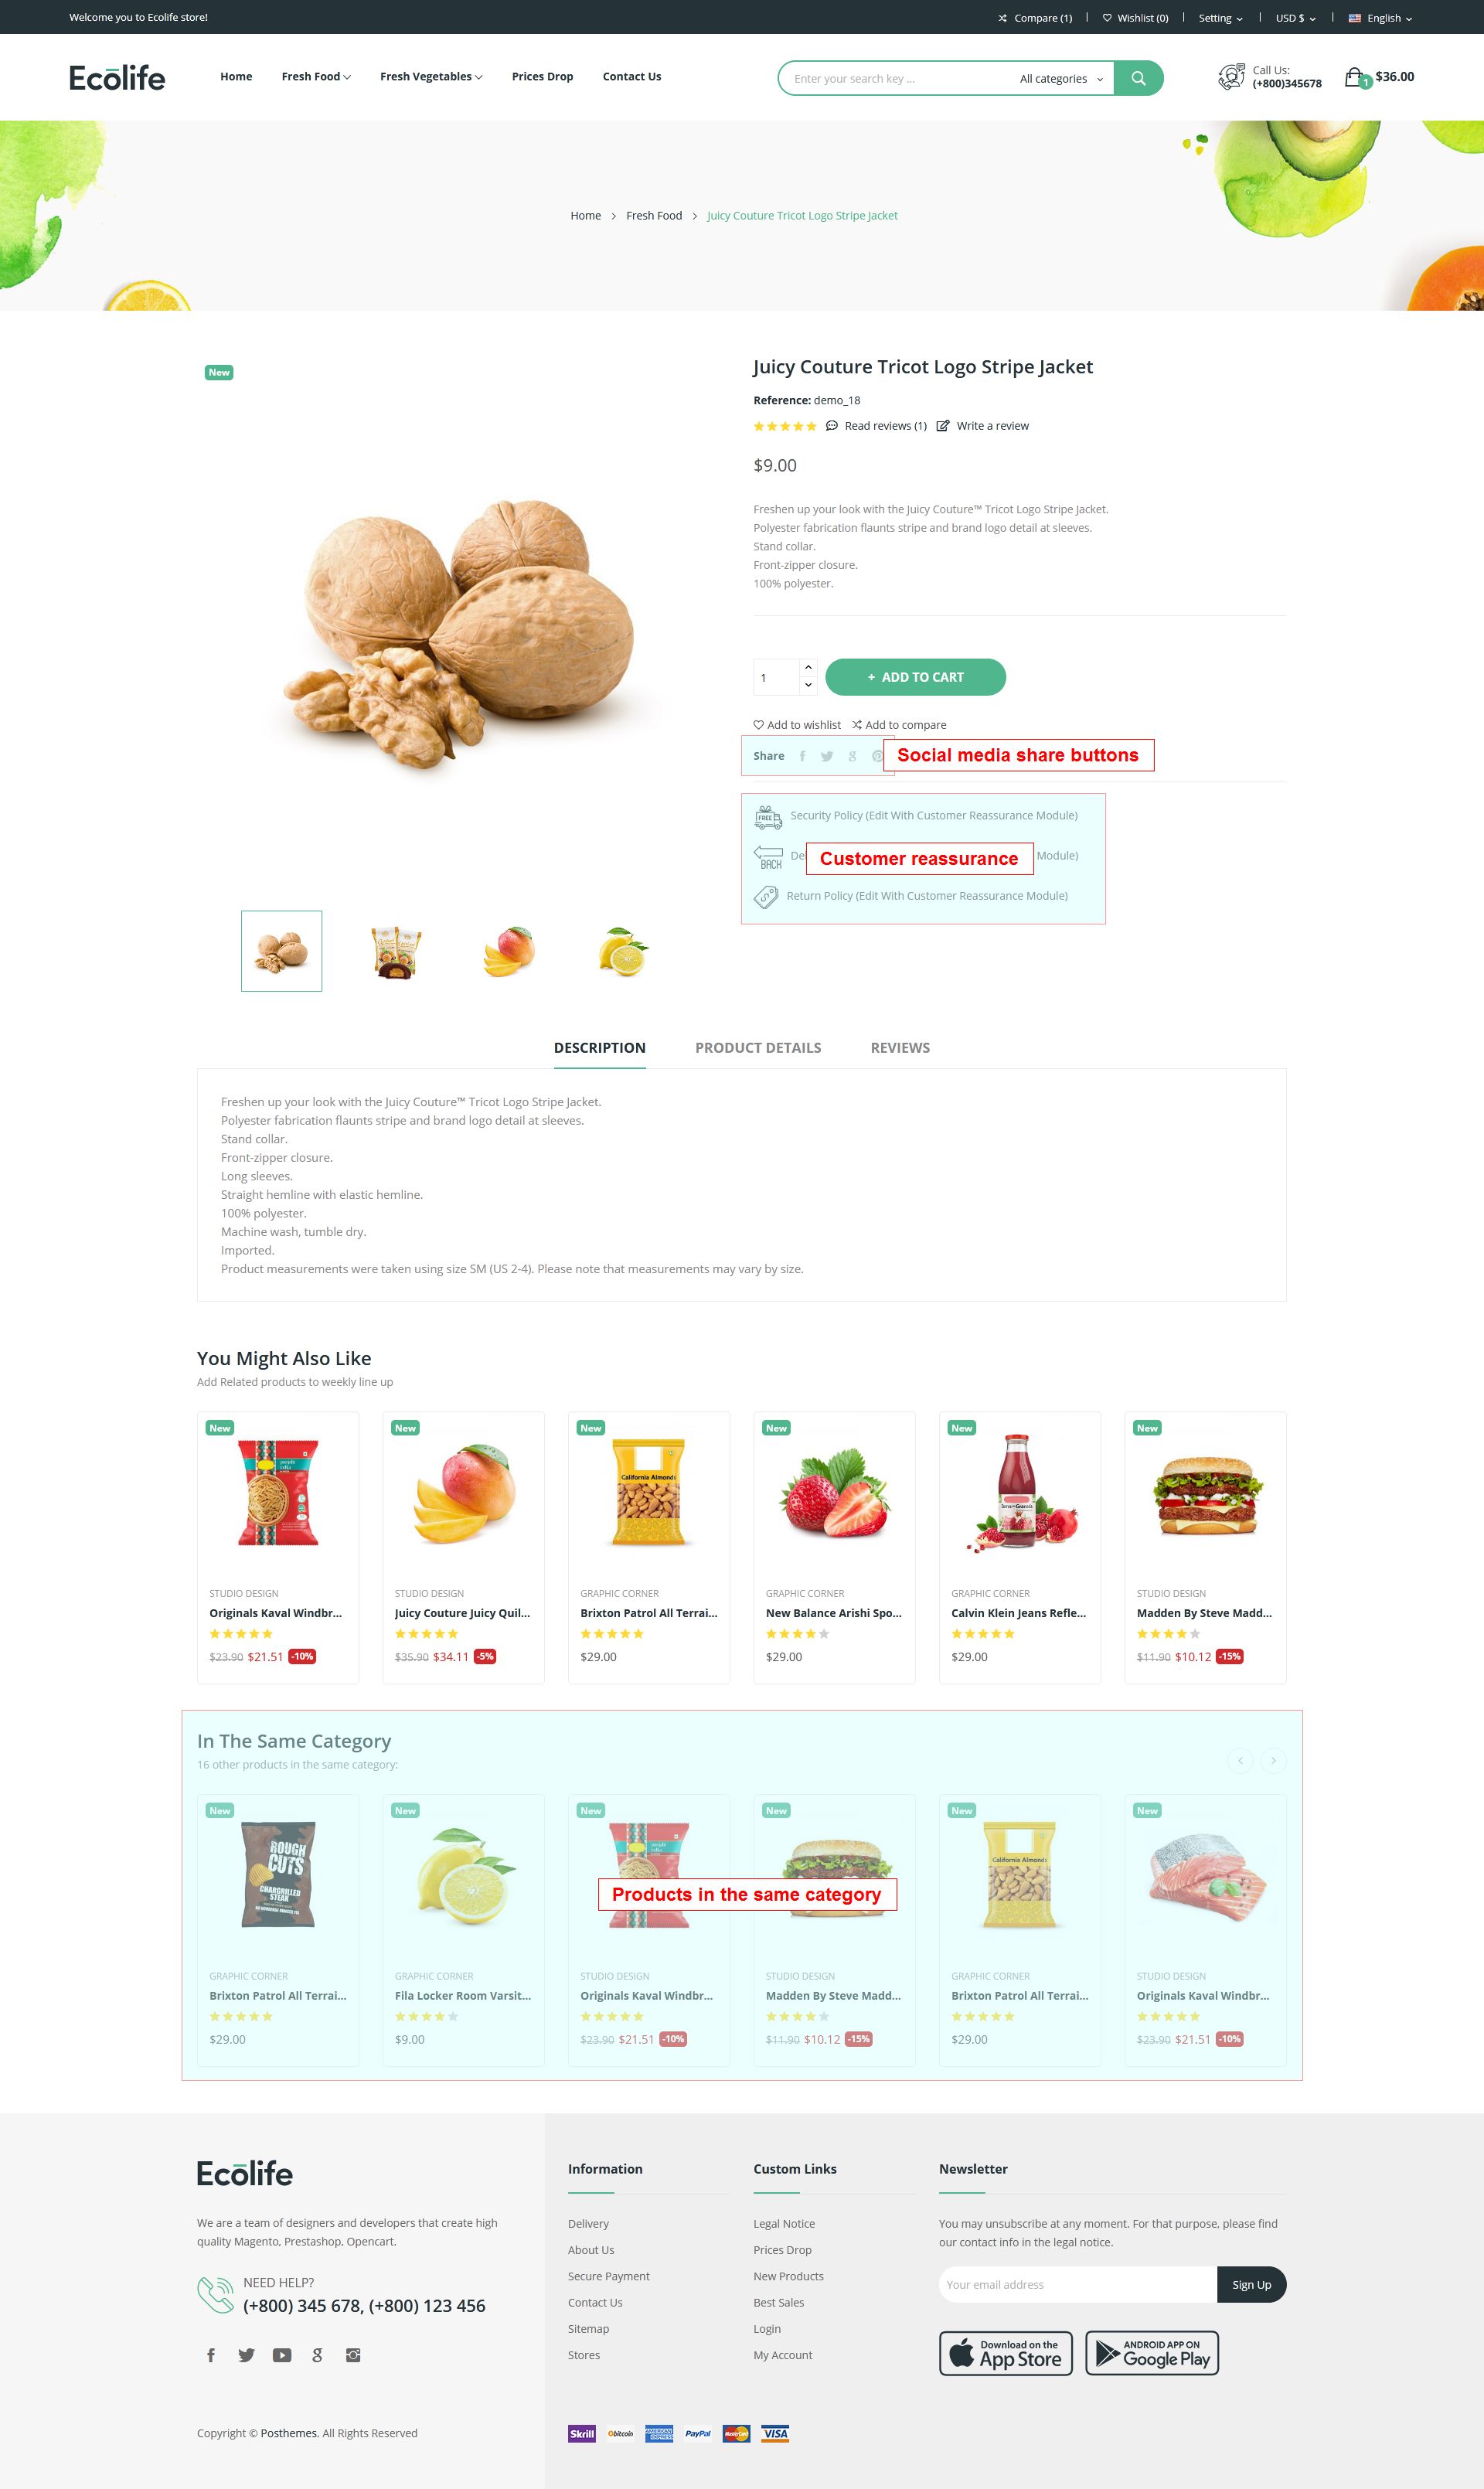
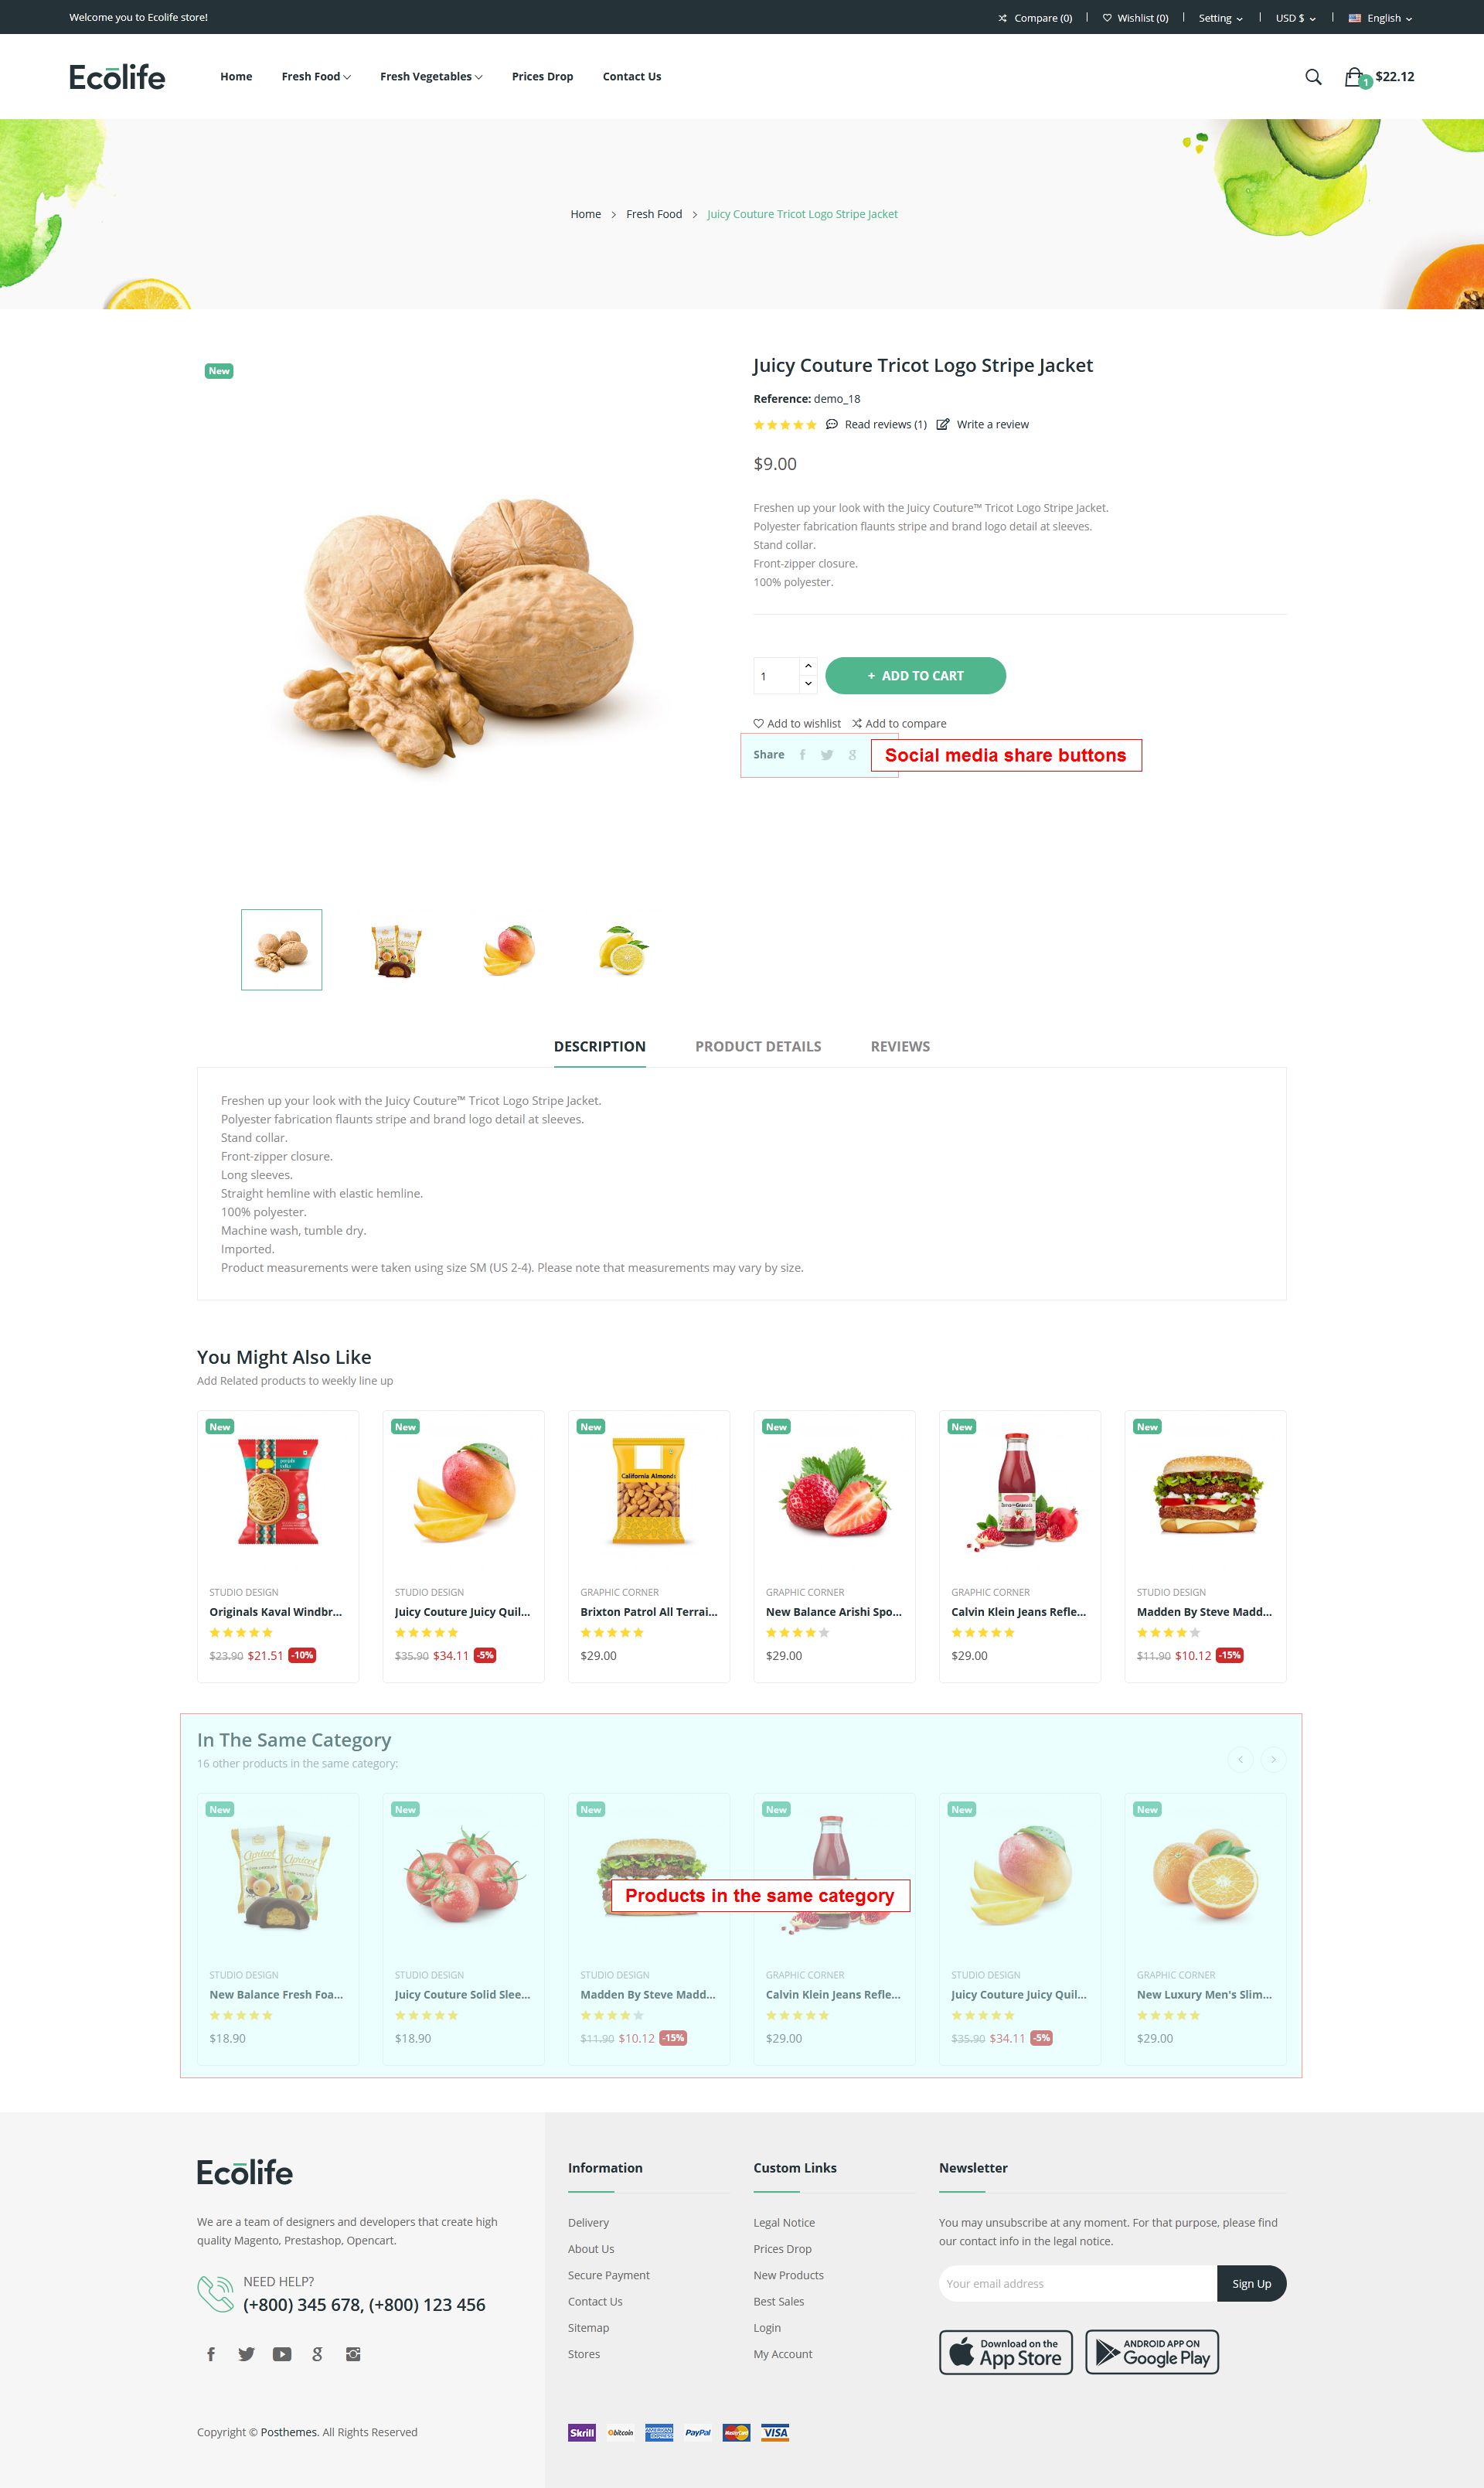
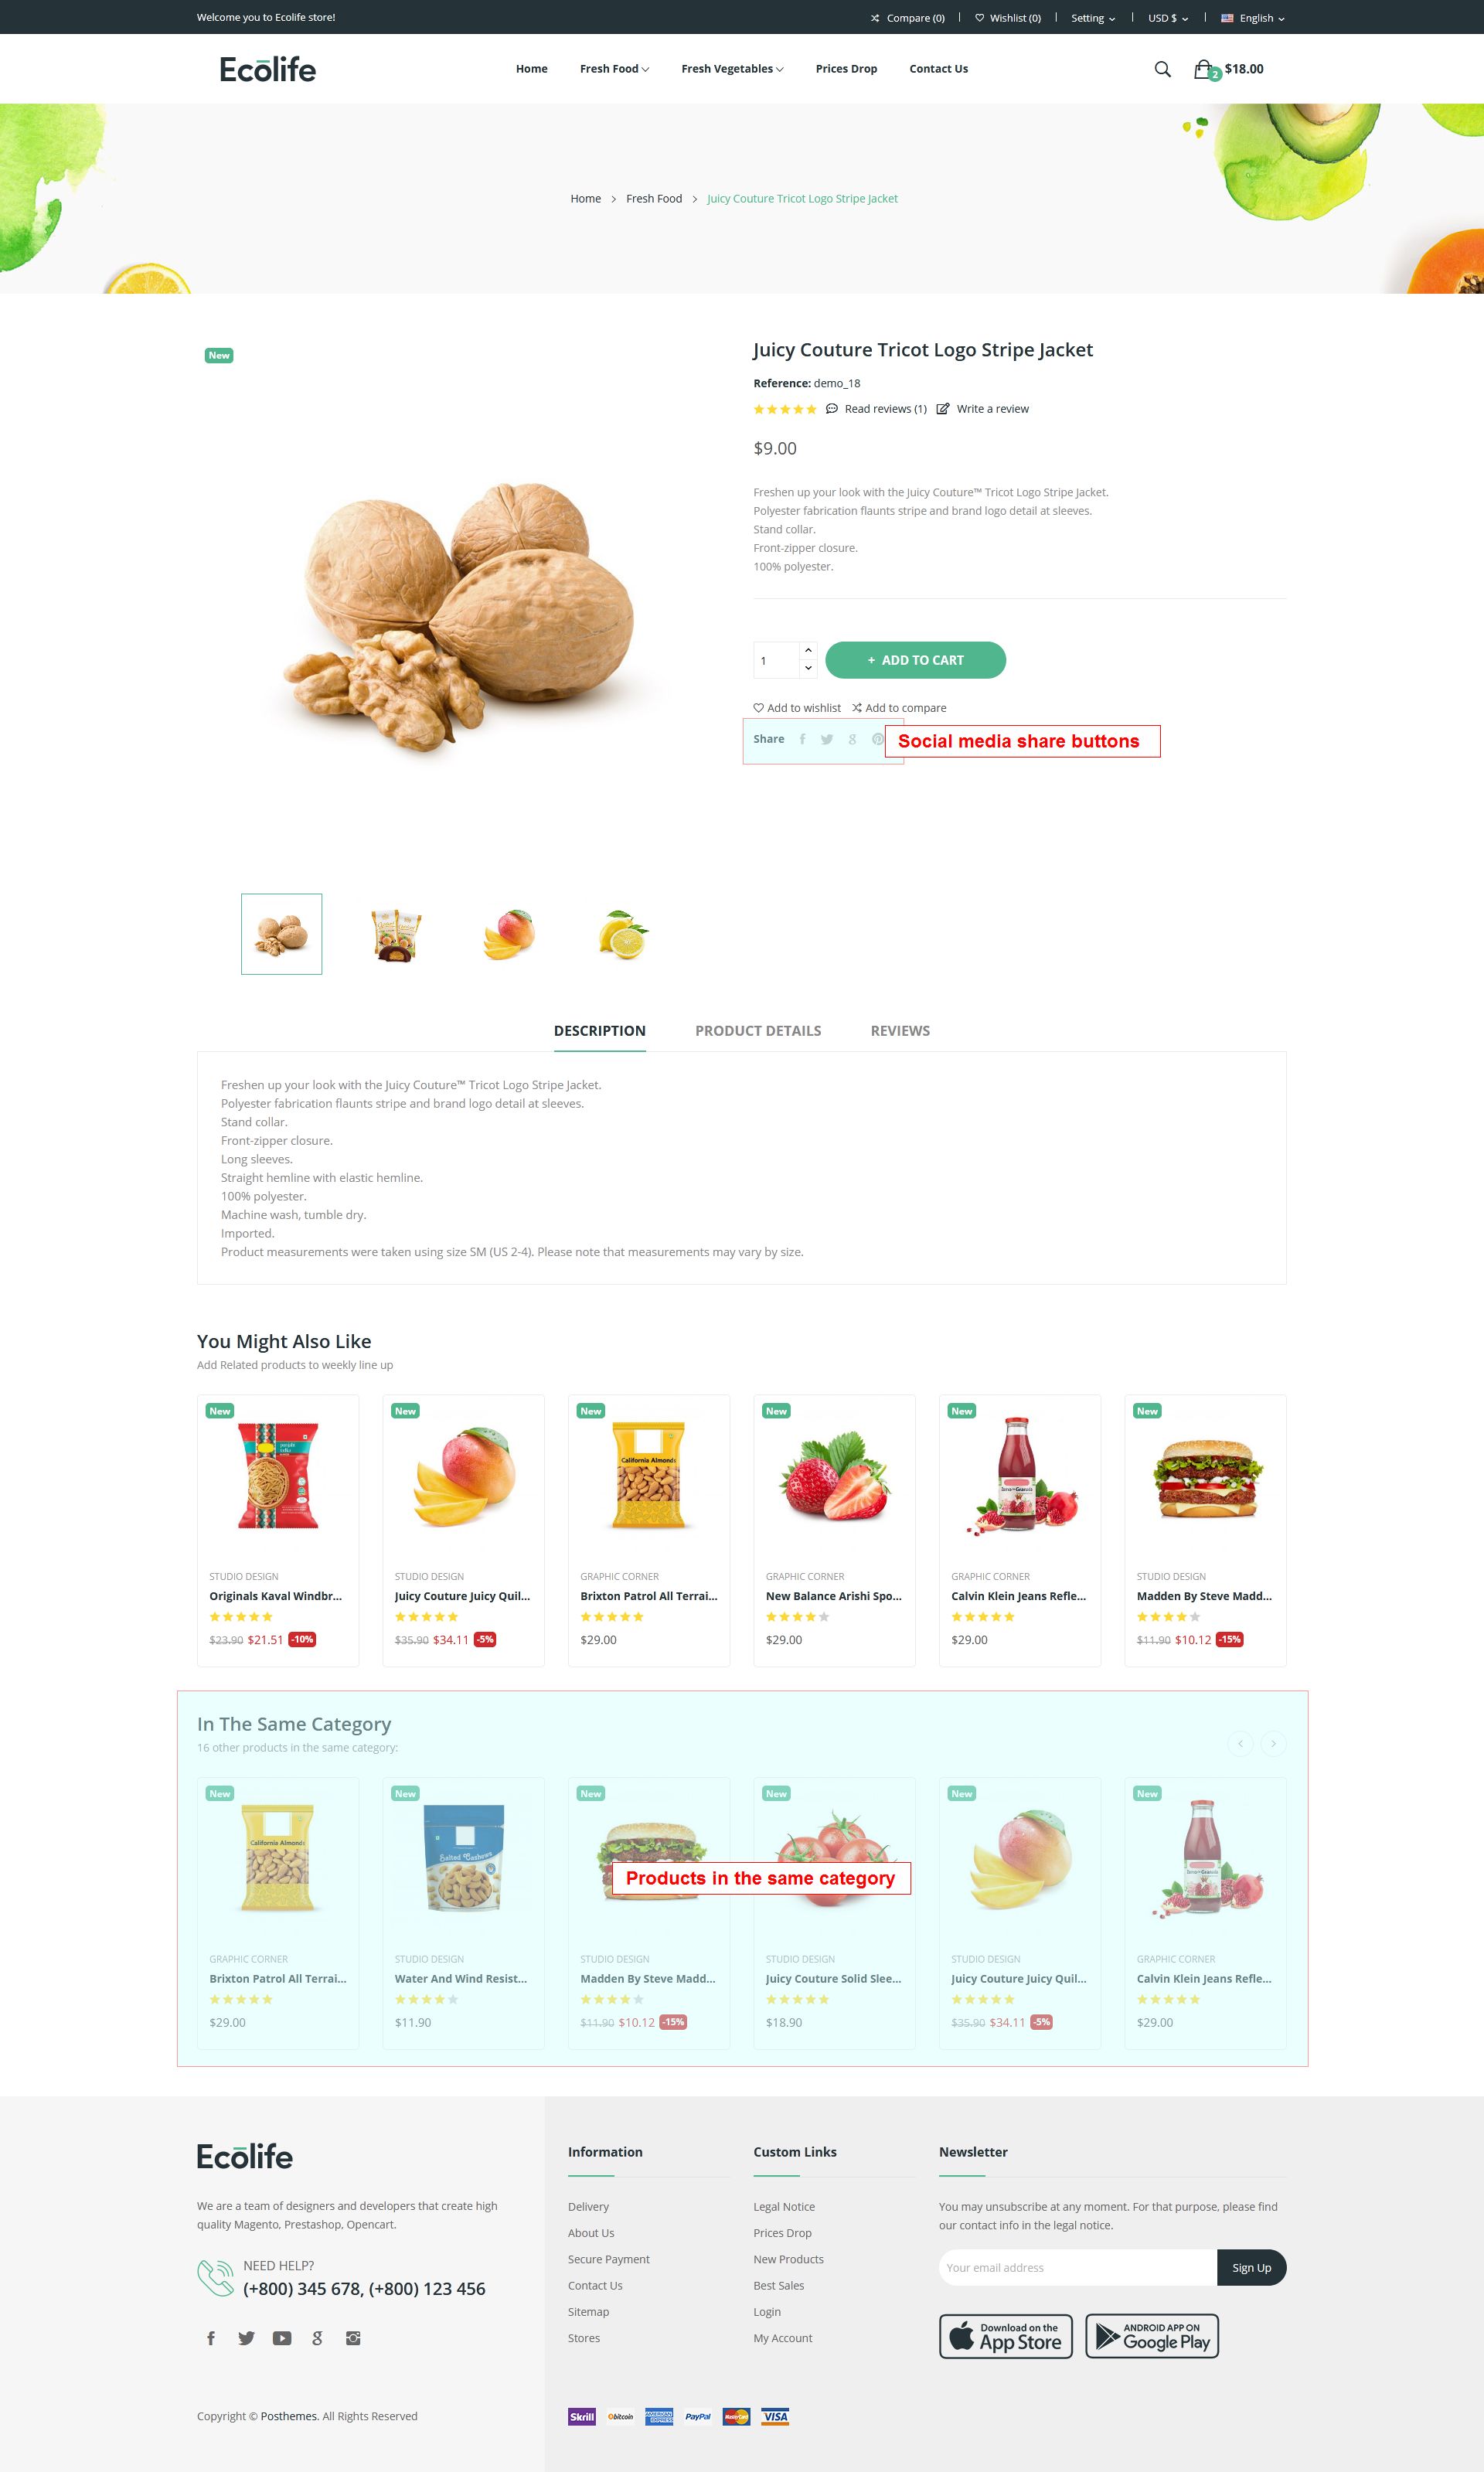
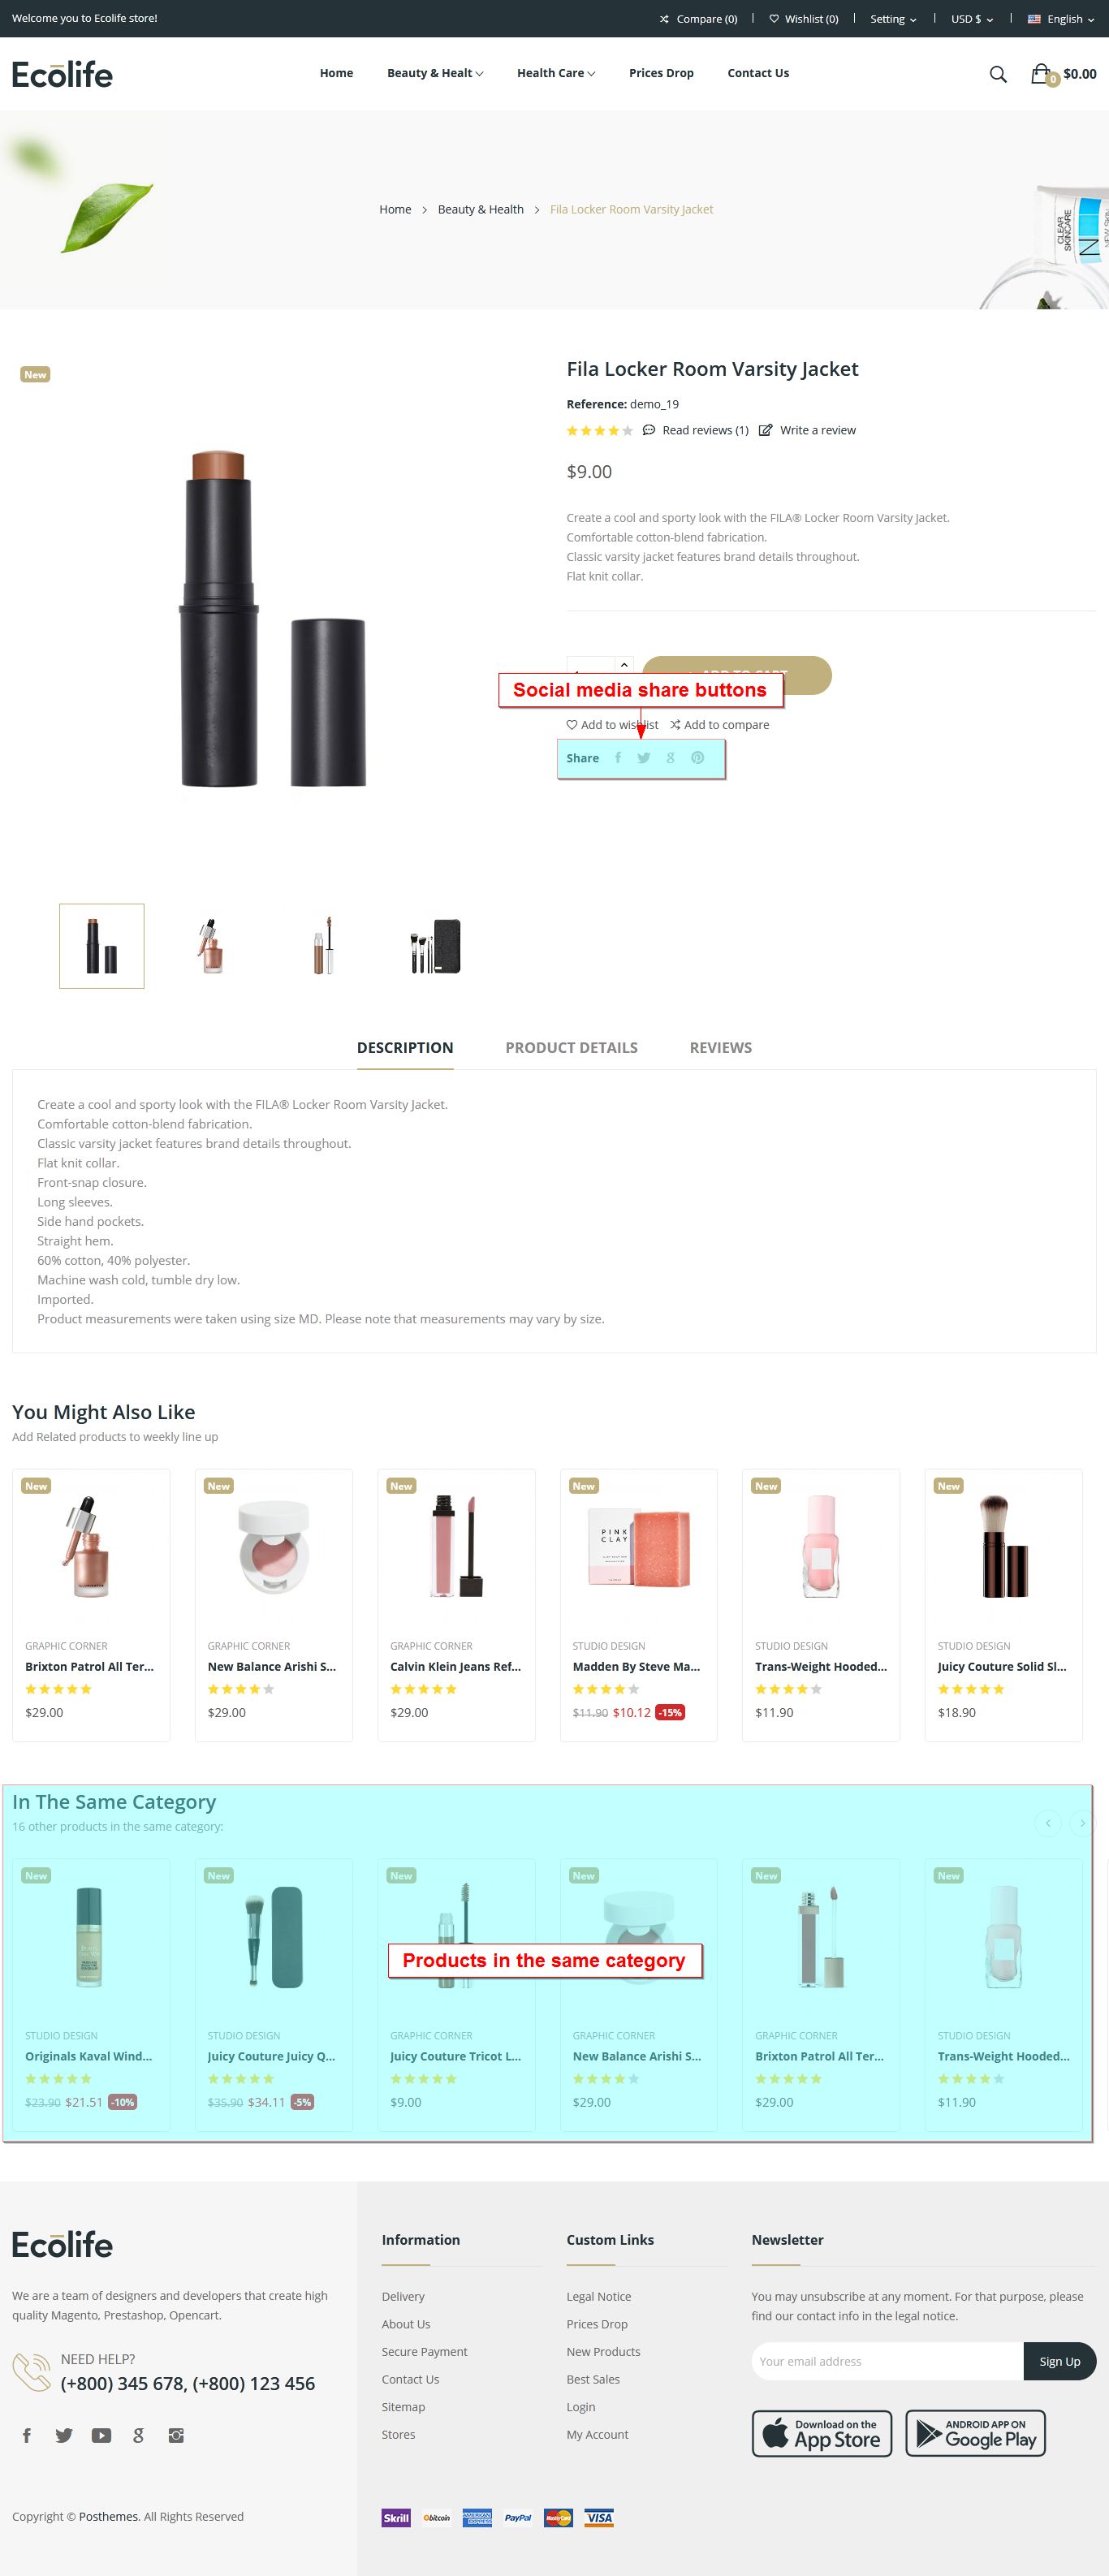
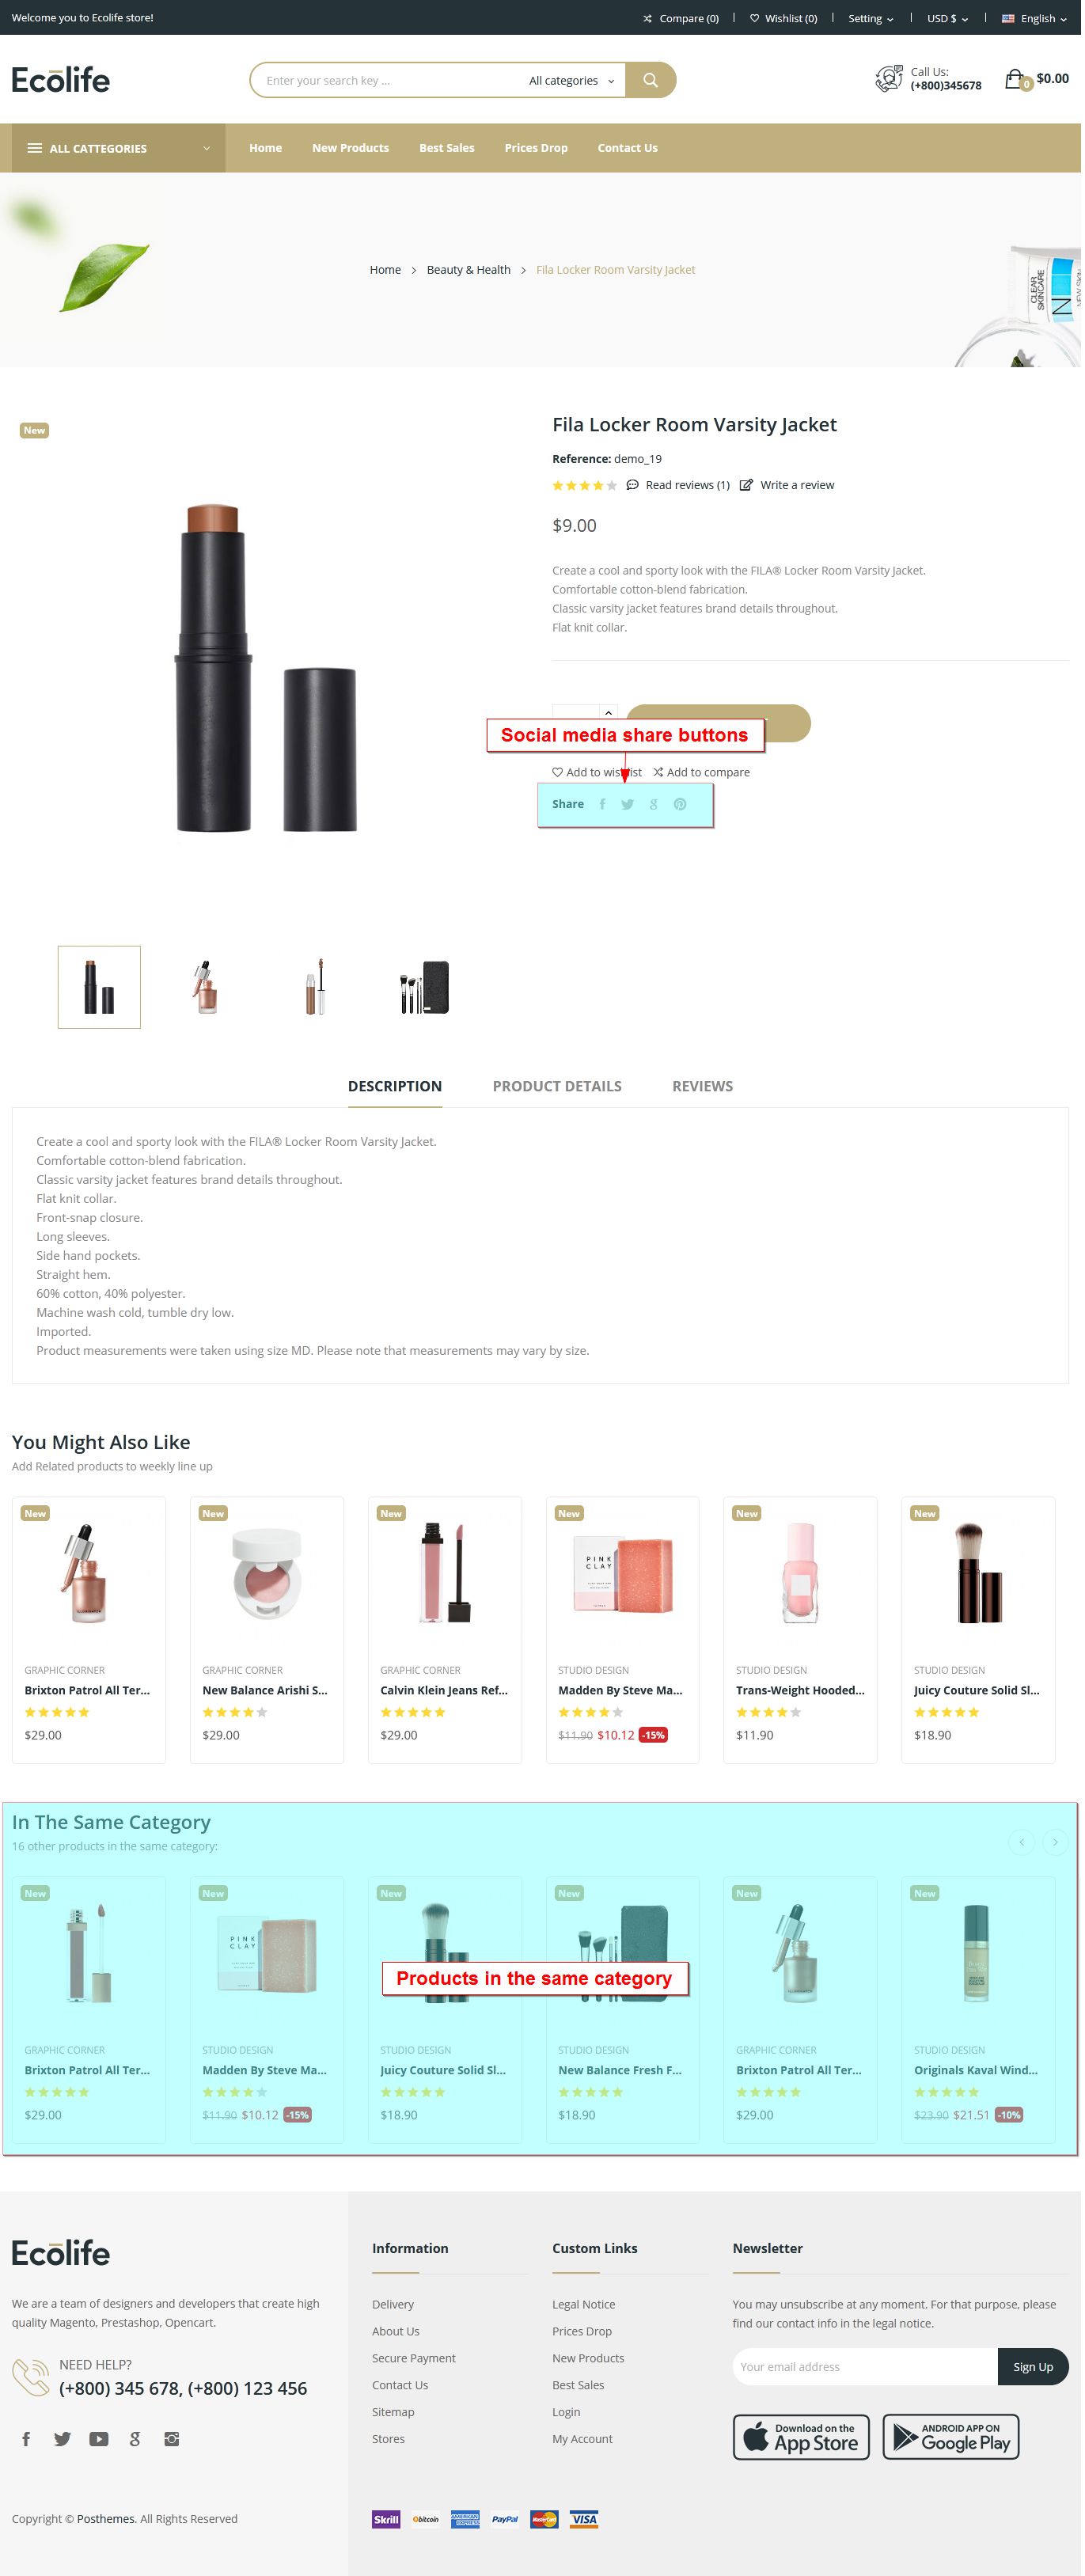
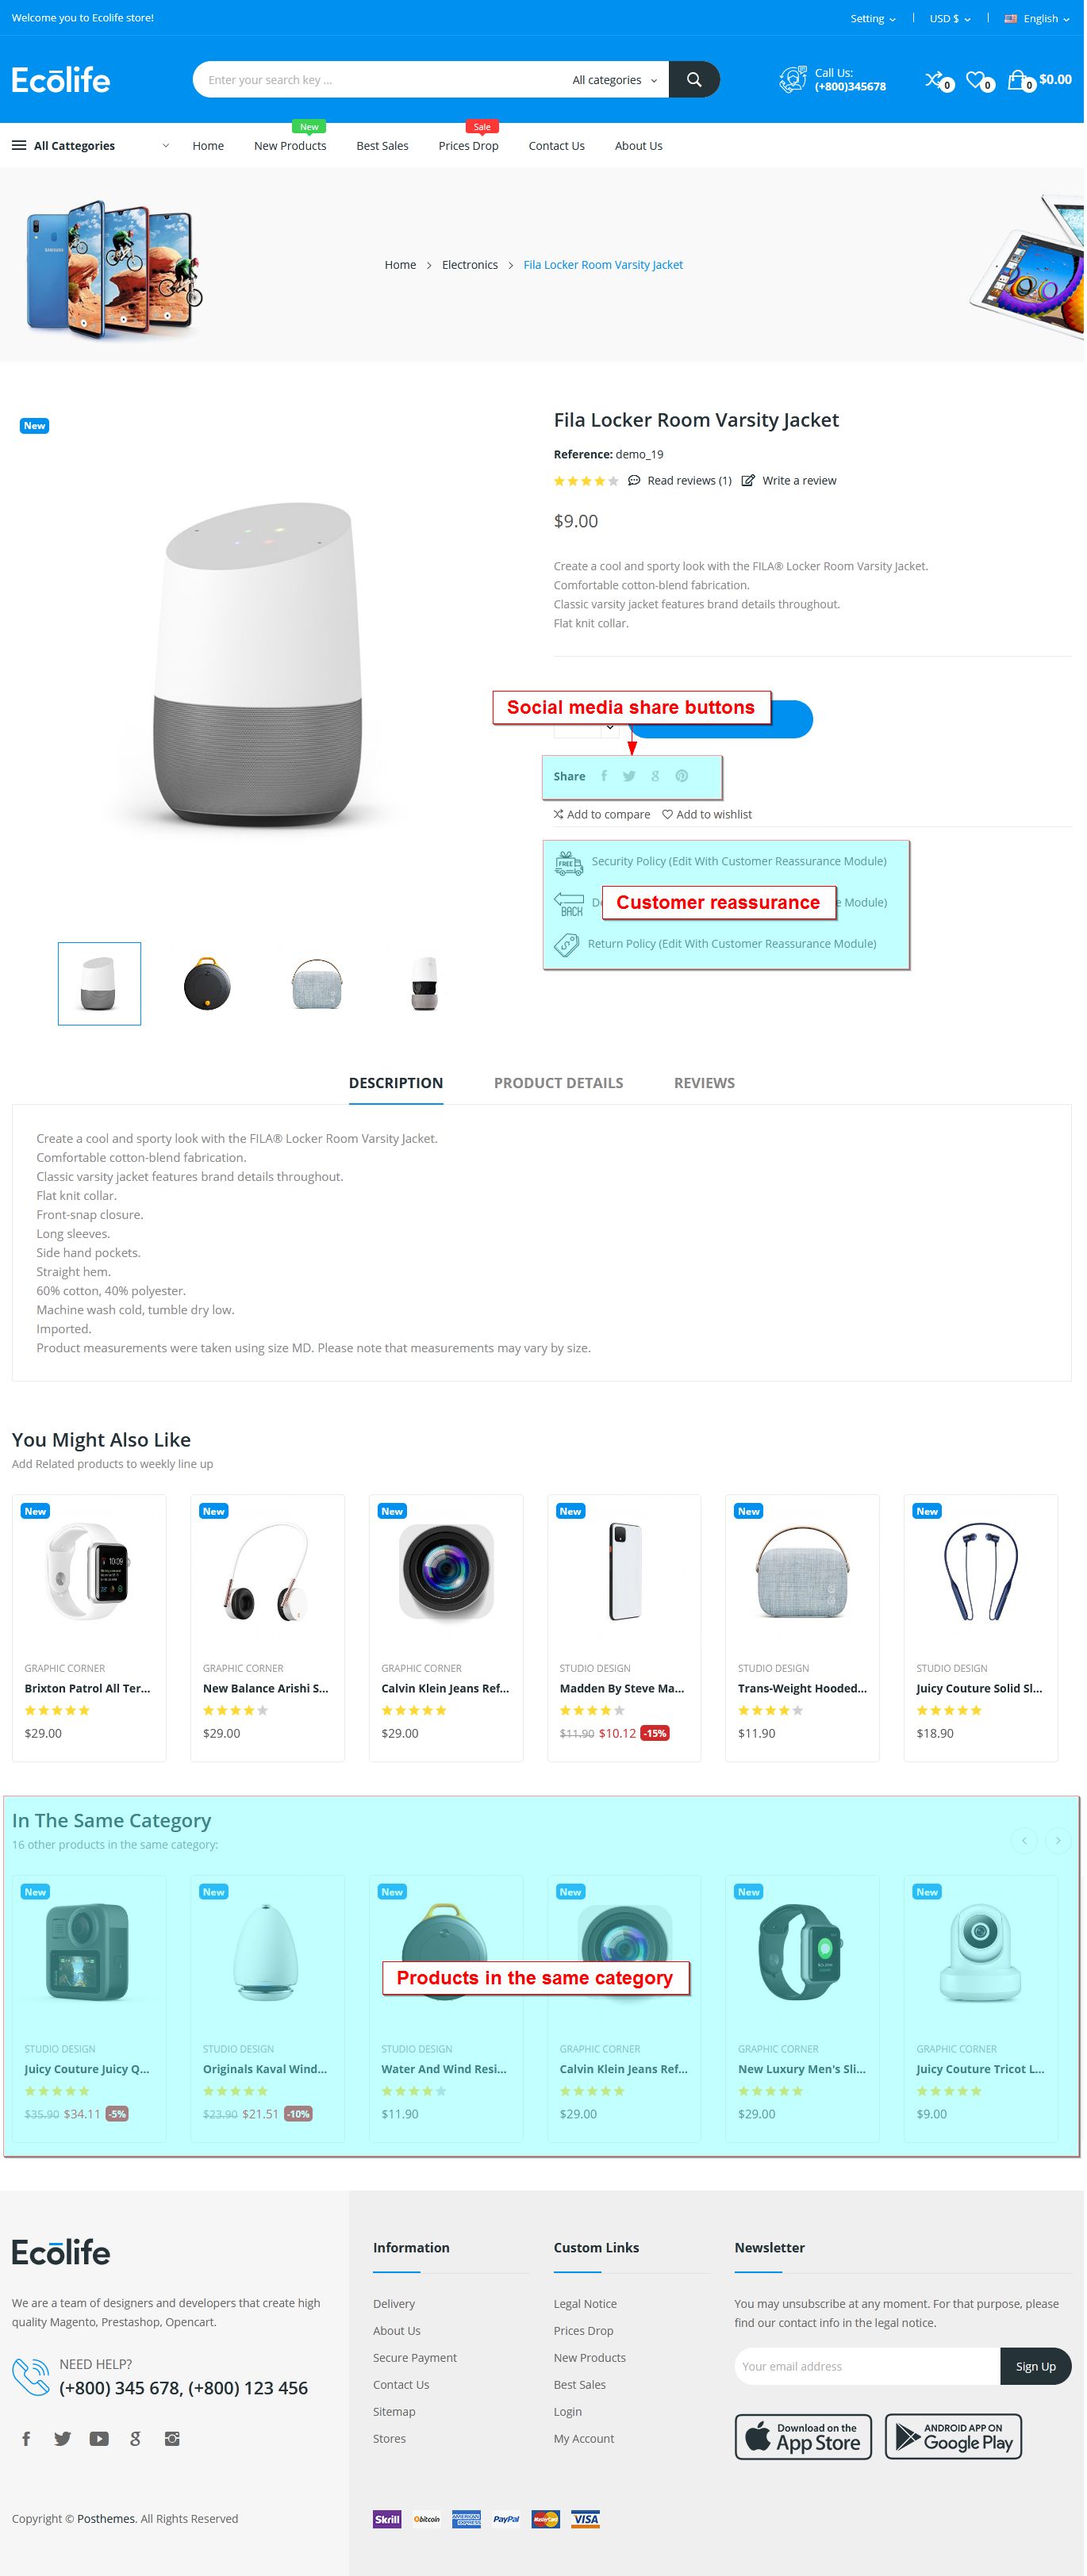
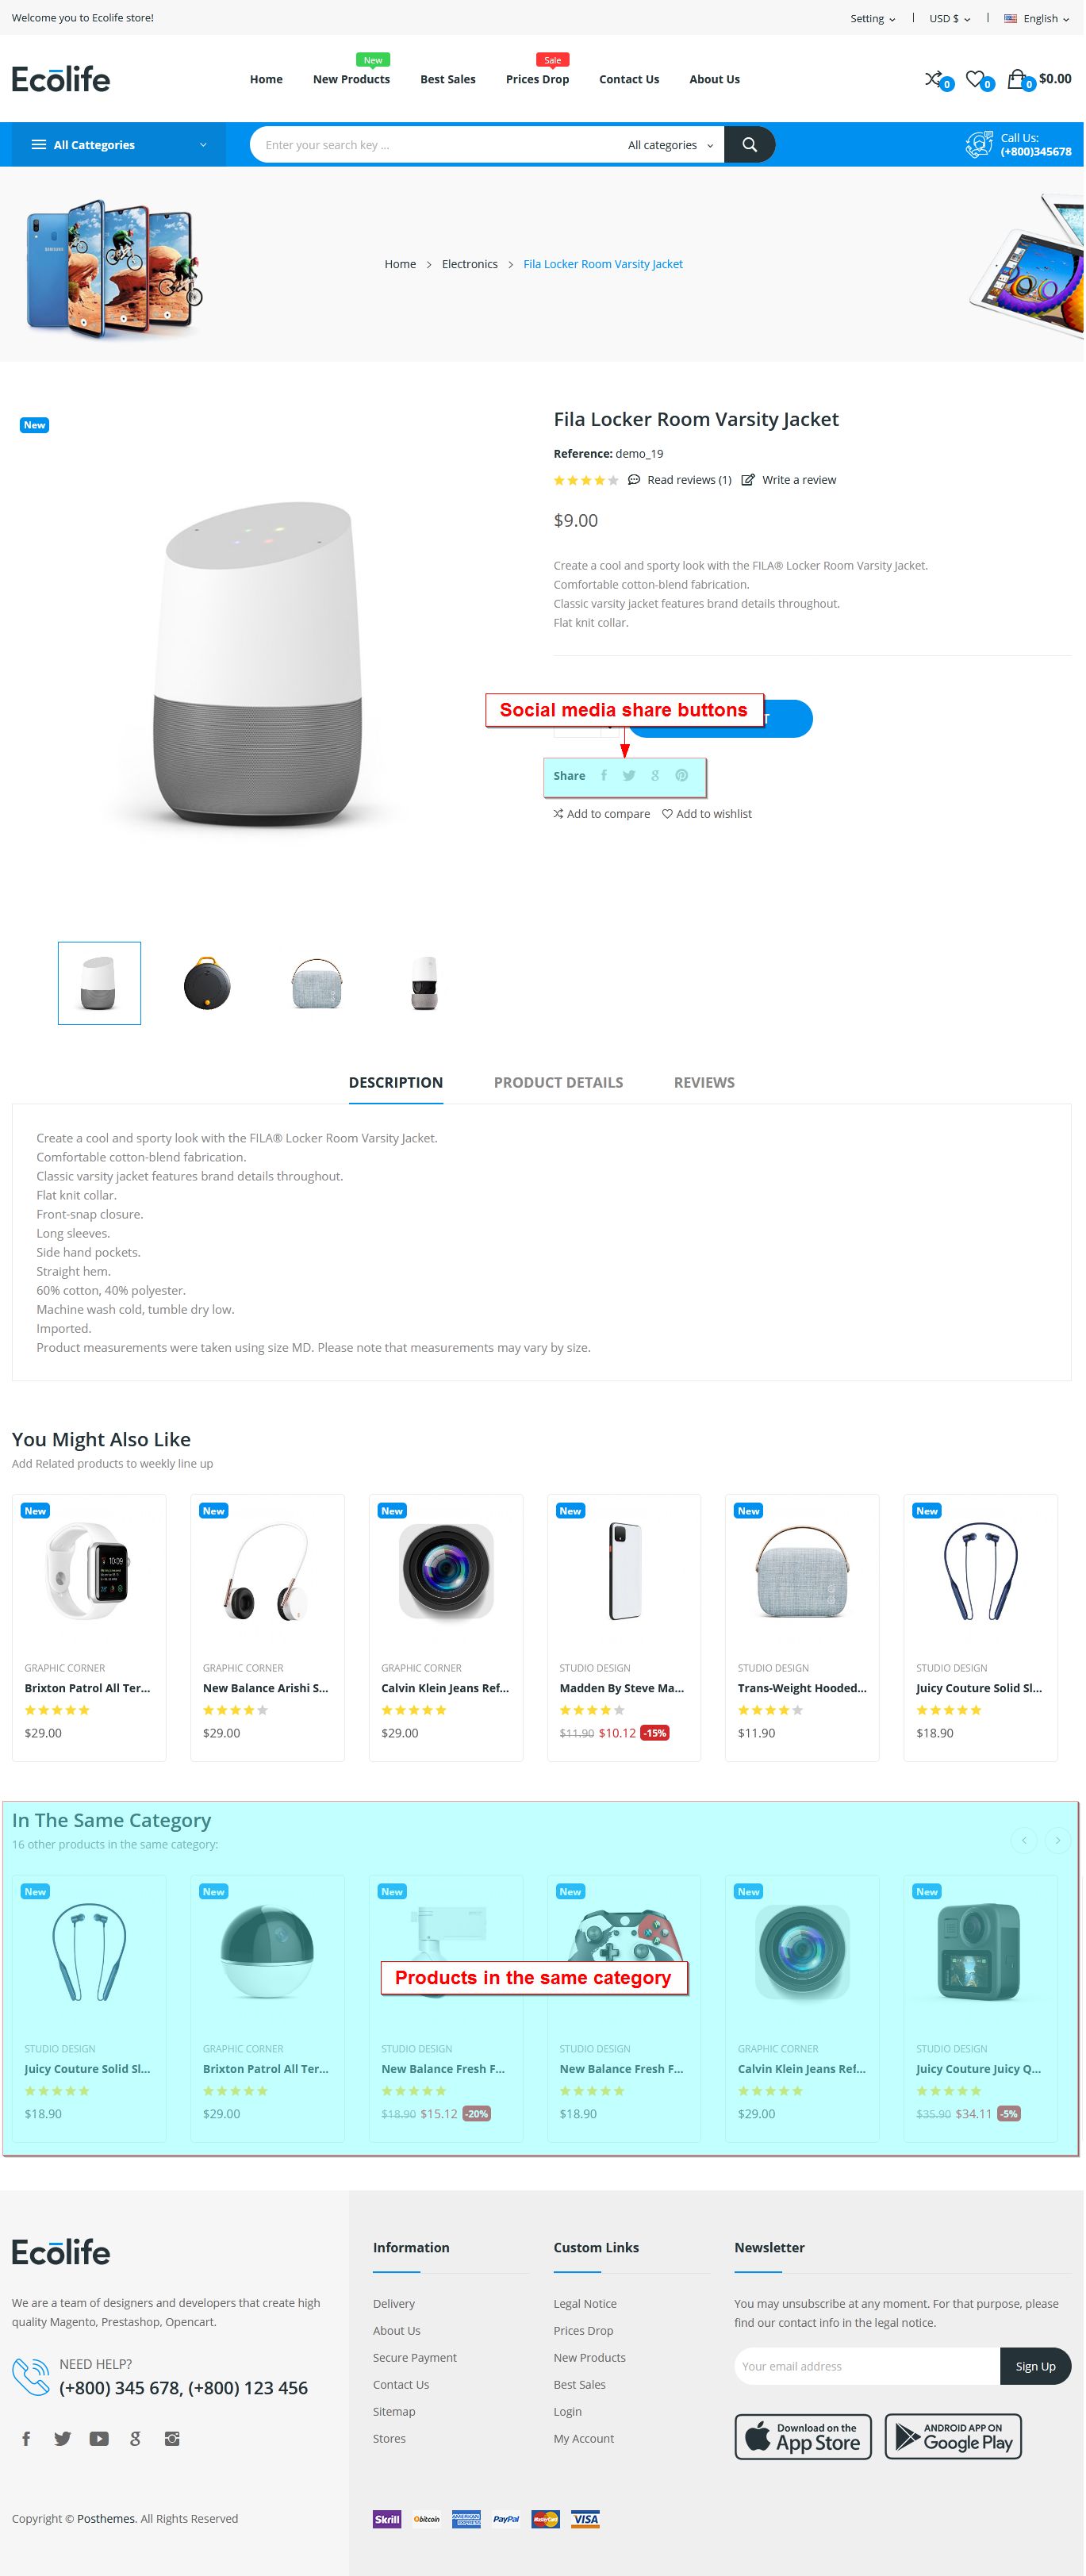
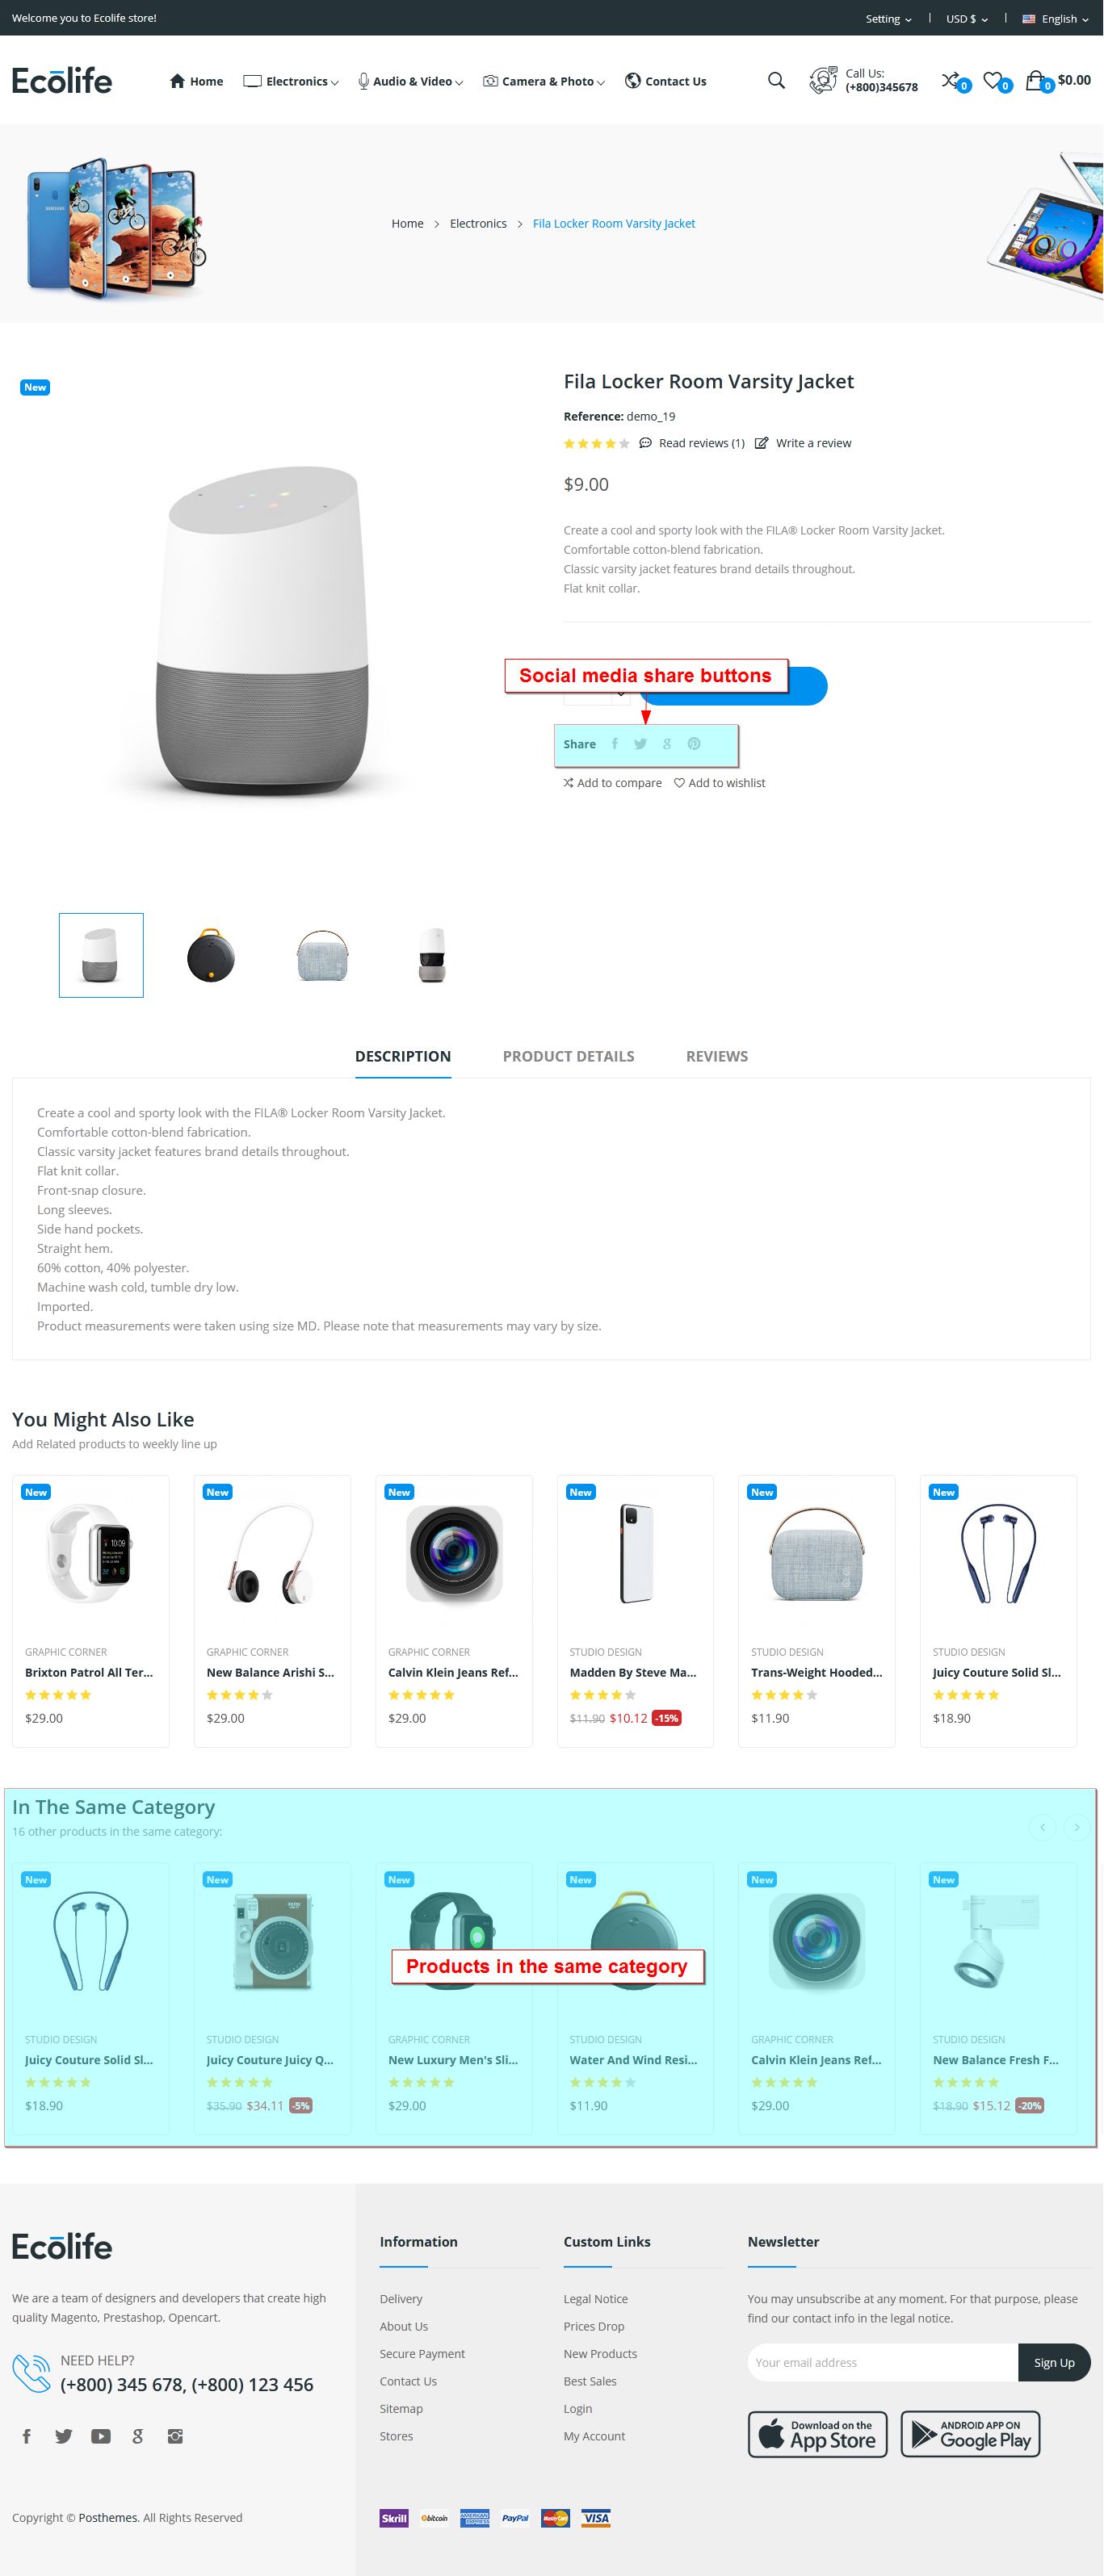
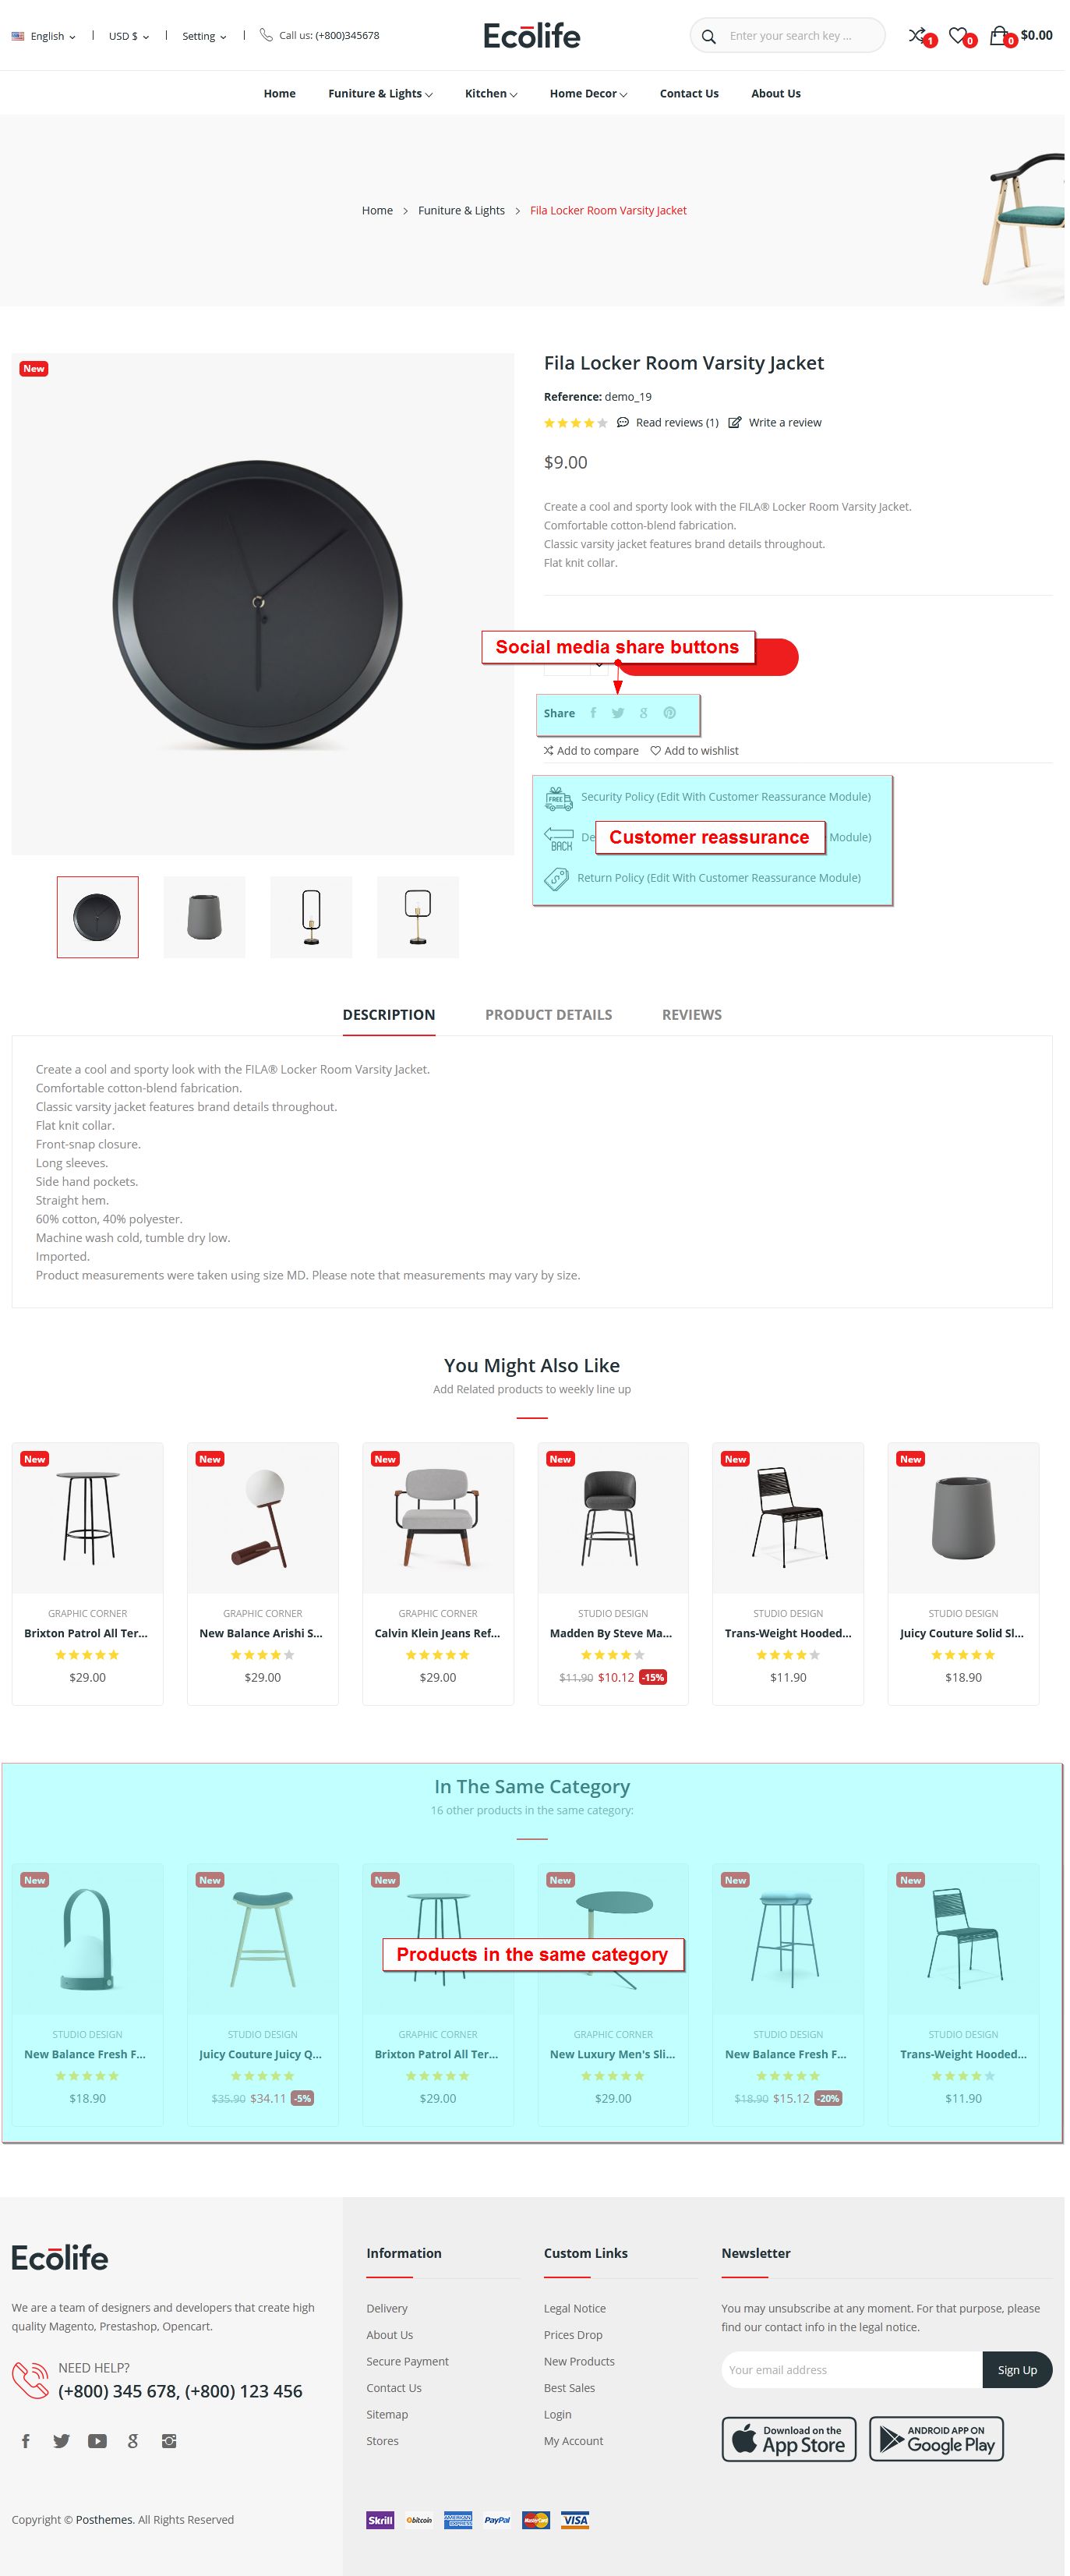
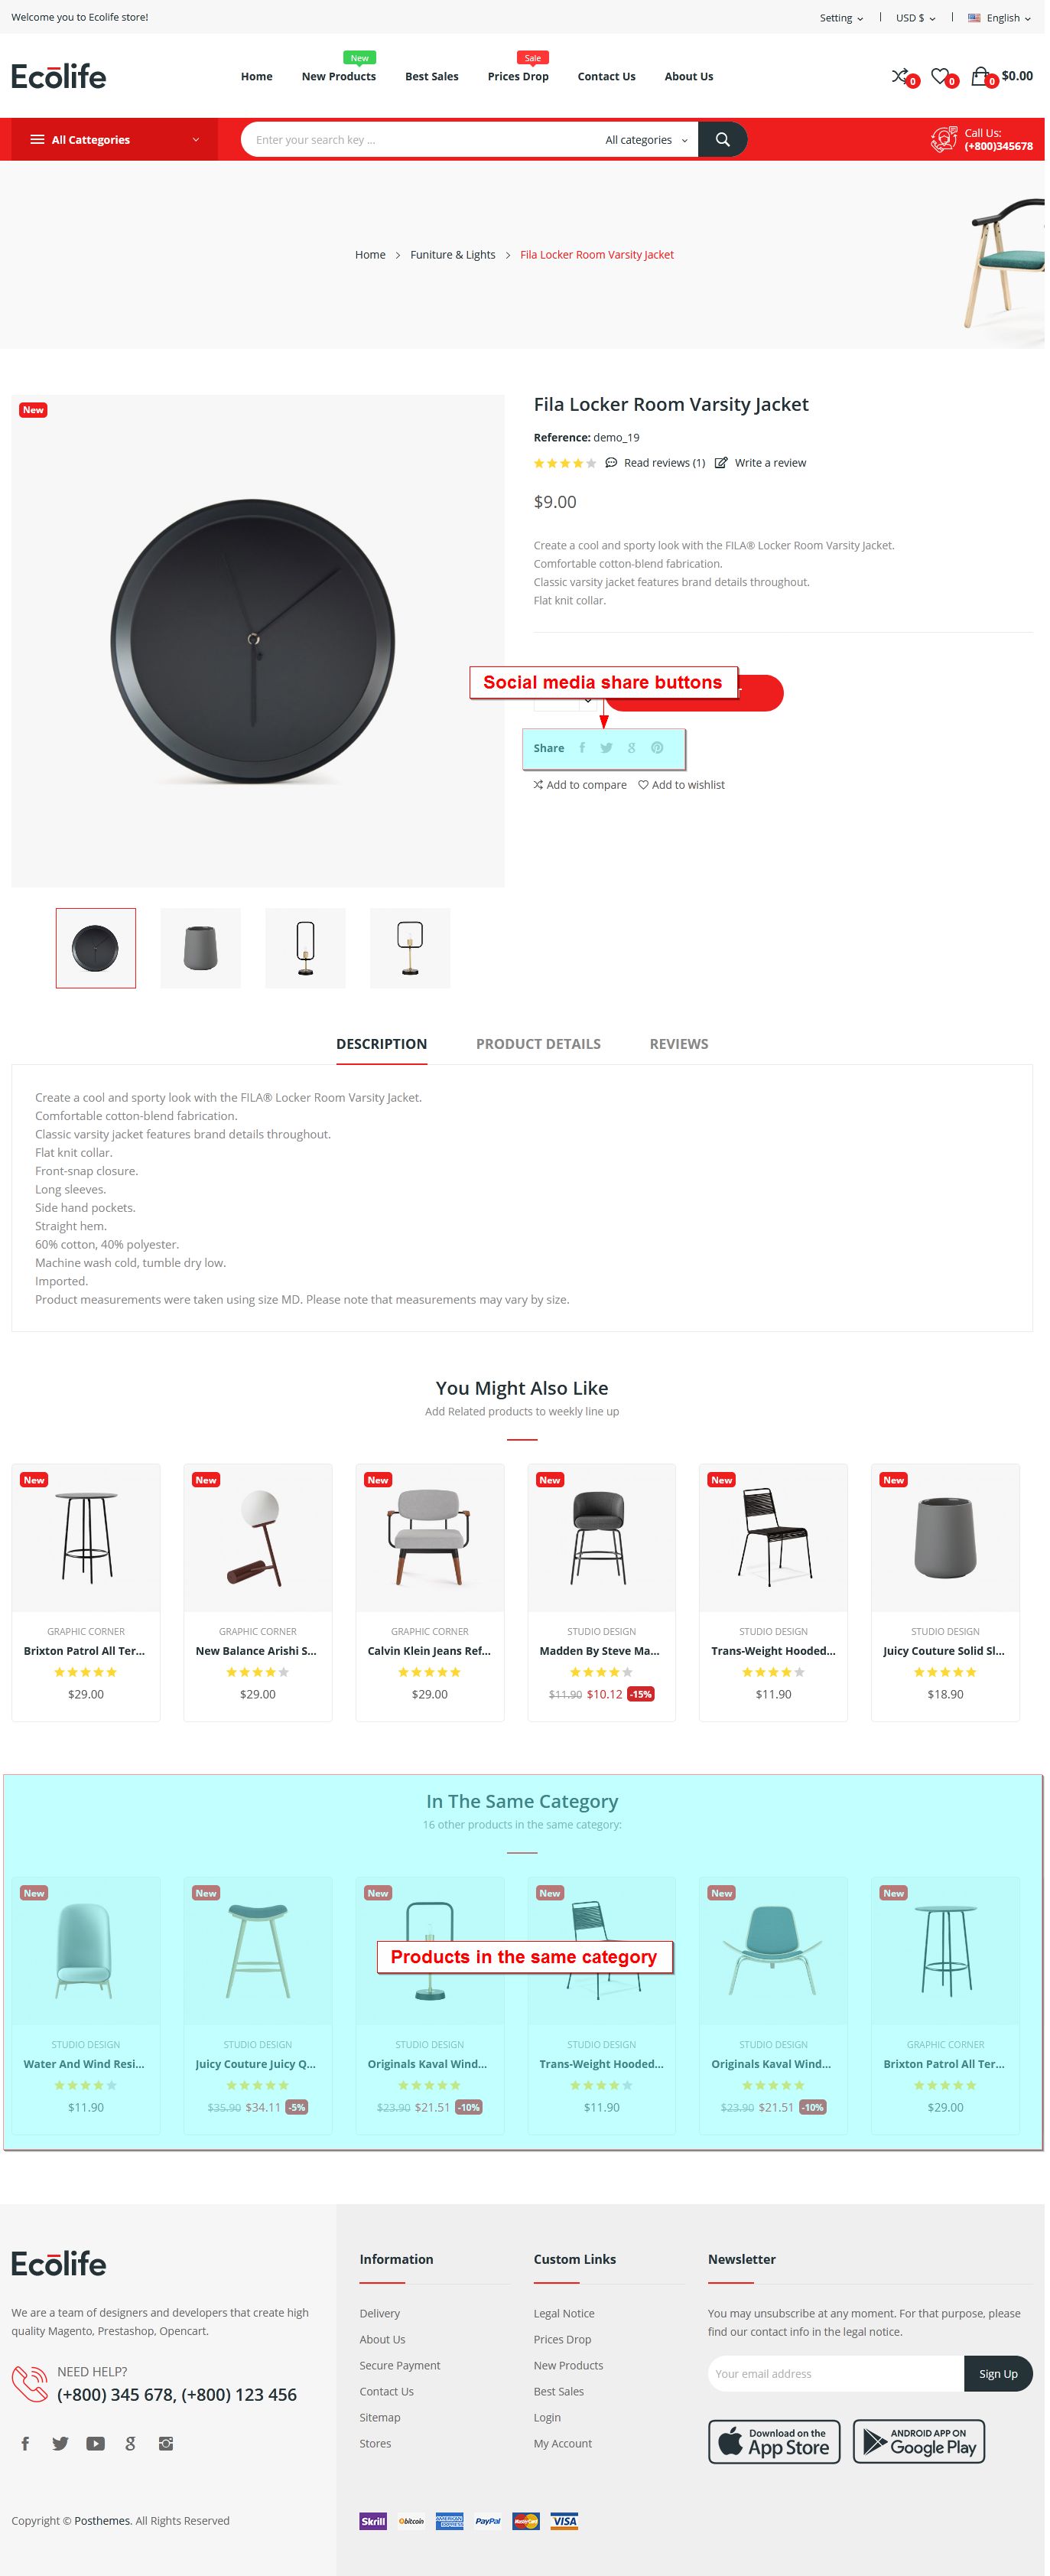
- Products in the same category
Products in the same category show products on the same category.
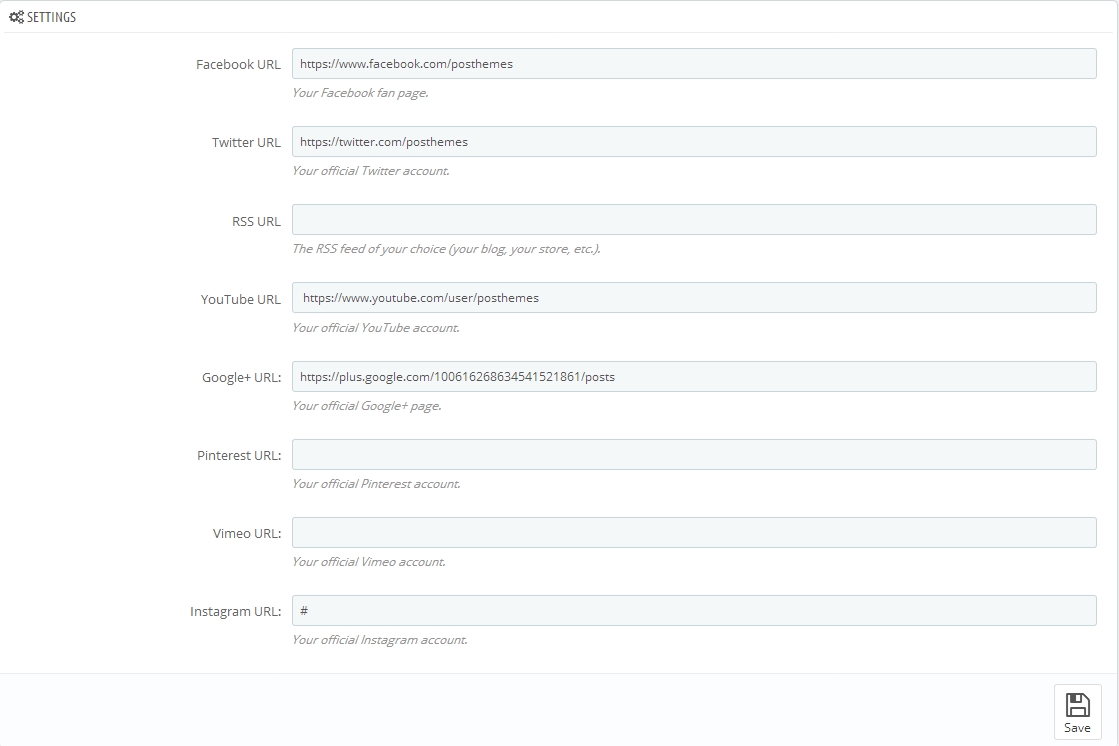
- Social media follow links
Social media follow links allows you to add information about your brand's social networking accounts
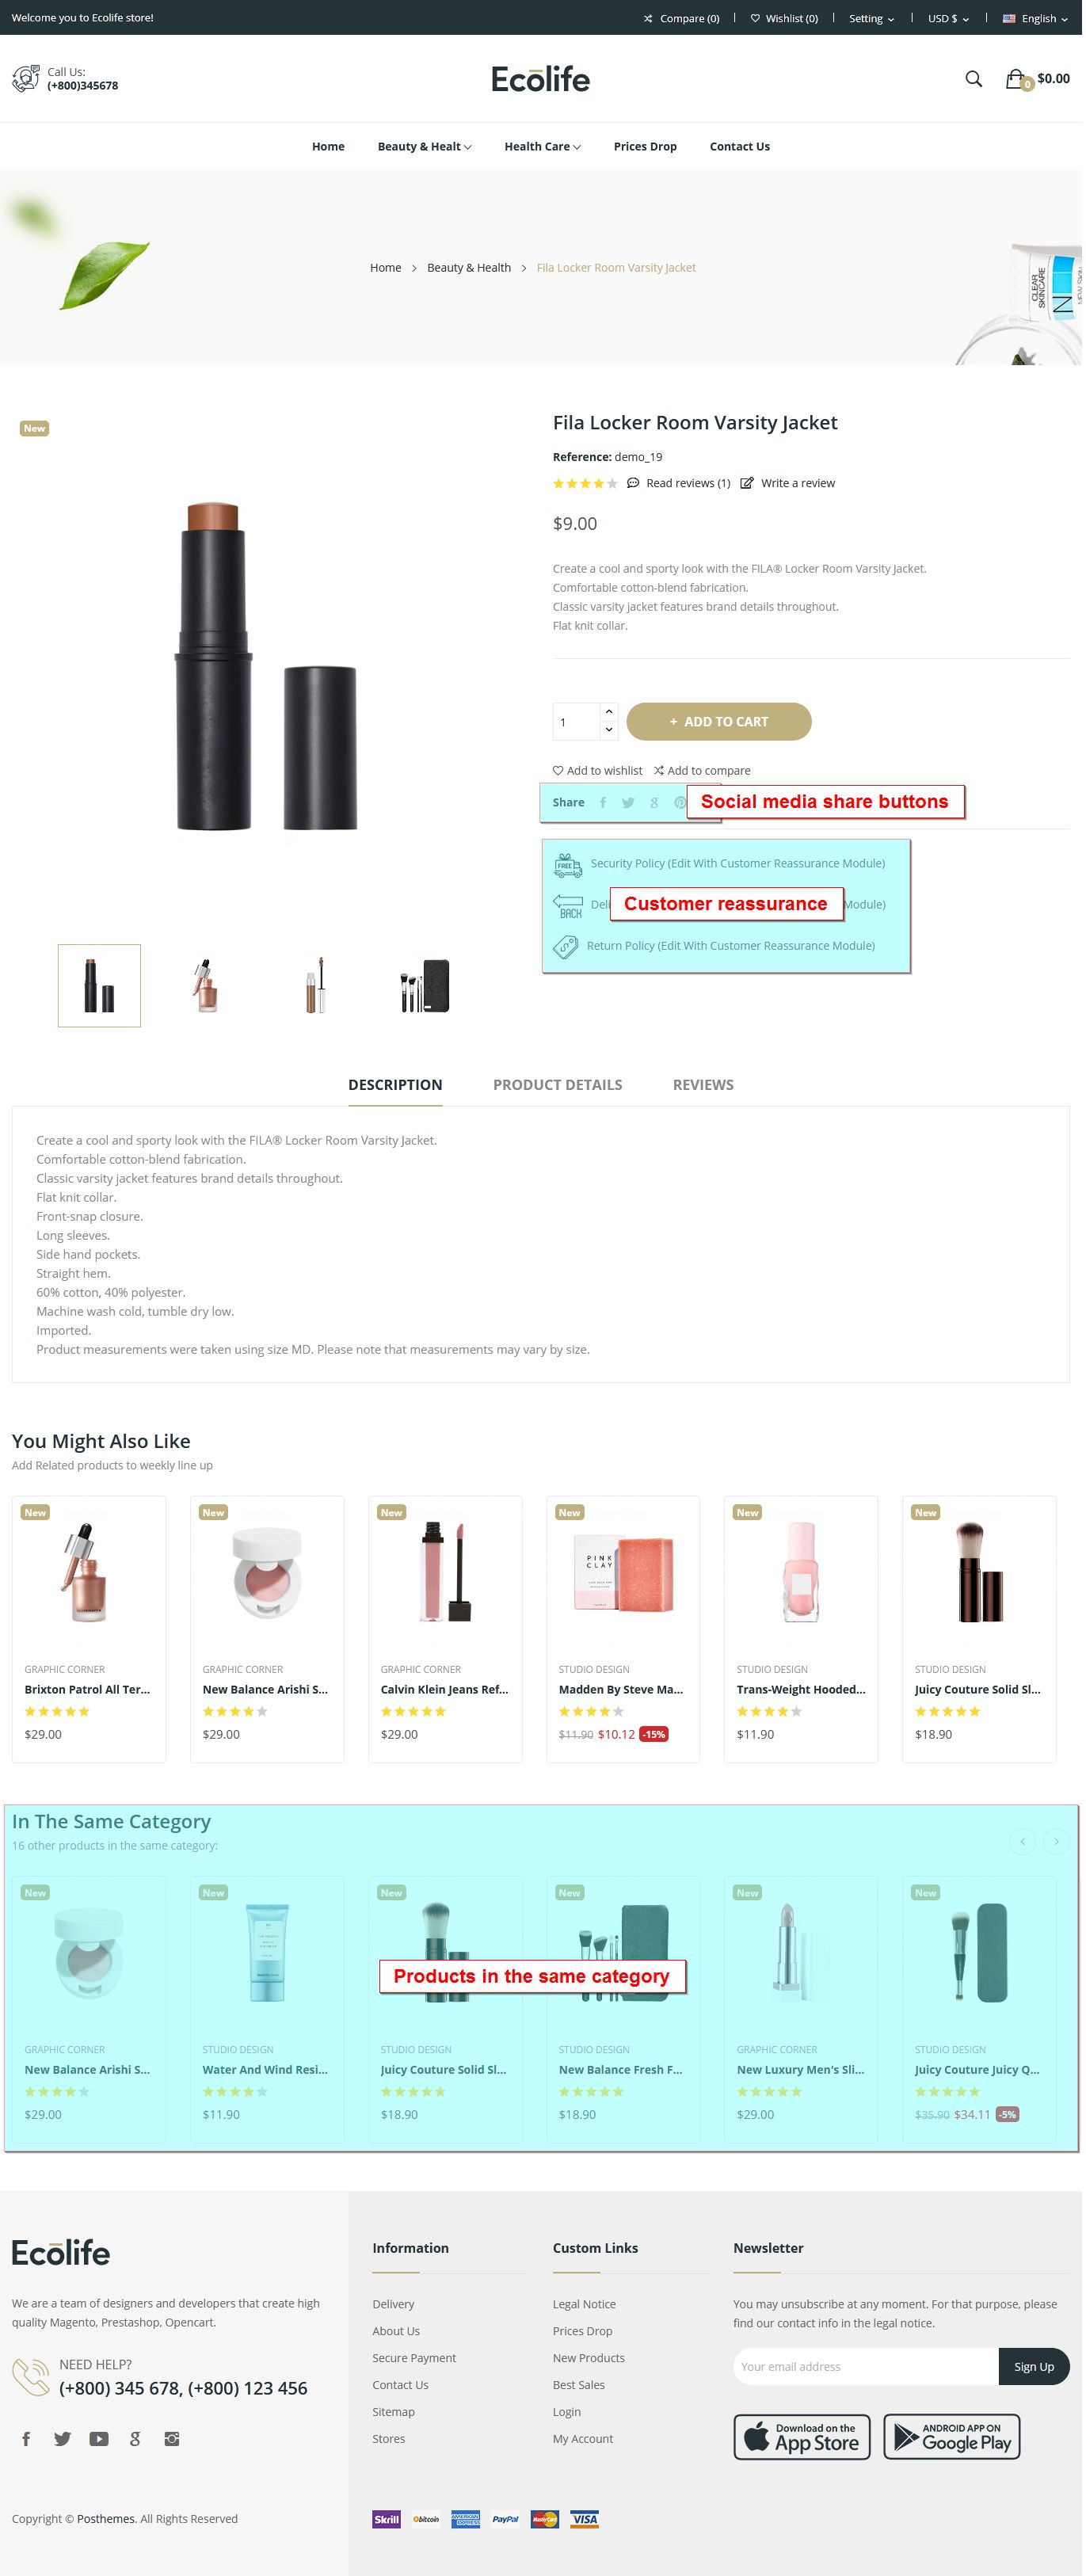
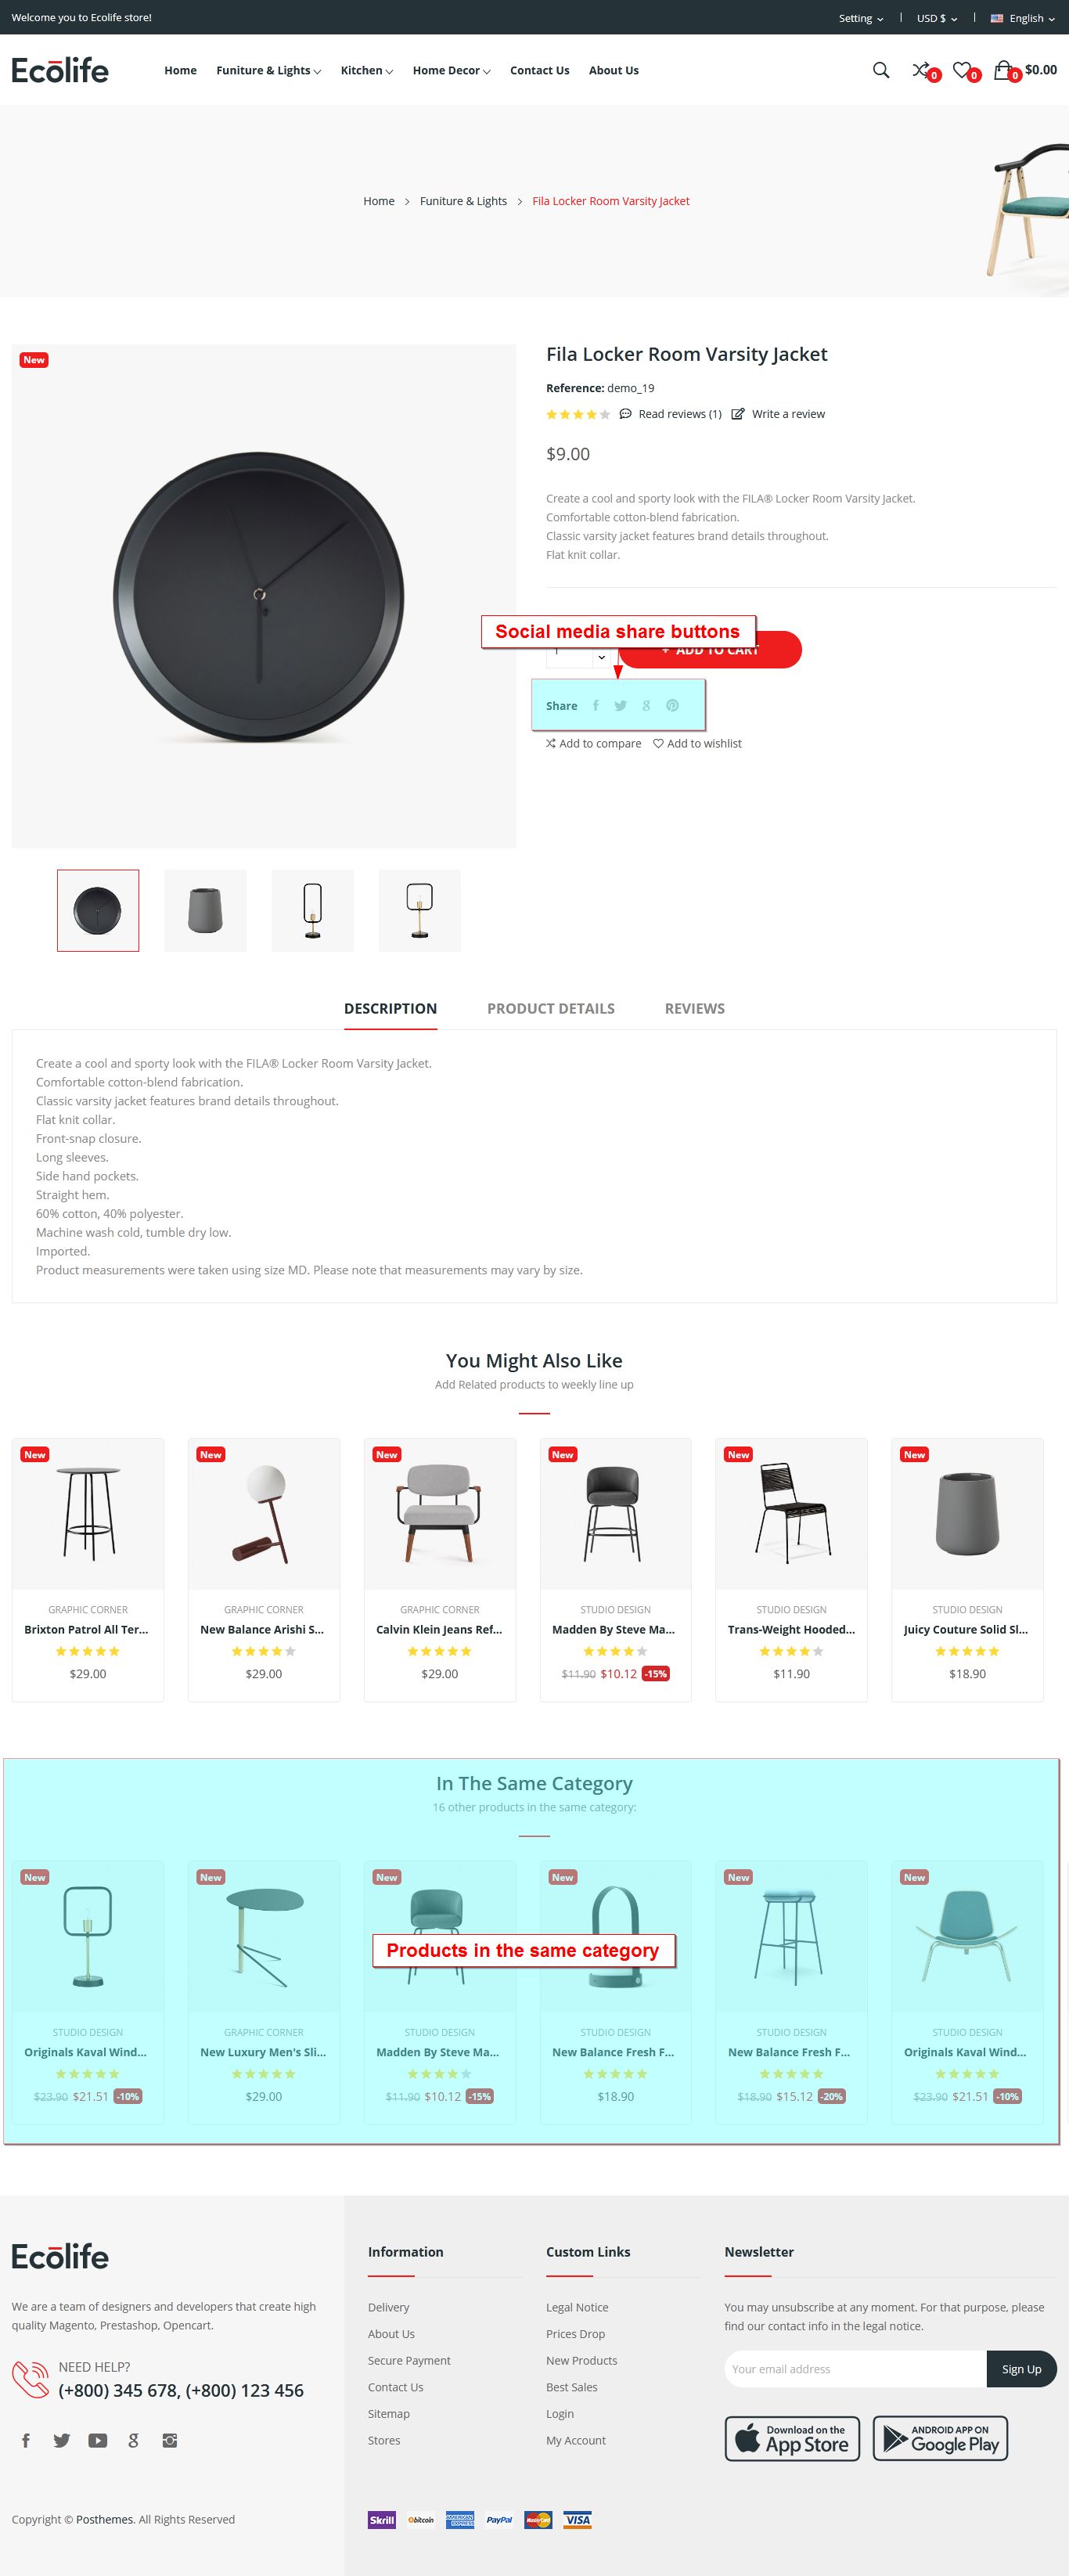
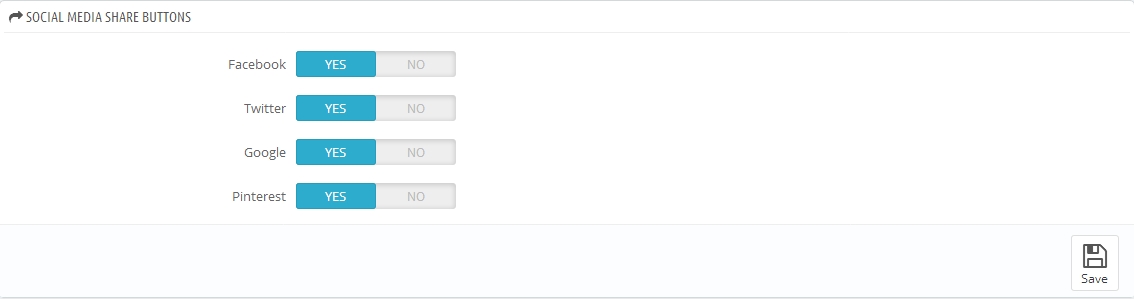
- Social media share buttons
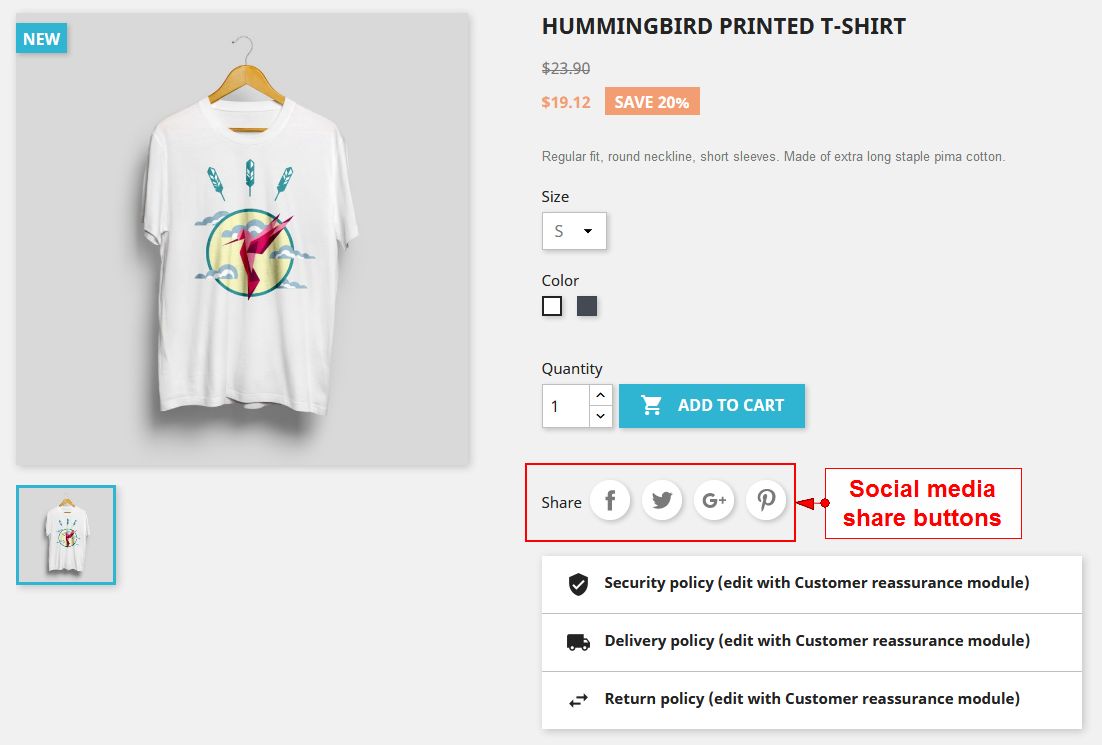
Social media share buttons displays social media sharing buttons (Twitter, Facebook, Google+ and Pinterest) on every product page
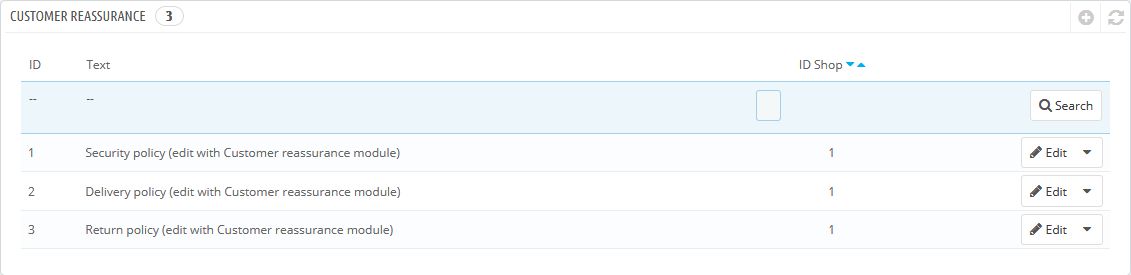
- Customer reassurance

Customer reassurance module offering helpful information to reassure customers that your store is trustworthy.
- Category tree links
Category tree links displays a block featuring product categories
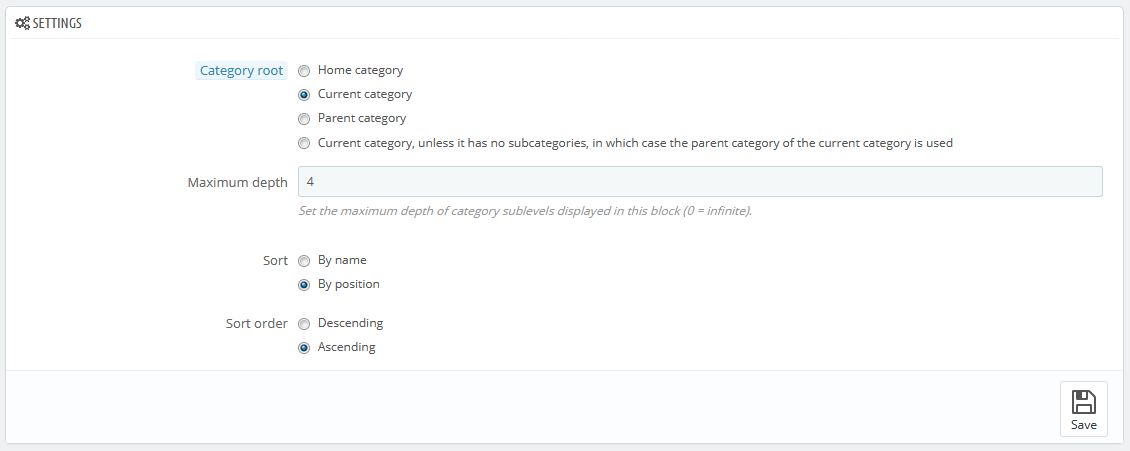
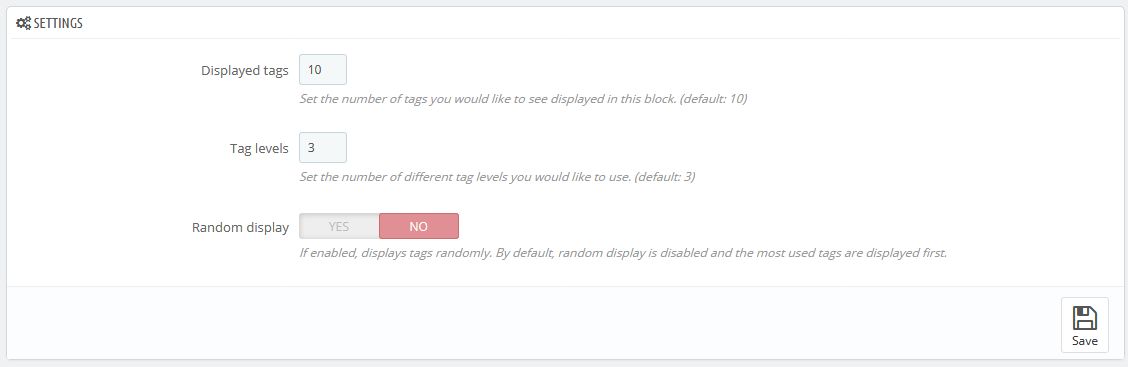
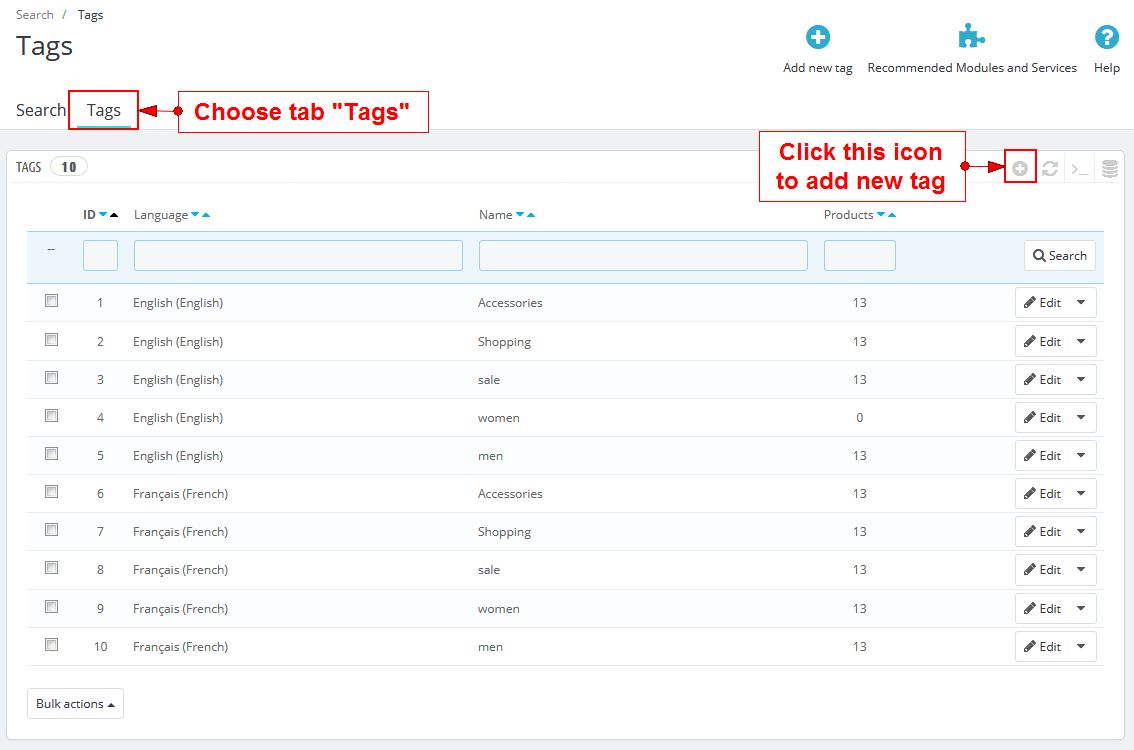
- Tags block
* How to add tags
- Login your prestashop admin
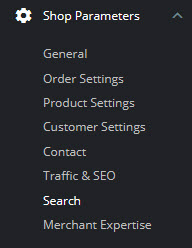
- Navigate to Shop Parameters>Search
* How to manage Product Tags
- Login your prestashop admin
- Navigate to Catalog>Products
-
- Choose product you want to edit, click Edit
- Choose tab “Options”
- From the Options data tab, look for Tags and add more tag for the selected products.
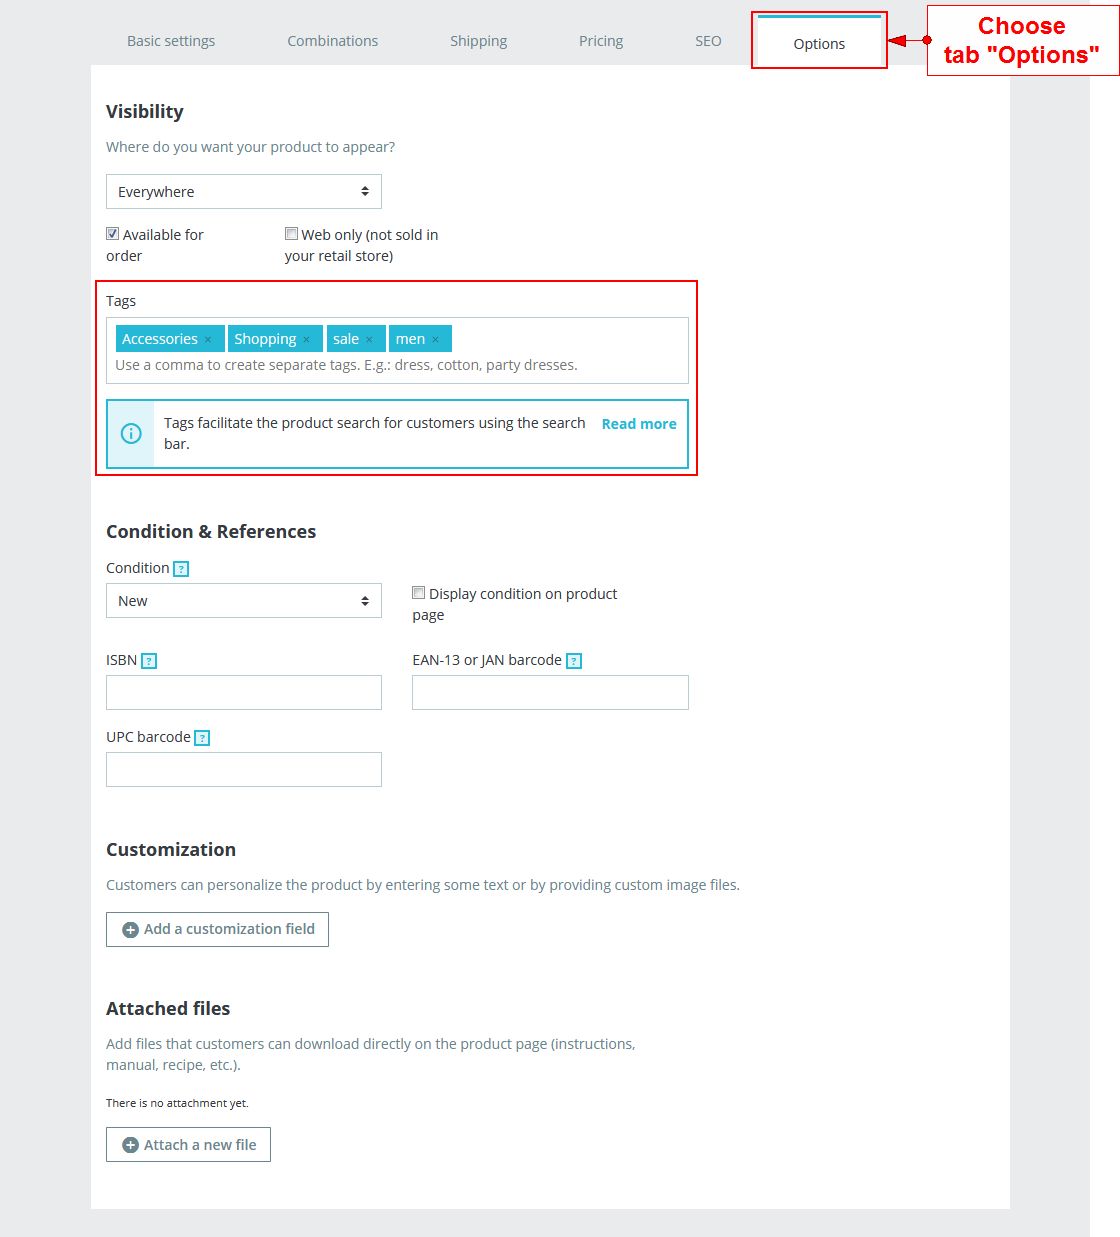
- Click “Save” button when you finish.
Translate Ecolife theme
Back office translations
- Login your prestashop admin
- Go to International > Translations
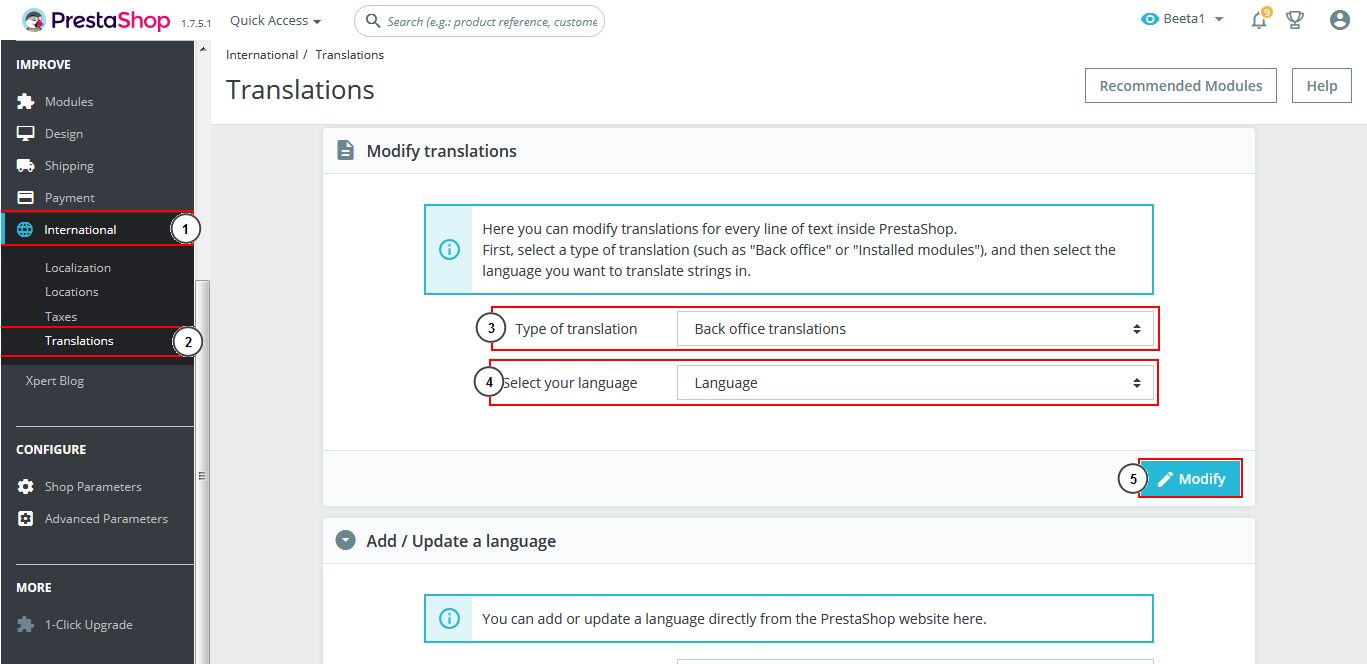
- At "Modify translations" section:
- Type of translation : Back office translations
- Select your language : Choose language you want to translate
- Choose Modify
- Then search text need translate

- After typing your language, click Save to finish.
- Note: To find more informations, please read on http://doc.prestashop.com/display/PS17/Translations
Themes Translations
- Login your prestashop admin
- Go to International > Translations
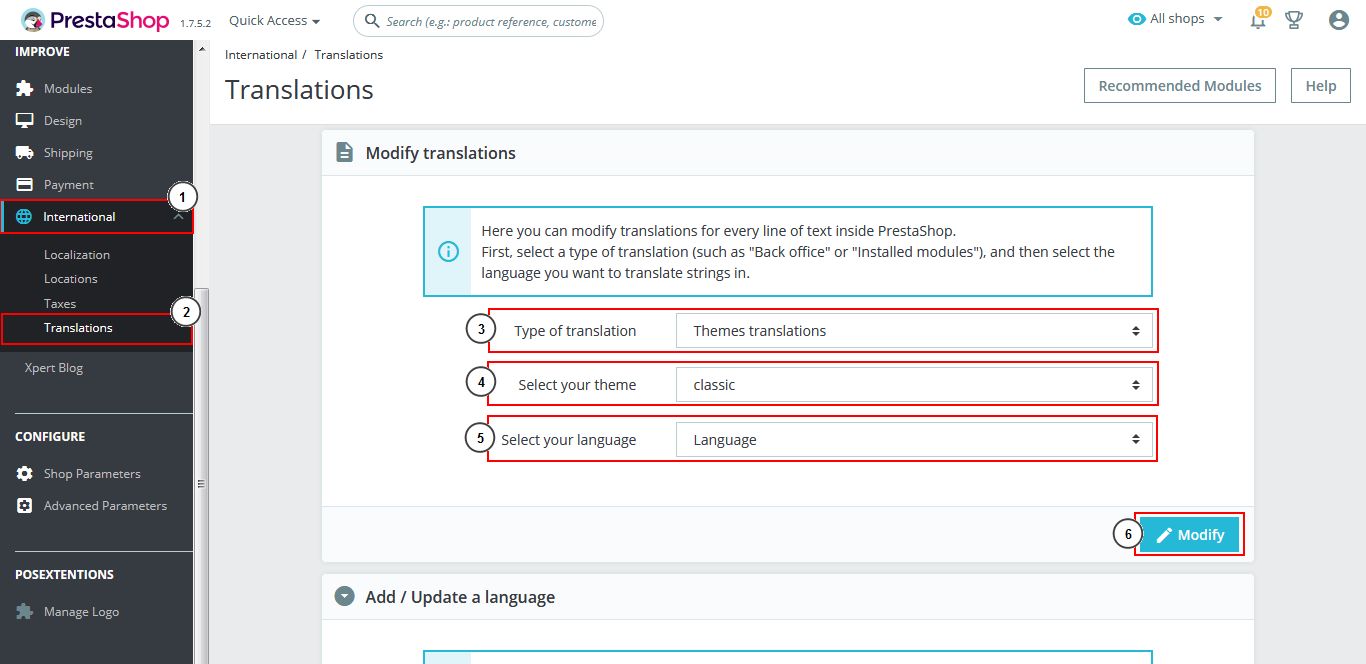
- At "Modify translations" section:
- Type of translation : Themes translations
- Select your theme : Select theme you want to translate
- Select your language : Choose language you want to translate
- Choose Modify
- Then Search titles or text need translate
- After typing your language, click Save and stay or Save to finish.
- Note: To find more informations, please read on http://doc.prestashop.com/display/PS17/Translations
Translate module content
1. Pos Staticblocks
- Login your prestashop admin
- Go to Design > Pos Staticblocks

- Click "Edit" button of your selected block.
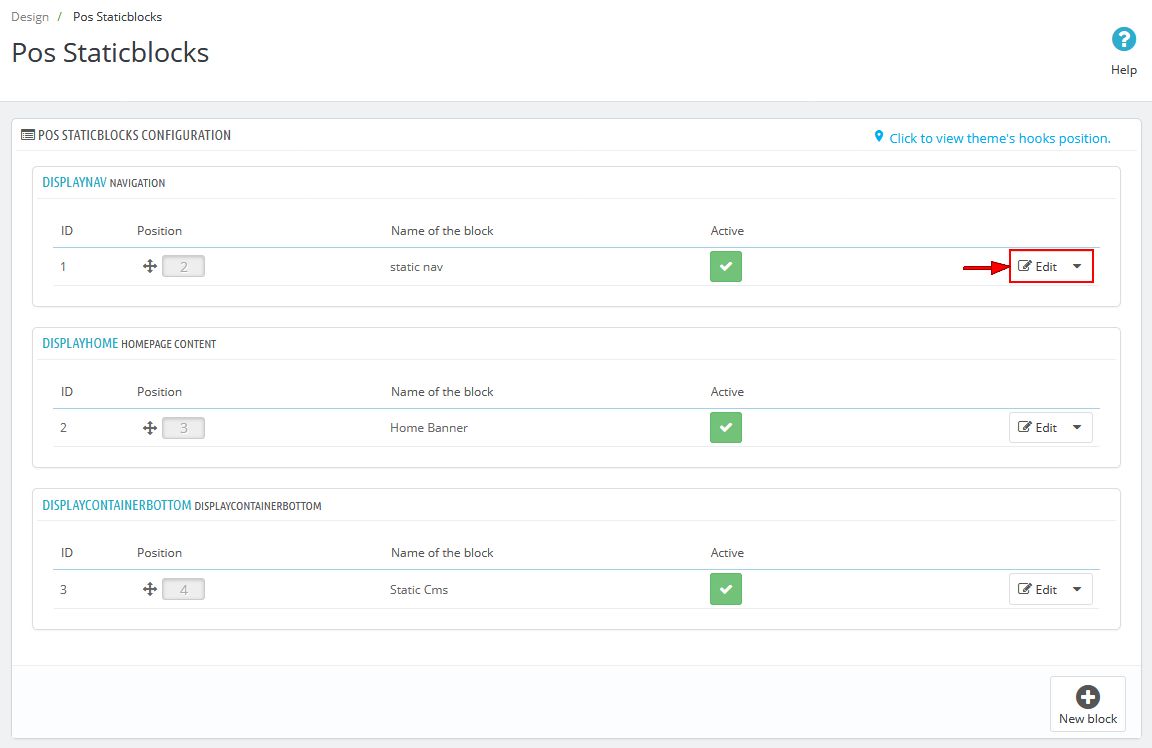
- Choose Source Code to show code HTML of this block in English. Then copy source code.
- Click to choose language you want to translate
- Choose Source Code and paste code HTML. Then translate
- Click Save button when you finish
2. Pos Staticfooter
- Login your prestashop admin
- Go to Design > Pos Staticfooter
- Click "Edit" button of your selected block.
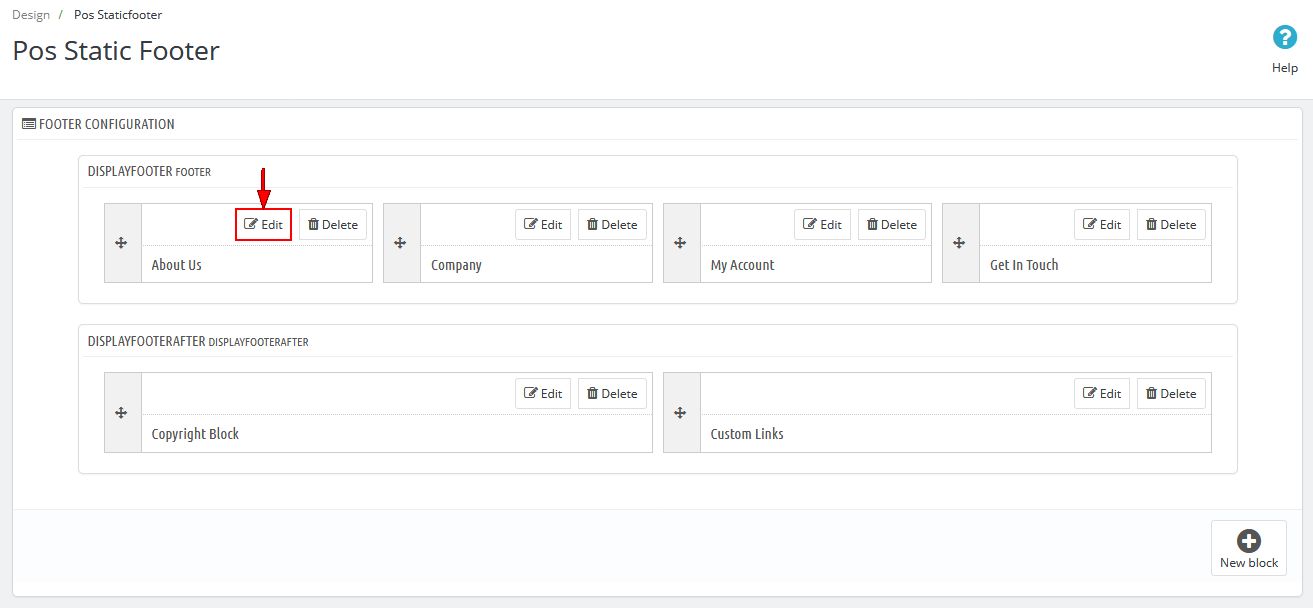
- Choose Source Code to show code HTML of this block in English. Then copy source code.
- Click to choose language you want to translate
- Choose Source Code and paste code HTML. Then translate
- Click Save button when you finish
3. Megamenu custommer
- Login your prestashop admin
- Go to Modules > Modules Manager
-
- Choose “Installed modules” tab
-
- On Megamenu custommer module, click "Configure" button.
-
- Click "Edit" button of your selected menu item.
- Click to choose language you want to translate.
- At Title, translate the menu item.
- Click Save button when you finish
4. Vertical Megamenu
- Login your Prestashop admin
- Go to Modules > Modules Manager
-
- Choose “Modules” tab
-
- On Vertical Megamenu module, click "Configure" button.
-
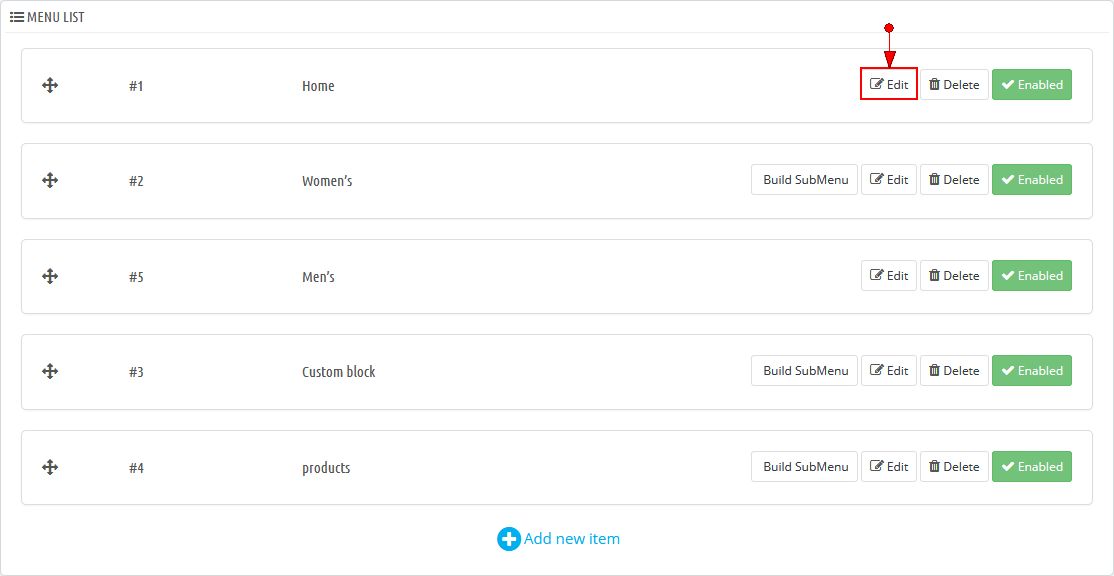
- In part MENU LIST, click Edit on selected menu item
-
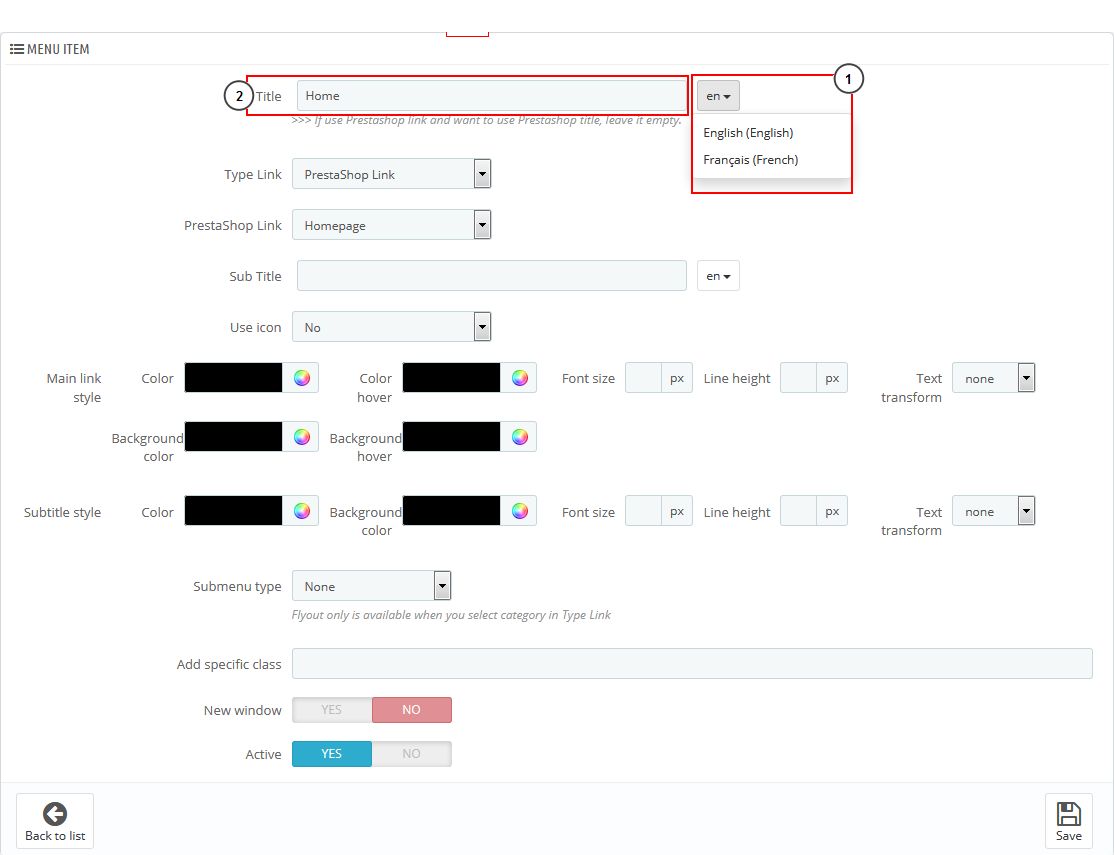
- Click to choose language you want to translate.
-
- At Title, translate the menu item.
- Click Save button when you finish
5. Pos Slideshow Slider
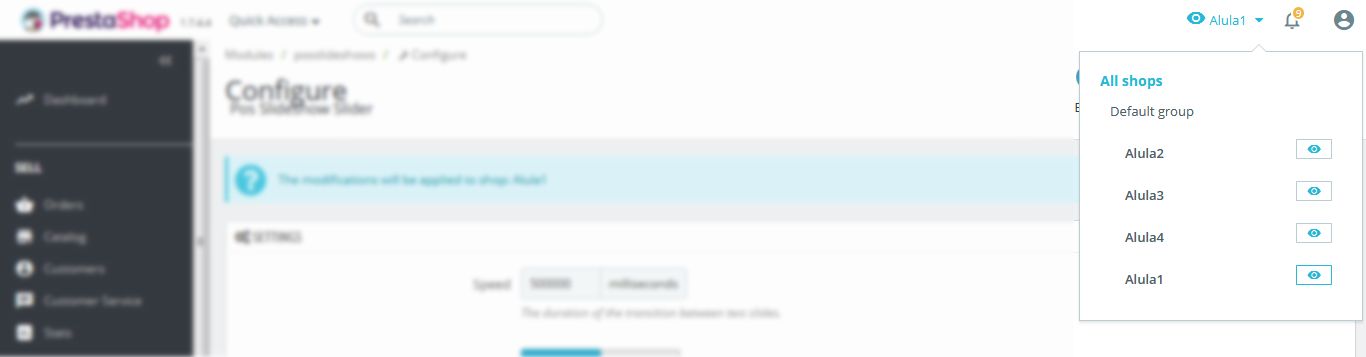
- Login your prestashop admin. Click "All shop", select the theme you want to translate
- Go to Modules > Modules Manager
-
- Choose “Installed modules” tab
-
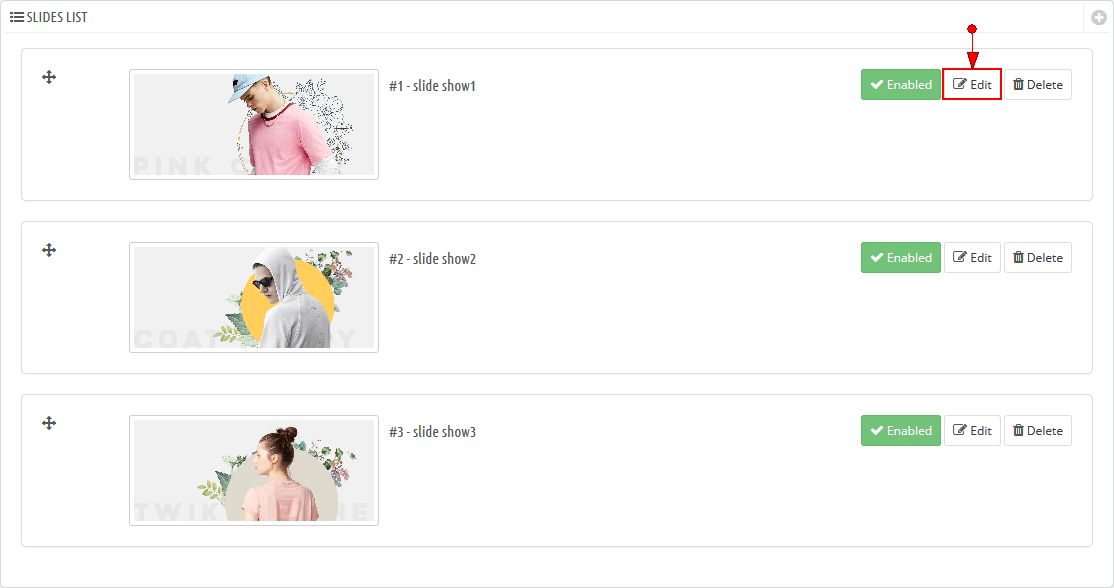
- On Pos Slideshow Slider module, click "Configure" button.
-
- At SLIDES LIST section, click "Edit" button of your selected slide.
- Choose other language of each value of parameters (Slide title, Caption or Description) to translate.
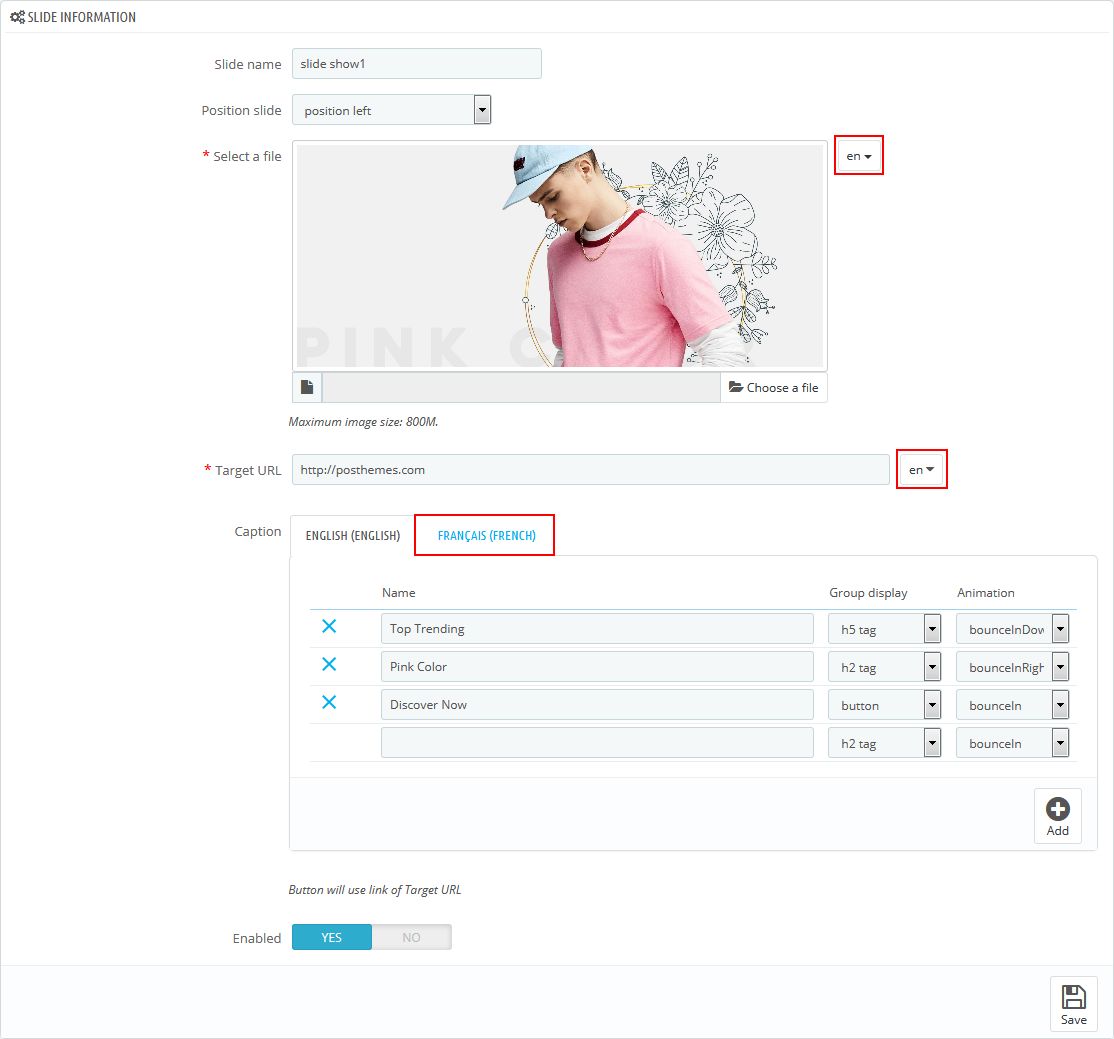
- Enter your language & click Save button when you finish
Posthemes Support
Support Working time: Monday - Friday
Estimated ticket and answers review time: 1-3 business days.
We have hundreds of questions and provide answers asap, but this can take up to 3 days after your submitted request. Please be patient and wait for answer.
Send us email to posthemes@gmail.com.